


Master Page: Left-start
22 EN
DIGITAL STILL CAMERA (D.S.C.) PLAYBACK
D.S.C. PLAYBACK
You can view the stored images in the memory card,
one at a time, much like flipping through a photo
album.
1 Open the LCD monitor fully.
● Set the Video Output Mode Switch to “LCD
MONITOR”. (੬ pg. 13)
2 Load a memory card. (੬ pg. 17)
3 Set the Playback Mode Switch to “MEMORY”.
4 Set the Power Switch to “ON” while pressing
down the Lock Button located on the switch.
● The still image which has been played back at
the last time is displayed.
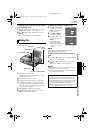
5 Press 3 to display the previous file. Press 5
to display the next file.
● Pressing INFO gives you details on the
displayed file. (੬ pg. 23)
● You can also look for the desired file using
Index Screen. (੬ pg. 23)
● You can turn off the on-screen playback
display. (੬ pg. 23)
NOTES:
● Images shot in a file size other than “640 x 480”,
“848 x 480”, “1280 x 720” and “1280 x 960”
with another devices will be displayed thumbnail
images. These thumbnail images cannot be
transferred to a PC.
● Images shot with devices (such as JVC GR-
DVM70) that are not compatible with DCF cannot
be viewed with this player; “UNSUPPORTED
FILE!” will be displayed.
Playback Zoom
Available only with the remote control (provided).
(੬ pg. 41)
You can run through all the images stored in
memory card automatically.
1 Perform steps 1 – 4 in “Normal Playback Of
Images”.
2 Press 4/9 to start Auto Playback. Files are
displayed in descending order.
● If you press 3 during Auto Playback, files
are displayed in ascending order.
3 To end Auto Playback, press 8.
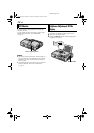
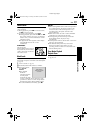
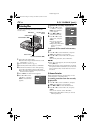
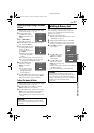
Normal Playback Of Images
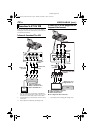
INFO Button
Play/Pause Button (4/9)
Rewind Button (3)
Playback Mode
Switch
Power Switch
Stop Button (8)
Fast-Forward Button (5)
INDEX Button
MENU Button/
R T Button
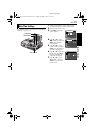
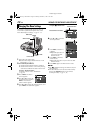
Auto Playback Of Images
[For Normal Playback]
To display the next image
[For Auto Playback]
Image playback screen
To display the previous image
100-0013
100-0014
100-0015
100-0016
CU-VH1US.book Page 22 Friday, November 28, 2003 8:01 PM