


Masterpage:Left-FullCol
82 EN
Filename [HM-100U_Eng_05Index.fm]
EDITING (cont.)
S-VIDEO/VIDEO
Connections
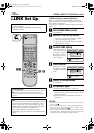
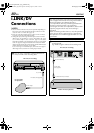
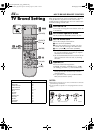
A Make connections
A Connection with the camcorder
Connect an audio/S-video cable between the
camcorder’s audio/S-video output connectors
and your VCR’s [AUDIO/S VIDEO] input
connectors.
•When the JVC camcorder is equipped with
the Master Edit Control, you can control the
VCR from the camcorder. Connect the mini-
plug cable (not supplied with this VCR) as
illustrated on the left.
•When using a camcorder with a monaural
output, connect the audio output connector
on the camcorder to the [AUDIO L] input
connector on this VCR.
NOTE:
If the camcorder does not have S-video output
connector, use a video cable.
Various connection for editing tapes
The following three methods can be used for editing
tapes.
•VHS to S-VHS editing (VIDEO-VIDEO connection):
Although the picture quality is inherently limited by the
original VHS quality, the edited tape has better picture
quality than those made by VHS-to-VHS editing.
•S-VHS to VHS editing (VIDEO-VIDEO connection):
Since the original source is recorded in S-VHS mode, the
edited tape has better picture quality than those made by
VHS-to-VHS editing.
•S-VHS to S-VHS editing (S-VIDEO connection):
Original picture quality of S-VHS made can be duplicated
with minimal picture degradation. This is the best editing
method you can use on S-VHS VCRs.
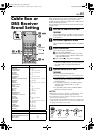
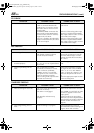
A You can use a camcorder as the playback device
and your VCR as the recording VCR.
IN F–1
This VCR (for recording)
To [AUDIO]
input
Mini-plug cable (not
supplied)
(JVC camcorder only)
DV camcorder
(for playback)
To rear panel
[REMOTE PAUSE/AV
COMPULINK]
To S-video
output
To [S-VIDEO] input
To Audio
output
Audio cable
(supplied)
S-video cable
(supplied)
To EDIT
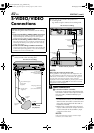
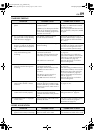
B You can use your VCR as the playback or
recording VCR.
E.g. When using this VCR as the recording VCR
NOTE:
When using this VCR as the playback VCR,
During playback, if the images cannot be displayed on the
TV, press [HDMI] on the front panel to turn off the [HDMI]
LED and set “TV OUTPUT 2” to “ALLto480i” (
A page 67).
In event when even the main menu screen cannot be
displayed on the TV when [MENU] is pressed, power off this
VCR, press and hold [PAUSE (
W)] for more than 5 seconds,
then power on the VCR again.
REMOTE PAUSE/
AV COMPULINK
CABLE BOX
ATSC IN
VHF/UHF
IN
ANTENNA
ANTENNA
L-2
PCM/STREAM
DIGITAL AUDIO OUT
OPTICAL
P
B
/C
B
P
R
/C
R
Y
COMPONENT
VIDEO OUT
OUTPUT
HDMI OUT
D-THEATER
REGION 1
i.LINK IN/OUT
DV IN
L-1
S400
INPUT
S-VIDEO
VIDEO
L
AUDIO
R
S-VIDEO
VIDEO
L
AUDIO
R
OUT
This VCR (for recording)
Another VCR (for playback)
To AUDIO
output
To [S-VIDEO
INPUT]
To S VIDEO
output
Audio cable
(supplied)
S-video cable
(supplied)
To [AUDIO
INPUT]
HM-DH100U_Eng.book Page 82 Thursday, August 5, 2004 1:54 PM