


13
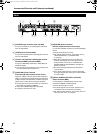
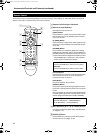
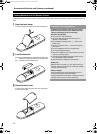
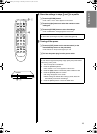
E Number Buttons
Use these to adjust the OSD menu items, such as
brightness and contrast (items that are adjusted using
numeric values). (A Page 27)
F Picture Adjustment Buttons
Use these to adjust Brightness, Contrast, Color, Tint
and Detail. Press the corresponding picture
adjustment button, followed by the number buttons to
enter a setting value.
● These items can also be adjusted in the OSD menu.
(A Page 27)
[BRIGHTNESS] Button
Adjusts the brightness of the picture image.
(Factory default value: 50)
[CONTRAST] Button
Adjusts the contrast of the picture image.
(Factory default value: 50)
[COLOR] Button
Adjusts the color density of the picture image.
(Factory default value: 50)
[TINT] Button
Adjusts the hue of the picture image.
(Factory default value: 50)
● Adjust this when the colors in the video image do not
seem balanced under the current tint settings.
● This item cannot be adjusted for component (YPrPb)
signals.
[DETAIL] Button
Adjusts the image quality.
(Factory default value: 4)
● Select your preferred setting values according to the
image to be viewed.
G Picture Size Adjustment Buttons
Use these to set the aspect ratio of video signal output
from this unit.
● Set the screen shape (aspect ratio) in the Setup menu.
(A Page 22)
[ANAMORPHIC] Button
Select this during output of 16:9 video signals.
● When input images are cinema images (aspect ratio of
2.35:1), these will be output as 16:9 video signals with
a black band at the upper and lower ends of the image.
[4:3] Button
Select this during output of 4:3 video signals.
[LETTERBOX] Button
When using a 4:3 source on a 16:9 screen, black bars
will appear on the left and right of the image. Select
this to clear the black bars and for the image to fill the
screen. The image will fill the screen but part of the
image at the top and bottom will not be displayed.
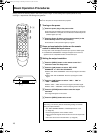
H [OFF] Button
Press this to switch to the standby mode when the
power of this unit is turned On. (A Page 19)
I Power On Button
Press to turn the unit On when it is in the standby
mode. (A Page 18)
J [STORE] Button
Press this button to select an output scan rate (ASET:
NTSC SCANRATEB or ASET: PAL SCANRATEB of
Setup menu), store the profile data upon modifying, or
invoke a profile number.
(A Page 26).
NOTE:
The buttons below will not function if ASET: 1080i TO
1080pB is set to AHIGH BANDWIDTH MODEB. In this
case, a AHIGH BANDWIDTH MODE KEY NOT VALIDB
message will appear on the LCD.
● [DETAIL] Button
● [ANAMORPHIC] Button
● [4:3] Button
● [LETTERBOX] Button
CAUTION:
Do not leave those other than 16:9 images (4:3, etc.)
with a 16:9 screen on for long periods of time. This
can cause permanent image burn-in. Image burn-in is
not covered by warranty.
ENGLISH
LD-HD2KU_E.book Page 13 Thursday, November 17, 2005 4:27 PM