


-
34
-
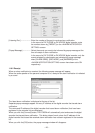
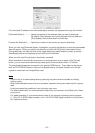
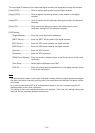
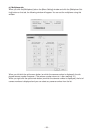
The name and IP address of the connected digital recorder are displayed at the top this window.
[Load] (DVR)-------------------- Click to load the setting data from the digital recorder.
[Regist] (DVR) ------------------ Click to register the settings shown on the window in the digital
recorder.
[Load] (PC) ---------------------- Click to load the e-mail notification setting file saved in the personal
computer.
[Save] (PC)---------------------- Click to save the settings shown on the window as an e-mail
notification setting file in the personal computer.
[DVR Setting]
[Target Address] ---------- Enter the e-mail destination addresses.
[SMTP Server] ------------ Enter the SMTP server used by the digital recorder.
[POP Server] -------------- Enter the POP server used by the digital recorder.
[DNS Server]-------------- Enter the DNS server used by the digital recorder.
[Account] ------------------- Enter the POP account.
[Password]----------------- Enter the POP password.
[OWN E-mail Address] - Enter the sender’s address shown in the [from] column of the e-mail
notification.
[Time Zone] --------------- Select the time difference from GMT.
[DVR ID]-------------------- Enter the unique name for identification of the digital recorder shown
in the e-mail notification.
Note
- The date and time shown in the e-mail notification indicate when the digital recorder processed
the alarm notification internally, and they aren’t the exact date and time when the alarm notifica-
tion issued.
- In an environment where NAT or IP masquerade is present, you can’t connect using the IP
address shown in the e-mail notification.
- The liability of the e-mail notification function isn’t absolute. Don’t use it for making critical judg-
ment nor for any purposes related to human lives.