


40
Setup Software
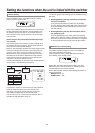
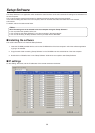
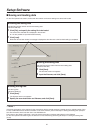
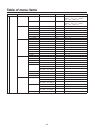
Auto IP setting
When IP addresses are to be changed
1 Click [RENEW].
New IP addresses are set in the target remote cameras
and switcher.
When [CANCEL] is clicked, the original settings are
restored.
2 Check that the IP addresses of the remote
cameras and switcher are displayed correctly,
and click [SET].
The IP addresses which have been set now take effect.
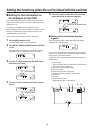
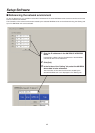
When IP addresses are not going to be changed
1 Click [KEEP].
The IP addresses of the target remote cameras and
switcher are displayed.
When [CANCEL] is clicked, the original settings are
restored.
2 Check that the IP addresses of the remote
cameras and switcher are displayed correctly,
and click [SET].
The displayed IP addresses now take effect.
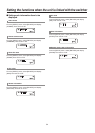
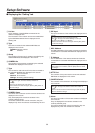
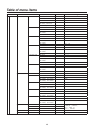
Changing the IP addresses
The IP addresses of the remote cameras and switcher can
be changed.
1 Directly input the IP address of the device
concerned into the [IP Address] box.
2 Click [SET].
The changed IP address now takes effect.
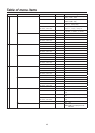
Changing the camera numbers
The camera numbers set for the remote cameras can be
changed.
1 Change the camera number for the remote
camera concerned in the [CAMERA Select]
box.
2 Click [SET].
The changed camera number now takes effect.
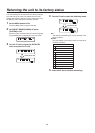
Registering the camera numbers in the
switcher’s input connectors
Set the camera numbers to be registered for the input
connectors (SDI IN 1 to SDI IN 4, DVI IN) of the switcher.
1 Select the camera numbers to be registered in
the [SW Input] box.
SW Input display Input connector of switcher
Input1
SDI IN 1 to SDI IN 4, DVI IN
Input2
Input3
Input4
Input5
2 Click [SET].
The registration of the camera numbers into the input
connectors of the switcher now takes effect.
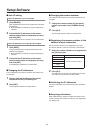
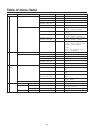
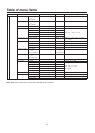
Initializing the IP addresses
The set IP addresses are initialized when [ALL CLEAR] is
clicked.
Acquiring information
When [REFRESH] is clicked, the latest information of the
remote cameras and switcher is acquired, and displayed in
the “Setting” tab.