


15
English
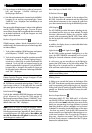
RR-1050
90
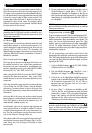
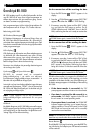
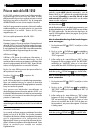
Översikt på RR-1050
RR-1050 ersätter upp till nio olika fjärrkontroller. Att lära
upp RR-1050 till att styra dina övriga komponenter tar
endast några minuter och görs endast en gång. Se mer
om detta i avsnittet om programmering.
När programmeringen är klar är den lätt att aktivera för
den komponent som du vill styra. CD, TV eller video osv.
Beskrivning på RR-1050:
IR Sändare/Mottagare
IR Sändaren/Mottagaren är placerad längst fram på
RR-1050. Den skickar IR-kommandon, (IR = infrarött ljus),
och måste riktas mot den komponent som skall styras. Den
kan också ta emot IR koder från dina övriga fjärrkontroller
under programmeringen.
LCD-display
LCD-displayen ger information om vilken enhetsknapp som
är aktiverad och vilket kommando som utförs. De åtta
alfanummeriska rutorna visar också information vid
programmering av RR-1050. Dessa indikatorer och tecken
beskrivs längre fram i denna bruksanvisning.
Dessutom visar displayen de personliga benämningarna
när en knapp har tryckts.
Ljusknapp och ljusavkännare
RR-1050 är utrustad med en automatisk
bakgrundsbelysning. I ett mörkt rum aktiverar
ljusavkännaren bakgrundsbelysningen automatiskt i 6
sekunder vid varje tillfälle en knapp trycks.
I ett mörkt rum kan även bakgrundsbelysningen aktiveras
manuellt med ljusknappen, ”LIGHT”, som är placerad på
RR-1050s sida. Bakgrundsljuset lyser i 6 sekunder och gör
så varje gång en knapp trycks.
OBS! I ljusa upplysta rum är den automatiska
bakgrundsbelysningen avaktiverad för att spara
batterierna.
Glidlock
Ett glidlock längst ner på RR-1050 döljer ett antal knappar.
Dessa knappar ger extra funktioner under programmering
och konfigurering av fjärrkontrollen. Låt glidlocket vara i
”stängt” läge vid normal användning.
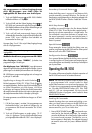
On the remote that will be receiving the data:
1. Press the EDIT button . “EDIT?” appears in the
display.
2. Press the /CLONE button . A prompt “REC/TRX?”
appears with either the “REC” or “TRX” flashing.
3. If necessary, press the – button until the “REC” is flash-
ing, and press the ENT button to confirm. The RE-
CEIVER indication and “WAITING” show in the DIS-
PLAY, confirming that the unit is ready to receive data.
NOTE: Cancel the clone function by pressing the
/CLONE button again, instead of the ENT button.
On the remote that will be sending the data:
1. Press the EDIT button . “EDIT?” appears in the
display.
2. Press the /CLONE button . A prompt “REC/TRX?”
appears with either the “REC” or “TRX” flashing.
3. If necessary, press the – button until the “TRX” is flash-
ing and press the ENT button to confirm. The TRANS-
MITTER and indicators along with the word “SEND-
ING” appear in the display confirming that data is
being sent. It takes 10 minutes to send all of the data.
NOTE: Cancel the clone function by pressing the
/CLONE button again, instead of the ENT button.
While the data transfer is in progress, the LOADING indi-
cator appears in the display of the receiving unit. At the
completion of the data transfer, one of the following con-
firmation messages appears in the display of the receiving
RR-1050:
• If the data transfer is successful, the “OK”
prompt appears and the unit returns to normal mode.
• If no data is received for 60 seconds in re-
ceive mode, “NO DATA” appears in the LCD and
the unit reverts to normal operating mode.
• If corrupted data is received, the CLONE REPT
indicator appears advising you to repeat the trans-
mitting procedure. The unit will remain in the CLONE
REPT mode and cannot be used until it successfully
receives the transmitted data.
NOTE: Do not attempt to use the CLONE function to transfer
data from any remote other than another Rotel RR-1050.
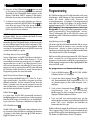
Reset Button
Should the RR-1050 stop functioning, press the RESET but-
ton with the tip of a ballpoint pen. All learned commands
will be retained.