


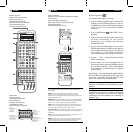


RR-1050
10
95
Svenska
Programmering
RR-1050 kan ersätta upp till nio fjärrkontroller, en för varje
enhetsknapp. AUD-knappen är förprogrammerad med
koder för Rotels audio/video receivrar och
surroundprocessorer. V1-knappen är förprogrammerad
med koder för Rotels DVD-spelare. De övriga Enhets/
Ingångs knapparna (CD, TUN, TAPE och V2-V5) är tomma.
Alla knappar kan omprogrammeras med nya
IR-signaler. Övriga programmeringsegenskaper såsom
makro-programmering, rensa kommandon i minnet,
”klona” kommandon från en RR-1050 till en annan och
återställning av RR-1050 kommer att beskrivas längre fram
i detta stycke.
Upplärnings-funktion
För att lära upp RR-1050 med kommandon från en annan
fjärrkontroll skall de placeras mot varandra enligt
illustrationen i början av denna bruksanvisning. IR-
signalerna som skickas från den andra fjärrkontrollen måste
vara riktade mot RR-1050s IR mottagare.
Det finns två olika sätt att programmera RR-1050. Det ena
sättet används för att programmera Kommando-
knapparna och det andra används för programmering av
Enhets/Ingångs-knapparna som väljer ingångskälla för den
enhet som skall styras.
Att programmera en Kommando-knapp:
1. Tryck på LEARN-knappen på RR-1050. LEARN-
indikatorn blinkar nu i displayen.
2. Tryck på den Enhets/Ingångs-knapp på RR-1050
vars kommandokoder skall programmeras (CD, V2
osv.) Benämningen på den valda knappen visas i
displayen.
3. Tryck på den Kommando-knapp som skall
programmeras (t.ex. 4, CH UP/DOWN).
Benämningen för den Kommando-knappen visas i
displayen LEARN-indikatorn blinkar.
4. Tryck och håll ned motsvarande knapp på den
sändande fjärrkontrollen (original fjärrkontrollen) tills
texten ”OK!” visas i displayen som bekräftar att
kommandot har lärts upp.
LEARN-indikatorn återgår till att blinka när kommandot är
inlärt. Upprepa Steg 3 och 4 för varje Kommando-knapp
som du vill lära upp för den Enhetsknapp som du valt, t.ex.
CD-släden och sökfunktionen för din CD-spelare.
2. Press any of the COMMAND buttons to send
an IR command to the component you have selected.
The label for the COMMAND button appears in the
display. If the label “EMPTY” appears in the display,
the button has no learned command for that device.
3. To select an input source for the device you have se-
lected press and hold a DEVICE/INPUT button
for
more than one second
. That input source device be-
comes the selected device. The display shows the la-
bel for the input source selected.
NOTE: The default labels that appear in the display match
the button labels. You can customize the labels for every
DEVICE and COMMAND button.
Remember that the COMMAND buttons duplicate controls
on many different types of audio/video components. Their
function depends on the type of component selected. Make
sure that you have pressed the correct DEVICE button and
use the button labels as a guide.
Sending Macro Commands
Twenty of the buttons on the RR-1050 (the nine device but-
tons, the EXT button and the number buttons 0 - 9) can
store multiple command macro sequences. For example, a
sequence that turns on the TV set, selects channel 5, turns
on the surround processor, and selects the TV input. A macro
sequence is sent by pressing the MACRO button followed
by the button where the macro is stored. See the Macro
Programming section for more information.
Multi-Step Button Operation
The five buttons labelled SCAN, PTY, P-TUN, TA, TP pro-
vide a special option – the ability to program up to three
different commands. The first command is sent when the
button is pressed once, the second command is sent the
next time the button is pressed, and the third command is
sent the third time the button is pressed.
LIGHT Button
In a dark room, the RR-1050 automatically activates its
backlighting feature for 6 seconds when a button is pressed.
Press the LIGHT button to manually turn on the backlight-
ing in a dim room. This button is disabled in a bright room.
KEY TONE Button
The RR-1050 can be configured to beep whenever a but-
ton is pressed. When this feature is activated, the indicator
appears in the display. Press the /CLONE button to
toggle this feature on or off.