


6
RR-1050
99
Svenska
Introduction
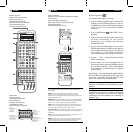
Thank you for purchasing the RR-1050 Universal Learning
Remote Control. The RR-1050 can replace up to nine in-
frared remote controls, operating audio or video compo-
nents from Rotel or other manufacturers.
Key Features
• Simple programming using your existing remote con-
trols to teach the RR-1050 their commands.
• Pre-programmed to operate a variety of Rotel audio/
video components. Any button can be reprogrammed
and “learn” the control signals from any other remote.
• LCD DISPLAY provides visual feedback during pro-
gramming and operation, including status indicators,
and customizable labels for every command button.
• Backlighting for ease of use in dark rooms along with
optional beep whenever a button is pressed.
•Twenty MACRO buttons send a sequence of up to 20
commands with the press of two buttons.
Sensible Precautions
• The RR-1050 is rugged, but it is not indestructible. So
please don’t drop it!
• Do not expose the RR-1050 to moisture. To clean the
RR-1050, use a soft, lint-free damp cloth. Avoid harsh
cleaning solvents.
• Don’t try to take the RR-1050 apart. Disassembly will
void the warranty.
Battery Installation
Remove the RR-1050 and the 4 AAA batteries from the
box. Turn the RR-1050 over and lift the cover off the bat-
tery compartment by compressing the release tab and lift-
ing up. Place the four AAA batteries inside (follow the po-
larity illustrations on the bottom of the compartment) and
replace the cover.
Navigating the RR-1050
The RR-1050 replaces up to nine remote controls. Teach-
ing the RR-1050 to operate your components takes just
minutes and need only be done once. See the LEARNING
section of this manual for easy to follow instructions.
Once the programming is complete, select a component
with the press of a button to turn the RR-1050 into the
remote control for your CD player, TV, or VCR.
Kloningsfunktion
Med kloningsfunktionen kan all programmering föras över
från en RR-1050 till en annan RR-1050. Detta gäller alla
kommandon och egna knappbenämningar. Placera de två
RR-1050 med IR-sändarna mot varandra, ”nos mot nos”
och gör följande:
På den mottagande fjärrkontrollen:
1. Tryck på EDIT-knappen
. Texten ”EDIT?” visas i
displayen.
2. Tryck på ” /CLONE”-knappen . Texten
”REC/TRX?” visas i displayen med antingen “REC“
eller ”TRX“ blinkande.
3. Om nödvändigt, tryck på knappen tills ”REC” blinkar
och tryck på ENT-knappen för att bekräfta valet. RE-
CEIVER-indikatorn och texten ”WAITING” visas i
displayen som bekräftar att fjärrkontrollen är klar att
ta emot data.
OBS! Avbryt klonings-funktionen genom att trycka på ” /
CLONE”-knappen igen istället för ENT-knappen.
På fjärrkontrollen som skall sända data:
1. Tryck på EDIT-knappen . Texten ”EDIT?” visas i
displayen.
2. Tryck på ” /CLONE”-knappen . Texten
”REC/TRX?” visas i displayen med antingen “REC“
eller ”TRX“ blinkande.
3. Om nödvändigt, tryck på knappen tills ”TRX” blinkar
och tryck på ENT-knappen för att bekräfta valet.
TRANSMITTER- och indikatorerna tillsammans med
texten ”SENDING” visas i displayen som bekräftar
att data skickas. Det tar ca. 10 minuter att skicka all
data.
OBS! Avbryt klonings-funktionen genom att trycka på
” /CLONE”-knappen igen istället för ENT-knappen.
När data skickas visas ”LOADING” i displayen på den
mottagande fjärrkontrollen. Efter avslutad dataöverföring,
kloning, visas ett av följande meddelande i den mottagande
RR-1050.
• Om överföringen lyckats, visas ”OK!” i
displayen och fjärrkontrollen återgår till normal
funktion.