


10
Oa Ad
Owner’s Manual
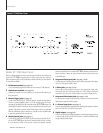
Model PT-7000 7.1 Channel Preamp/Processor/Tuner
Owner’s Manual
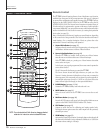
8 Numeric Keypad buttons (see page 32)
Use these buttons for control functions requiring you to enter numbers.
For numerals over 10, press the 10+ button for every multiple of ten, fol-
lowed by a second digit.
9 Theater Compensation button (see page 34)
The T.COMP button toggles Theater Compensation processing on and
off.
10 Surround/Data Format buttons (see page 31)
Press the 2, DTS, CR SURR or STEREO button once to select a surround
processing format .
Press the same button again to cycle through the various processing modes
available for the selected format.
Pressing and holding the button for ve (5) seconds calls up the Data
Format menu.
11 DIGITAL button (see page 30)
Cycles between the six digital inputs and the analog input on the PT-7000.
The selected input is shown on the FRONT PANEL DISPLAY and the
OSD, if active.
12 NIGHT button (see page 33)
Cycles through the various Night dynamic range compression modes.
13 Macro Control buttons (see page 39)
The M1, M2, M3 and M4 buttons are used to play back macros, which are
pre-programmed sequences of IR commands that you have been entered
in the remote.
14 Tuning and Volume buttons (see page 30, 32, 39)
Use the and CH/TUNE buttons to adjust the PT-7000 tuner’s
frequency down or up when AUD is selected as the input source. These
buttons also operate the tuner or change channels of other devices that
are selected as the current source.
Use the and VOL buttons to adjust the volume of the PT-7000 from
–80dB to +10dB. These buttons also operate the volume control of other
devices that are selected as the current source.
15 MENU button (see page 22)
Calls up the Main Menu on the FRONT PANEL DISPLAY and the OSD, if
active.
16 Navigation and Select buttons (see page 22)
Use the four Navigation buttons to move through menu options shown
on the FRONT PANEL DISPLAY or OSD. Use the SEL button to conrm
selections made in menus.
17 TONE button (see page 23)
Press this button to select either the Treble or Bass for adjustment. Once the
desired parameter is selected, use the < or > navigation buttons to change
the setting. The Treble and Bass can be adjusted ±6dB. Settings are shown
on the on the FRONT PANEL DISPLAY and the OSD, if active.
18 Auxilliary Input buttons (see page 30)
Use the AUX 1 and 2 buttons to select the device connected to one of the
two AUX inputs as the active source.
19 6 Channel Direct button (see page 34)
Pressing the 6 CH button selects as the source the analog signal from the
Multi Channel inputs (5 channels plus subwoofer) on the PT-7000, as
well as activating the dedicated Bass Management selected by the rear
panel switch. Pressing the button again returns the unit to the previously
selected source.
20 BYPASS button (see page 31)
Activates Stereo Bypass mode, sending the signal from the analog input in
use directly to the volume control, bypassing all digital processing. Pressing
the button again returns the unit to the previously selected mode.
21 AM/FM button (see page 32)
Press this button to select the PT-7000’s tuner as the input source, or to switch
between the AM and FM bands when the tuner is active. Pressing this button
when the PT-7000 is in Standby mode will also turn the unit on.
22 Tuner Mode button (see page 32)
Press the T.MODE button to switch the FM tuner between Mono and
Stereo.
23 SLEEP button (see page 35)
Sets the PT-7000’s built-in sleep function timer.
24 Preset Scan button (see page 32)
Pressing this button scans the AM or FM stations preset in the tuner’s
memory. Pressing it again stops the scan at the preset indicated in the
FRONT PANEL DISPLAY.
25 Memory buttom (see page 32)
Press and hold the MEM button to store an AM or FM station into a preset
location. Once the FRONT PANEL DISPLAY begins to ash Memory 01, enter
the desired preset number using the numeric keypad on the remote.
26 Light
Illuminates the Remote Control buttons for 7 seconds.
Remote Control
11
NOTE: For markets outside of North America, please see attached
addendum for instruction as how to access RDS Tuners.