


32
Oa Ad
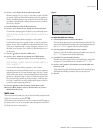
Owner’s Manual
Model PT-7000 7.1 Channel Preamp/Processor/Tuner
Owner’s Manual
Recording a Source
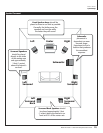
You can record from any input source available to the PT-7000 when you
have an audio or video recorder properly connected to the appropriate output
jacks on the rear panel of the unit as outlined in the section titled “Connecting
the Model PT-7000” starting on page 13. You can not monitor the output from the
recorder while the recording is in progress.
To record from the currently selected input source:
1. Prepare your recording device.
Follow the recommended procedures from the recorder manufacturer
regarding settings in order to properly make a recording.
2. Set the device to the record mode and begin recording.
The source audio signals appear at the TAPE OUT and VCR-OUT audio
jacks of the PT-7000. If the source contains a video signal, the output appears
at both the S-Video and Composite VCR-OUT video jacks.
Any digital source selected automatically appears at the DIGITAL
OUTPUT jacks.
Note: If you change the input source during recording, you will
record the signals from the newly selected input source from that
point on.
Night Mode
Night Mode is a special feature of Dolby Digital that compensates for difcult
listening situations by compressing the dynamic range of the speaker output.
An example would be when you are watching a movie with a soundtrack
that contains very loud passages and you don’t want to disturb others in the
house.
Information on the various compression options can be found on page 23-24.
Night Mode compensation is only available when the surround mode of the
selected input source is set to Dolby Digital or Dolby Digital EX.
To enable/disable Night Mode compensation:
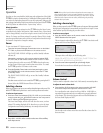
1. Press the NIGHT button on the remote control.
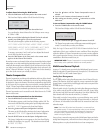
The Night Mode selected during Input Conguration appears on the Front
Panel Display and OSD under the currently selected input source.
DVD DOLBY D
NIGHT :DR COMP1
2. Use the < and > buttons to change the Night Mode setting.
The unit cycles through the options in the following sequence:
NO COMPDR COMP1DR COMP2DR COMP 3DR COMP4
The Night Mode menu will disappear automatically approximately 10
seconds after you make your selection.
Channel Trim
Channel Trim allows you to ne tune the channel levels to compensate for
various soundtrack anomalies. For example, you may play a movie and nd
that the center (dialogue) channel is weak, making the movie hard to follow.
Simply trimming the Center channel up a dB or two can x the problem. Or
another lm may have substantially more bass than normal and trimming the
Subwoofer channel down a dB or two may help balance the sound correctly.
This function can be accessed in two ways. You can press the TRIM button on
the front panel or the remote control, or you can access this feature through
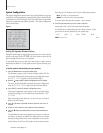
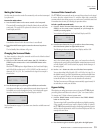
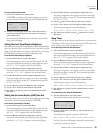
the Main Menu. The Channel Trim menu is shown below.
Figure 7
CHANNEL TRIM
> LEFT FRONT : 0dB
CENTER FRONT : 0dB
RIGHT FRONT : 0dB
RIGHT SURR : 0dB
RIGHT BACK : 0dB
LEFT BACK : 0dB
LEFT SURR : 0dB
SUBWOOFER : 0dB
RETURN TO MAIN MENU
To adjust channel trim from the Main Menu:
1. While playing the program material with output that you wish to
ne tune, press the MENU button to enter the Main Menu.
The Main Menu appears on the Front Panel Display and the OSD. The
cursor on the OSD should be pointing to the Input Conguration menu
and
INPUT CONFIG
appears on the Front Panel Display.
2. Press the button until the Channel Trim menu is selected.
The cursor on the OSD should be pointing to the Channel Trim menu
and
CHANNEL TRIM
appears on the Front Panel Display.
3. Press SELECT to enter the Channel Trim menu.
The Channel Trim menu appears on the Front Panel Display and the OSD
(see gure 7). The selected menu item should be
LEFT FRONT
.
4. Use the < and > buttons to adjust the channel trim.
You can adjust the selected channel trim level in 1dB steps across a
range of-15dB to +10dB.
5. Press the button when you have nished making the channel
trim adjustment.
If necessary, repeat steps 4 and 5 until you have completed setting the
level for each speaker in your system. The sequence is as follows:
LEFT FRONTCENTER FRONTRIGHT FRONT RIGHT
SURR(OUND)RIGHT BACK (SURROUND)LEFT BACK
(SURROUND)LEFT SURR(OUND)SUBWOOFER
6. Press the button when you have nished making the channel trim
adjustment to all the speakers in your system to select the Return
to Main Menu option.
7. Press the SELECT or MENU button to return to the Main Menu, or
press the MENU button twice to exit.
Operation
33