


Owner’s Manual
7
Mde 950 7.1 Chae Pea/Pce
Owner’s Manual
Complete Multiroom System
When properly connected, a second source may be sent to a remote
room, complete with remote volume control, source selection and tuner
control. A trigger for the second zone allows a second amplier to turn
on and off independently of the main room. This system may also be
used to record an input source that is different from the one being used
in the main room.
2 Low voltage triggers
One trigger provides automatic turn on/off of compatible power ampli-
ers such as the Sherbourn Model 7/2100 and 5/5210, or relay-controlled
products such as projection screens, blinds and lighting systems. A separate
trigger provides turn on/off control for an amplier used with the multiroom
system.
Unpacking
The carton and packing materials used in shipping your new Preamp/Processor
were specially designed to cushion it from the shocks and vibration of shipping.
We strongly suggest that you save the carton and packing materials to use if
you move, or if the unit ever needs to be shipped back to us for any reason.
To minimize the size of the carton in storage, you may wish to atten it by
carefully opening the top and bottom aps and folding the carton at. Other
cardboard inserts may be stored in the same manner. Packing materials that
cannot be collapsed should be saved along with the carton in a plastic bag.
Although not particularly heavy, the PT-7000 has many front mounted controls and
rear panel connectors, so be careful when lifting it so as not to cause damage.
Accessories
After unpacking the PT-7000, please check that the following accessories
are in the box:
Remote Control with Batteries
AC Power Cord
FM Antenna
RCA Connection Cables
Owner’s Manual
If for any reason any of the above is missing from your shipment, please contact
Sherbourn Technologies immediately.
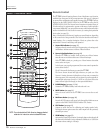
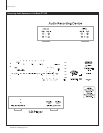
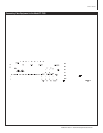
1 Standby power button (see page 22, 30)
When the main POWER switch on the rear panel is in the ON position,
pressing this button turns the unit on. The yellow STANDBY/MUTE indica-
tor light goes out.
Pressing this button again returns the Preamp/Processor to standby mode.
The STANDBY/MUTE indicator light illuminates.
In this mode of operation, the FRONT PANEL DISPLAY is turned off, control
functions are disabled, and all outputs to the main zone are turned off.
However, outputs to the remote zone remain active and available.
2 FM MODE button (see page 32)
Sets the FM Tuner to Mono mode. The letter “M” appears next to the Tuner
Preset number in the FRONT PANEL DISPLAY. Pressing the button again
returns the FM Tuner to Stereo mode.
3 TUNE buttons (see page 32)
The and buttons adjust the tuner’s frequency down or up when Tuner
is selected as the input source.
4 FM/AM button (see page 32)
Toggles between AM and FM frequency bands. Pressing this button when
listening to any other source automatically changes the unit’s input source
to the tuner and the last station chosen.
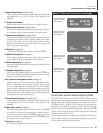
5 FRONT PANEL DISPLAY (see page 9)
Indicates program source, DSP mode, tuner preset and/or frequency,
digital input, volume level, and other preamp/processor/tuner operating
information. Also displays menu selections.
6 TEST TONE button (see page 27)
Press this button to use the internal test generator to adjust the output level
for each channel. As the test signal circulates among the channels press
the < or > Navigation buttons to make an adjustment.
7 DIGITAL SELECT button (see page 30)
Press this button to select a digital input. Each press of the button scrolls to
the next input, as shown on the FRONT PANEL DISPLAY or the ON SCREEN
DISPLAY. When ANALOG is shown, the L/R analog input associated with
the input in use will be used.
8 STEREO BYPASS button (see page 31)
Defeats the DSP processing section and provides an unaltered, full-band-
width stereo signal to the Left and Right channel outputs on the rear panel.
However, the subwoofer DSP crossover remains active and bass frequencies
are available at the subwoofer output should you wish to augment your
front LR speaker’s low frequency performance. The word BYPASS appears
in the FRONT PANEL DISPLAY. Pressing the button again returns the unit
to the previously selected DSP mode.
9 TRIM button (see page 33)
Press this button to adjust the output of an individual channel above or
below the master volume level setting from -15dB to +10dB. Press the <
or > Navigation buttons to adjust the level for the channel indicated in
the FRONT PANEL DISPLAY or the ON SCREEN DISPLAY and then press
the button again to select another channel.
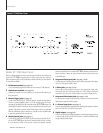
Model PT-7000 Front Panel
Sherbourn Technologies, Inc.
6
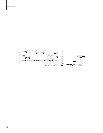
Model PT-7000 Front Panel
AM Loop Antenna