


22
Oa Ad
Owner’s Manual
Model PT-7000 7.1 Channel Preamp/Processor/Tuner
Owner’s Manual
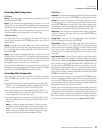
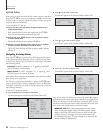
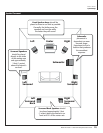
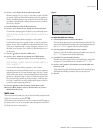
Input Setup and Selection
Before calibrating your PT-7000 and adjusting loudspeaker setup and con-
guration, you should rst set up the sources connected to it. You will make
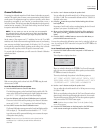
your selections using the Input Conguration menu, shown below.
Figure 1
INPUT CONFIG
> SOURCE :DVD
INPUT :OPTICAL1
MODE :DOLBY
DIGITAL
TREBLE : 0dB
BASS : 0dB
NIGHT :NO COMP
RETURN TO MAIN MENU
Because of the extensive options available for each input source, we strongly
recommend you use the chart on page 18 to record the settings for each input
and component. Later, if you re-congure your system, this chart will help
avoid confusion.
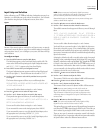
To congure an input:
1. Press the MENU button to enter the Main Menu.
The Main Menu appears on the Front Panel Display and the OSD. The
cursor on the OSD should be pointing to the Input Conguration menu
and
INPUT CONFIG
appears on the Front Panel Display.
2. Press SELECT to enter the Input Conguration menu.
The Input Conguration menu appears on the Front Panel Display and
the OSD (see gure 1). The selected menu item should be
SOURCE
.
3. Use the < and > buttons to select which particular Source you wish
to congure.
The Source choices appear as follows as you scroll through them:
DVDVIDEO1VIDEO2VIDEO3VCRTUNERCD
TAPEAUX1AUX 2
You can scroll in either direction using the < and > buttons .
4. Press the button once to select the Input menu.
5. Use the < and > buttons to select an Input for that source.
The input choices appear as follows as you scroll through them:
ANALOGOPTICAL1OPTICAL2OPTICAL3
OPTICAL4COAXIAL1COAXIAL2
You can scroll in either direction using the < and > buttons .
If you connected the source to the Analog inputs, select: ANALOG.
If you connected the source to one of the Optical Digital inputs, select
the appropriate one by choosing: OPTICAL 1, 2, 3, or 4.
If you connected the source to one of the Coaxial Digital inputs, select
the appropriate one by choosing: COAXIAL 1 or 2.
NOTE: Always connect and congure the digital input source
option if one is available from the specic component, as this will
provide maximum performance and best sound quality.
Remember that you can always return to any menu to change your
selection, should that be required.
6. Press the button once to select the Mode menu.
7. Use the < and > buttons to select a Mode for that source.
The available surround modes appear as follows as you scroll through
them:
PLII-CPLII-MDOLBY PL7 STEREO
5 STEREOSTEREOPLIIC+CRPLIIM+CR
NEO:6-CNEO:6-MDOLBY DDOLBY EX
DTSDTS-ES
You can scroll in either direction using the < and > buttons .
You should choose a surround mode to be the default for this source.
Please refer to the table on page 12 for a detailed listing of all options.
Remember that all available mode options can be selected for a Digital
input source, but certain modes will not be available through the Analog
input for that source.
Selecting the default mode will not exclude other modes of surround
decoding. In fact, certain digital signals (Dolby Digital, DTS, some Dolby
Digital EX, and others) contain a special digital “ag” that tells the PT-7000
to switch to that surround mode. When the PT-7000 receives one of
these bitstreams it will switch to that mode of operation. Additionally,
you can manually cycle through the available modes while the source
is playing to choose the one you wish to use.
8. Press the button once to select the Treble menu.
9. Use the < and > buttons to adjust the Treble.
The amount of Treble boost can be adjusted ±6dB in 2dB increments.
10. Press the button once to select the Bass menu.
11. Use the < and > buttons to adjust the Bass.
The amount of Bass boost can be adjusted ±6dB in 2dB increments.
NOTE: Any tone control setting you make in this mode are
global, and will affect all input sources and all output channels.
They will remain in effect until you go back into the setup menu
and change them or change them using the TONE button on the
remote control.
12. Press the button to select the Night menu.
NOTE: This option only operates with a Dolby Digital or Dolby
Digital EX source and one of these modes is active.
This option allows you to set the amount of Dynamic Range Compression
used when the PT-7000 is placed into the NIGHT mode. This mode can
also be selected by pressing the NIGHT button on the remote control.
There are two types of automatic compression control built into the
Dolby Digital process. Compression makes the loud parts softer and the
soft parts louder to reduce the difference between the two.
System Setup
23