


Sherbourn Technologies, Inc.
Owner’s Manual
25
Mde 950 7.1 Chae Pea/Pce
Owner’s Manual
One type of compression is most useful for situations such as late night
viewing of programs with a wide dynamic range (like many action
movies) that might disturb others in your home. This function can
also be used to provide compression for program material that may
require enhancement of overall intelligibility (such as some older
soundtracks).
Another feature provided by this option is the necessary peak limiting
required to avoid signal overload when "downmixing" functions are
selected.
The second variable provides additional peak limiting to allow overall
average program level to be increased by adding even more compres-
sion to the signal.
These two algorithms can provide sufcient overall gain reduction to
allow even wide dynamic range soundtracks with very soft parts and very
loud parts to maintain good audibility at low volume levels.
In most cases a minimum amount of dynamic range reduction is
automatically included in the bitstream to ensure safe downmixing.
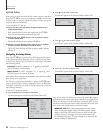
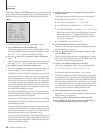
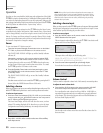
13. Use the < and > buttons to select a Dynamic Range option you
prefer for the Night setting.
NO COMP This option leaves the compression at 0% change.
DR COMP1 This option increases the compression by 25%.
DR COMP2 This option increases the compression by 50%.
DR COMP3 This option increases the compression by 75%.
DR COMP4 This option increases the compression by 100%.
Each option increases the amount of Dynamic Range compression
to the signal. Depending on your family, neighbors, circumstances,
and the overall volume you wish to achieve, we recommend you start
with DR COMP1 or DR COMP2 as your initial setting. You will have to
experiment with program material and your personal preferences to
determine what is acceptable and best for you.
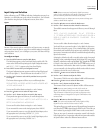
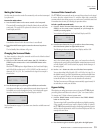
14. Press the button to select the Return to Main Menu option.
15. Press the SELECT or MENU button to return to the Main Menu, or
press the MENU button twice to exit the menu system.
NOTE:
Except for the input source and surround mode, the settings
chosen during this input setup process are universal and apply to
all sources. You will need to correctly set each digital source to the
appropriate input and select a default surround mode for each source
connected to your PT-7000. Once you have completed these selec-
tions, proceed to the next step: configuring your loudspeaker setup and
calibrating your system.
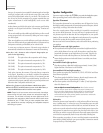
Speaker Conguration
You are now ready to congure the PT-7000 for your particular loudspeaker system.
Before proceeding please read the following information carefully:
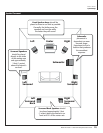
Speaker Placement
The best speaker placement for your particular room will depend on it’s size,
furnishings, seating arrangement, the acoustical properties of the space, includ-
ing wall type, coverings, and various other factors.
Due to the complex nature of these variables it is impossible to recommend
any one-size-ts-all placement. You may well have to experiment with vari-
ous placement options to determine the best conguration for your specic
situation. Please note that, the conguration and placement of your speakers
is critical for creating the best possible surround sound playback.
Here are some basic recommendations you should consider when positioning
your speakers.
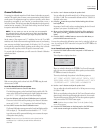
Front left, center and right speakers:
These speakers should be placed at the same relative height from the oor
and a similar distance from any walls. Most speakers sound best when
located with the tweeter at ear height when you’re seated. Typically, the
further away from the walls the speakers are, the better they will sound.
Insure that the speakers are aimed at the listener’s ears within your chosen
seating position.
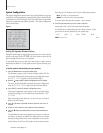
Surround left and right speakers
Place these speakers so that their height is approximately 1 meter (3 feet)
higher than that of the listener’s ears if feasible.
Surround back left and right speakers
These speakers are required for Surround EX, DTS-ES, DTS NEO:6 and Cirrus
Extra Surround playback.
Place these speakers behind the listener so that the angle between each
speaker and the listener is approximately 30 degrees.
Place these speakers so that their height is 1 meter (3 feet) higher than
that of the listener’s ears.
Note on dipole surround loudspeakers: Most dipoles surround
speakers have an arrow which indicates their proper orientation rela-
tive to your video display/screen. Dipoles placed on side walls should
have the arrows pointing forward. Dipoles placed on a rear or back
wall should have the arrows pointing towards each other to achieve the
correct acoustical image in the room.
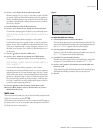
Subwoofer
Subwoofer placement can frequently be a trial and error affair as bass energy
set up “standing waves” in most every room. These standing waves can cause
areas with too much bass, areas with too little bass, and areas in between. You
may have to move the subwoofer and or the prime listening area to improve the
bass response. Be aware that every surface you place the woofer close to (one
wall, oor, two walls in a corner) will increase the overall apparent bass in the
room. But this can potentially lead to boomy and muddy sounding bass.
When connecting any speakers, be sure to read the instruction manuals that
came with the product and check your power amplier’s instruction manual
for proper hook-up of the loudspeakers.
System Setup
24