


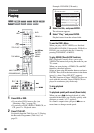


64
“PB Video Equalizer”:
• Contrast: (weak) –3 ~ 0 ~ 3 (strong)
• Brightness: (dark) –3 ~ 0
~ 3 (bright)
• Colour: (light) –3 ~ 0 ~ 3 (deep)
• Hue: (red) –3 ~ 0
~ 3 (green)
Repeat steps 2 and 3 to adjust any other items.
* “1” softens the outlines of the images. “2”
enhances the outlines and “3” enhances them more
than “2.”
b Notes
• If the outlines of the images on your screen become
blurred, set “BNR” and/or “MNR” to “Off.”
• Depending on the disc or the scene being played, the
above BNR, MNR, Y NR, or C NR effects may be hard
to discern. And, these functions may not work with
some screen sizes.
• When using the DVE function, noise found in the title
may become more apparent. In this case, it is
recommended that you use the BNR function with the
DVE function. If the condition still does not improve,
set the DVE level to “1” or “Off.”
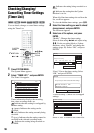
1 Press TOOLS during playback to select
“Audio Settings,” and press ENTER.
2 Select an item, and press ENTER.
“Surround” (TVS): Selects one of the
surround modes.
TVS* (TV Virtual Surround) lets you enjoy
virtual surround sound effects created from
the front left and right speakers. The selected
setting is displayed in the front panel display
for a few seconds.
• Off: No surround effect
• Dynamic: Creates one set of virtual rear
speakers.
• Wide: Creates five sets of virtual rear
speakers.
• Night: Creates five sets of virtual rear
speakers. Effective at low volume.
• Standard: Creates three sets of virtual rear
speakers. Effective when you use two
separate front speakers.
*TVS was developed by Sony to produce home
surround sound with just a stereo TV.
“Audio Filter”: Selects the digital filter to
reduce noise above 22.05 kHz (Fs* is 44.1
kHz), 24 kHz (Fs is 48 kHz), or 48 kHz (Fs is
above 96 kHz).
• Sharp(default): Provides a wide frequency
range and spatial feeling.
• Slow: Provides smooth and warm sound.
“AV SYNC”: When the video is delayed, this
function delays the audio for synchronization
with the video (0 to 120 milliseconds). Larger
numbers indicate a longer audio delay for
synchronization with the video. When
dubbing to a VCR or other video recording
equipment, be sure to return this setting to 0
ms (default).
* Sampling frequency of audio source. This
function only adjusts the output signals from the
LINE 1 – TV, LINE 3, or LINE 2 OUT (AUDIO
L/R).
3 Press </M/m/, to select the option,
and press ENTER.
b Notes
• There may be little effect by changing the Audio Filter
depending on the disc or playback environment.
• To enjoy the surround TVS modes, set “Digital Out” to
“On” and “Dolby Digital” to “D-PCM” and “MPEG”
to “PCM” in “Audio” setup.
• The volume may be reduced when surround effects are
set.
• When the playback signal does not contain a signal for
the rear speakers, the surround effects will be difficult
to hear.
• In addition, the surround effects may also be difficult to
hear depending on the title being played and the
environment where the recorder is being used.
• When you select one of the surround modes, turn off
the surround settings of the connected TV or amplifier
(receiver).
• Make sure that your listening position is between and
at an equal distance from your speakers, and that the
speakers are located in similar surroundings.
• When you use the DIGITAL OUT (COAXIAL) jack to
listen to MPEG audio signals and set “MPEG” to
“MPEG” in “Audio” setup, no sound will come from
your speakers if you select one of the TVS modes.
• The surround effects do not work while performing
playback quickly with sound.
Adjusting the sound quality
+
R
DVD
VCD
-
RWVR
-
RW
Video
+
RW
-
R
HDD
CD
DATA CD