


D:\DVR project\Instruction
manual\DTP\2689634111\GB07REC-CEK.fm
master page=right
SVR-S500
2-689-634-11(1)
27
Timer Recording
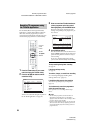
2 Select an item using M/m and adjust using
</, and the coloured control buttons
displayed on you remote control.
“Channel Name”: Sets the Channel Name
“Date”: Sets the date.
The item changes as follows:
Today y Tomorrow y …… y Thu
28.10 (1 month later) y Today.
“Frequency”: Sets the recording frequency.
The item changes as follows:
Once y Daily yWeekly y Once
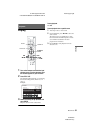
“Start”: Sets the start time.
Press the coloured buttons on you remote
control to set the desired start time.
“End”: Sets the stop time.
Press the coloured buttons on you remote
control to set the desired stop time.
“Mode”: Selects the recording mode.
The item changes as follows:
SP y LP yEP
Select a recording mode according to the time
and picture quality you need. For example:
• If picture quality is your priority, select the
Standard Play mode (SP).
• If recording time is your priority, Long Play
mode (LP) or Extended Play mode (EP) can
be a possible choice.
Please note that the recording compression
process is not instantly performed at the time
of the recording. The compression process
takes approximatley 4 hours for each hour of
programming when the hard disk recorder is
in standby mode.
3 Press ENTER to confirm your settings.
The Timer List (page 29) appears showing the
settings to be added to the Timer List.
4 Press GREEN to confirm
The selected manual timer moves into the
Record List and the TIMER indicator
(page 51) lights up on the front panel
indicating that the recorder is ready to start
recording.
To confirm, change, or cancel timer recording
See “Checking/Changing/Cancelling Timer
Settings (Timer List)” on page 29.
To stop recording during timer recording
1 Press TIMER LIST on your remote.
The TIMER LIST display appears.
2 Press M/m to highlight the programme being
recorded you want to stop.
3 Press GREEN to stop recording.
To simultaneously record two programmes
within the same time range
Once you have set a recording, proceed as of Step
1 of “Setting the timer manually (Standard)” on
page 26 to simultaneously record a second
programme.
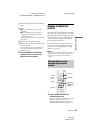
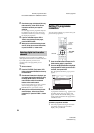
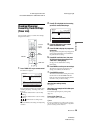
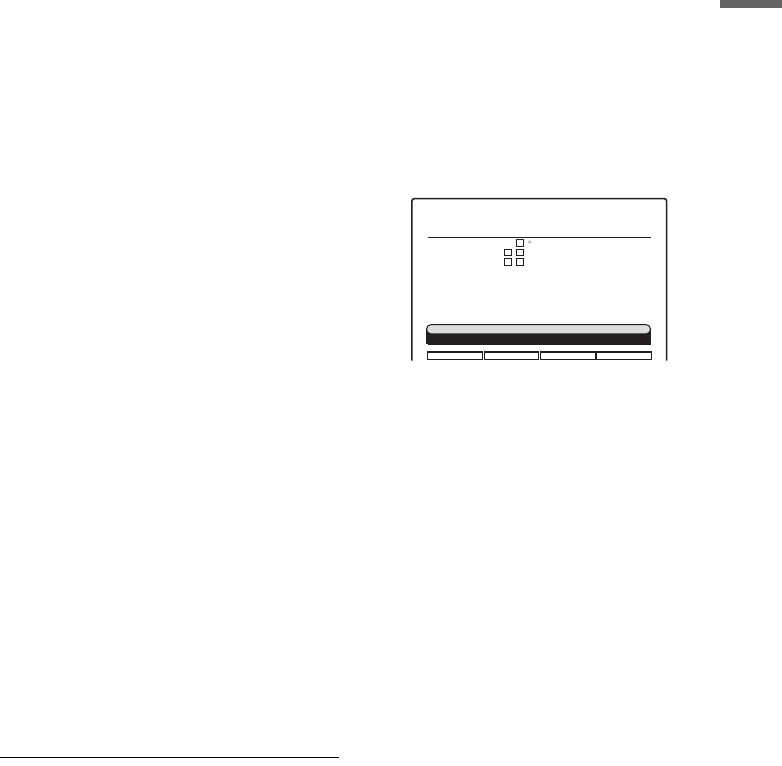
If the timer settings overlap
Only two programmes can be recorded
simultaneously.
Overlapped timer settings are highlighted in the
TIMER LIST display as follows.
To add the New Timer as shown in the TIMER
LIST, you will have first to change or cancel a
previous timer recording that has been set within
the same time range, see “Checking/Changing/
Cancelling Timer Settings (Timer List)” on
page 29.
To clear the New Timer that overlaps, press the
Blue button on your remote control.
If insufficient disk space for the recording
You can free up disk space by erasing titles
(page 37).
z Hint
You can play the recorded programme by selecting the
programme title in the Title List.
b Notes
• Before you start recording, check that the HDD has
enough available space for the recording (page 16).
• Even if the timer is set for the same daily or weekly
programme, the timer recording cannot be confirmed if
it overlaps with two other timer recordings scheduled at
the same time.
TIMER LIST
11:23
Edit Clear
Date
Wed 08/02
Mon 13/02
Mon 13/02
Start
11:20
10:17
11:39
End
13:25
12:22
14:20
Duration
125 min
125 min
161 min
Record List
DDE news
NCE
CMY
HDD Usage: 26.9/80 GB
Freq Mode Start DurationAdd Timer
Once 11:23 12:28
65 min
DDE News
End
SP
This programme overlaps another programme
LP
EP
SP
w
d
,
continued