


17
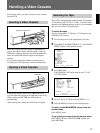
Handling a Video Cassette
This section shows you how to insert a video cassette
into the VCR.
Inserting a Video Cassette
Selecting the Tape
This VCR is designed and calibrated with 120-mimute
or 160-minute tape (T-120 or T-160). To ensure stable
operation and optimum picture quality, we recommend
that you use a Sony 120-minute tape.
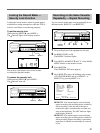
To select the tape
You can select either T-120 tape or T-160 tape on the
GENERAL SET menu.
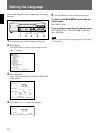
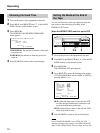
1 Turn on the power of the equipment to be used.
2 Press MENU and MENU
V
until “4” of the MAIN
MENU flashes on the monitor screen.
3 Press MENU
B
.
The GENERAL SET menu appears and “T-160 ”
of TAPE flashes.
4 Set to T-160 or T-120 by pressing
MENU + or –.
5 Press SEARCH to return to the normal display.
To return to the MAIN MENU screen from the
current menu
Press MENU again.
To go to the next menu from the current menu
Press MENU
V
until “NEXT PUSH
B
” flashes and
press MENU
B
.
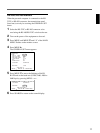
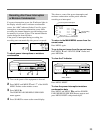
Insert the cassette into the cassette compartment by
slowly pressing its center with the arrow on the top.
When the cassette is inserted, the VCR automatically
turns on and the q indicator lights in the display
window.
If you insert the cassette without its safety tab for
recording, the VCR ejects the cassette automatically.
Ejecting a Video Cassette
To eject the cassette, press EJECT Z on the VCR.
You can eject the cassette even when the power is off.
When you press EJECT Z, the VCR turns on
automatically.
After ejecting the cassette, the VCR turns off again.
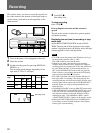
Cassette compartment
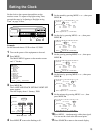
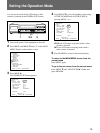
1. LANGUAGE
CLOCK SET
DAYLIGHT SET
2. DISPLAY SET
3. ALARM SET
4. GENERAL SET
5. TIMER SET
6. HOLIDAY SET
7. POWER FAILURE
/
DEW
BUZZER
8. ALARM DATA
SELECT : NEXT : RETURN : MENU
USED HOUR
SW OUT
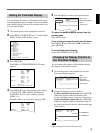
<
MAIN MENU
>
GENERAL SET
TAPE
TAPE IN
TAPE END
MODE
MODE
TAPE USED COUNT
CLOCK ADJUST
APC
THREAD CHECK
T
/
D SEARCH
T–160
STOP
REW
OFF
01:00
ON
OFF
CONVENTION
19200
SELECT : DATA SET :
+
/
–
RETURN : MENU
<
NEXT PUSH
>
BAUD RATE
EJECT Z