


27
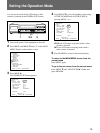
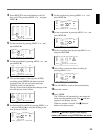
1 Turn on the power of the equipment to be used.
2 Press MENU and MENU
V
until “5” of the MAIN
MENU flashes on the monitor screen.
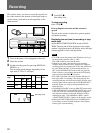
3 Press MENU
B
.
The TIMER SET menu appears.
4 Press
MENU V
to move the flashing to the line of
WEEK you want and set TUE by pressing MENU
+ or –.
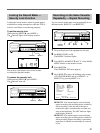
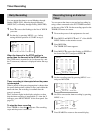
5 Press MENU
B
to move the flashing to the hour
position of START.
6 Set the start hour by pressing MENU + or – and
press MENU
B
.
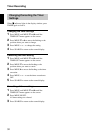
7 Set the start minute by pressing MENU + or – and
press MENU
B
.
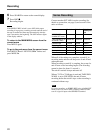
8 Set the stop hour by pressing MENU + or – and
press MENU
B
.
SUN MON TUE WED THU FRI SAT
WEEK STRAT
SUN
STOP SPEED
––– OFF
MON ––– OFF
TUE
––– OFF
W
ED
24 ON
THU ––– OFF
FRI ––– OFF
SAT ––– OFF
MON–SUN ––– OFF
EXT
:
:
:
:
:
:
:
:
:
:
:
:
:
:
:
:
:
:
––– OFF
––––
––––
––––
0008
––––
––––
––––
––––
––––
––––
––––
0017
––––
––––
––––
––––
TIMER SET
WEEK
SUN
MON
TUE
W
ED
THU
FRI
SAT
MON–SUN
EXT
START STOP SPEED
–––
SELECT : DATA SET :
+
/
–
RETURN : MENU
/
<
NEXT PUSH
>
OFF
––– OFF
––– OFF
––– OFF
––– OFF
––– OFF
––– OFF
––– OFF
:
:
:
:
:
:
:
:
:
:
:
:
:
:
:
:
:
:
––– OFF
––––
––––
––––
––––
––––
––––
––––
––––
––––
––––
––––
––––
––––
––––
––––
––––
TIMER SET
WEEK
SUN
MON
TUE
W
ED
THU
FRI
SAT
START STOP SPEED
––– OFF
––– OFF
––– OFF
––– OFF
––– OFF
––– OFF
––– OFF
:
:
:
:
:
:
:
:
:
:
:
:
:
:
––––
––––
––––
––––
––––
––––
––––
––––
––––
––––
––––
––––
––––
––––
TIMER SET
WEEK
SUN
MON
TUE
W
ED
THU
FRI
SAT
START STOP SPEED
––– OFF
––– OFF
––– OFF
––– OFF
––– OFF
––– OFF
–––
OFF
:
:
:
:
:
:
:
:
:
:
:
:
:
:
––––
––––
––––
––08
––––
––––
––––
––––
––––
––––
––––
––––
––––
––––
TIMER SET
WEEK
SUN
MON
TUE
W
ED
THU
FRI
SAT
OS
START STOP SPEED
––– OFF
––– OFF
––– OFF
––– OFF
––– OFF
––– OFF
––– OFF
O
:
:
:
:
:
:
:
:
:
:
:
:
:
:
––––
––––
––––
0008
––––
––––
––––
––––
––––
––––
––––
––––
––––
––––
TIMER SET
WEEK
SUN
MON
TUE
W
ED
THU
FRI
SAT
START STOP SPEED
––– OFF
––– OFF
––– OFF
––– OFF
––– OFF
––– OFF
–––
OFF
:
:
:
:
:
:
:
:
:
:
:
:
:
:
––––
––––
––––
0008
––––
––––
––––
––––
––––
––––
––17
––––
––––
––––
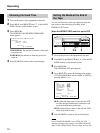
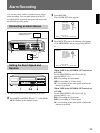
Timer Recording
You can set the timer recording to either: day-of-the-
week recording or daily recording.
Before starting, make sure that the time and date are
set properly. (See page 13.)
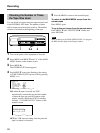
The setting of each line of WEEK except EXT (the
lowest line) changes as follows using MENU +:
SUN t MON t TUE t WED t THU t FRI t
SAT t MON-SUN t MON-SAT t MON-FRI t
SUN....
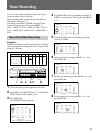
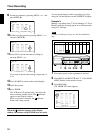
Day-of-the-Week Recording
Example 1:
Making a recording from 8:00 on Tuesday to 17:00 the
same day with the recording speed set to 24-hour mode
using an T-160 tape.
TIMER SET
WEEK
SUN
MON
TUE
W
ED
THU
FRI
SAT
START STOP SPEED
––– OFF
––– OFF
––– OFF
––– OFF
––– OFF
––– OFF
OFF
:
:
:
:
:
:
:
:
:
:
:
:
––––
––––
––––
––––
––––
––––
––––
––––
––––
––––
––––
––––
1 14 5 2-11 12