


48
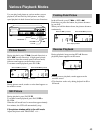
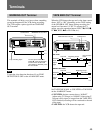
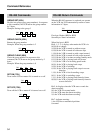
REMOTE Jack
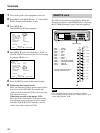
The VCR can be remotely controlled by adding the
circuit shown below to the REMOTE jack or by using
the SVT-RM10 Remote Control Unit (not supplied).
REMOTE jack
SW1 ......... STOP
SW2 ......... PAUSE
SW3 ......... REW
SW4 ......... FF
SW5 ......... PLAY
SW6 ......... REC
SW7 ......... MENU
SW8 ......... REV
SW9 ......... REC/PLAY SPEED+
SW10 ....... REC/PLAY SPEED–
SW11 ....... MEN V
SW12 ....... MENU B
Resistor tolerance should be
equal to or less than ±2%.
SW3
SW4
SW5
SW6
SW7
SW8
SW2
SW1
SW9
SW10
SW11
SW12
R2
R3
R4
R5
R6
R7
R8
R9
R10
R11
R12
R13
1.5K
0.43K
0.51K
0.62K
0.75K
0.91K
1.1K
1.3K
2.0K
2.4K
3.6K
5.6K
Notes
• Use a shielded cord less than 5 m (16 ft.) in length.
• The recording indicator on the SVT-RM10 does not light
when using with this VCR.
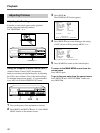
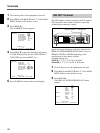
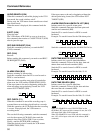
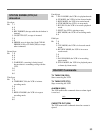
1 Turn on the power of the equipment to be used.
2 Press MENU and MENU
V
until “4” of the MAIN
MENU flashes on the monitor screen.
3 Press MENU
B
.
The GENERAL SET menu appears.
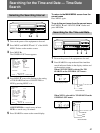
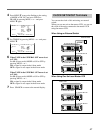
4
Press MENU V to move the flashing to “01:00” of
CLOCK ADJUST
and
set the time for clock setting
by pressing
MENU + or –
.
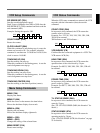
5 Press SEARCH to return to the normal display.
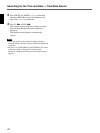
6 When using an external switch:
When you turn the switch on and an input signal is
received at the CLOCK SET IN terminal, the
clocks of all the connected VCRs will be set to the
time adjusted in step 4.
When using one unit as the master VCR:
When the clock of the master VCR comes to the
time adjusted in step 4, the signal will be output
from the CLOCK SET OUT terminal to set the
clocks of the other connected VCRs.
GENERAL SET
TAPE
TAPE IN
TAPE END
MODE
MODE
TAPE USED COUNT
CLOCK ADJUST
APC
THREAD CHECK
T
/
D SEARCH
T–160
STOP
REW
OFF
01:00
ON
OFF
CONVENTION
19200
SELECT : DATA SET :
+
/
–
RETURN : MENU
<
NEXT PUSH
>
BAUD RATE
GENERAL SET
TAPE
TAPE IN
TAPE END
MODE
MODE
TAPE USED COUNT
CLOCK ADJUST
APC
THREAD CHECK
T
/
D SEARCH
T–160
STOP
REW
OFF
01:00
ON
OFF
CONVENTION
19200BAUD RATE
SELECT : DATA SET :
+
/
–
RETURN : MENU
<
NEXT PUSH
>
Terminals