


53
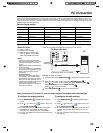
PC connection
As PCs are sometimes supplied with a ‘conventional’ CRT monitor, you may need to adjust the display settings of your PC’s
graphics card, otherwise the pictures may not appear correctly. Switch on your PC (still with your original monitor) - select “1360
x 768” for the screen resolution, and select 60 Hz for the on-screen refresh rate. Switch off your PC, then connect it to your TV
while both items are still switched off.
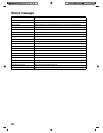
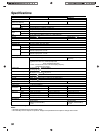
Monitor Display modes
(according to Graphic card)
After connecting a PC to your TV, you can now configure the display and audio settings.
MODE Resolution V. Frequency H. Frequency Pixel Clock Frequency
VGA 640 x 480 59.940 Hz 31.469 kHz 25.175 MHz
SVGA 800 x 600 60.317 Hz 37.879 kHz 40.000 MHz
XGA 1024 x 768 60.004 Hz 48.363 kHz 65.000 MHz
WXGA 1280 x 720 60.000 Hz 45.000 kHz 74.250 MHz
WXGA 1280 x 768 59.870 Hz 47.776 kHz 79.500 MHz
WXGA 1360 x 768 60.015 Hz 47.712 kHz 85.500 MHz
Select PC input
(1) Switch on the TV.
(2) Switch on the computer.
(3) Select the PC input mode (see
page 13). (When you use HDMI
cable, select HDMI input mode.)
Notes:
• If there is no video signal from the
computer when the unit is in PC mode,
“No Signal” will appear on the TV
screen.
• Digital PC connection via HDMI input
is not supported.
If you try to connect your PC digitally,
the TV-operation might freeze. TV will
stop to respond properly on user
commands.
Countermeasure:
Switch-off your TV and disconnect
from the 220 ~ 240V power-supply.
Disconnect the digital PC connection.
Now you may retry operating your TV.
• If a digital PC connection does show a
picture, proper working is not
guaranteed. Digital PC connection is
not granted for this TV.
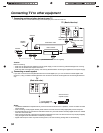
Use a PC-VGA cable (not supplied) to connect the TV to your PC.
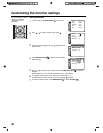
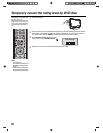
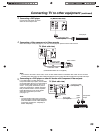
Example: To adjust the contrast.
1
During PC mode press MENU SETUP to display the Main Menu screen.
2
Press to select “Picture“, then press ENTER/CH LIST .
Press to select “Picture Setting“, then press ENTER/CH LIST .
Select CONTRAST, then press ENTER/CH LIST .
Press to adjust the contrast.
3
Press EXIT/CANCEL to return to the normal screen.
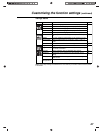
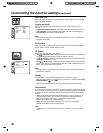
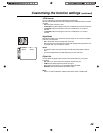
To configure the display settings
(1) Press MENU SETUP to display the Main Menu
screen.
(2) Press to select the “ Picture” menu, then
press ENTER/CH LIST .
(3) On the Picture menu you can adjust various picture
properties such as brightness, contrast, colour,
sharpness, tint, colour temperature and backlight.
(4) For a list of available menu options in the Picture menu,
see page 22.
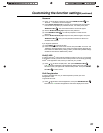
To configure the audio settings
(1) Press MENU SETUP to display the Main Menu
screen.
(2) Press to select the “ Sound” menu, then
press ENTER/CH LIST .
(3) On the Sound menu you can adjust the NICAM stereo
reception, and the bass, treble, balance and sound
effects.
(4) For a list of available menu options in the Sound menu,
see page 22.
TV (Back side view)
To HDMI/PC
AUDIO input
VGA cable
PC
All illustrated cables are not supplied
Audio cable
/
/
/
/
/