


14
4.1. Reverse one of the methods described
for lowering the cam into the housing
when lifting the cam. See section titled
"Cam and/or Input Shaft Replacement"
in this Service Manual.
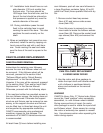
INPUT SHAFT INSTALLATION:
1. Prepare the input shaft for installation by
installing the locknuts and lockwasher on
the side of the input shaft with the long
shaft extension.
1.1. Just start the locknuts onto the thread-
ed portion of the input shaft. They will
be snugged up later and tightened after
setting the cam.
2. Measure the overall (stack) height of the
new bearing cones and bearing cups.
2.1. Compare the measured values to the
same values as measured on used bear-
ing cones and bearing cups.
2.2. Use this measurement to adjust the
amount of input shim used when
installing the new bearings.
3. Install a new bearing cone onto the long
extension of the input shaft.
3.1. Coat the shaft with anti-seize lubricant
prior to installation.
3.2. Heat a new bearing cone in a commer-
cial bearing oven that has been designed
for this purpose. Heat evenly to about
250˚F.
3.3. Alternatively. heat the bearing with a
heat gun.
WARNING
Use protective gloves while handling bearings
after they have been heated in an oven.
3.4. Using a twisting motion of the hand,
push the bearing cone against the shoul-
der on the input shaft.
CAUTION
Make sure the bearing is seated against the
shaft shoulder. Improper mounting of the
bearing can cause premature failure.
3.5. If the bearing does not immediately
seat against the shaft shoulder, use a
piece of tubing over the shaft and against
the bearing, and a soft hammer to drive
the bearing against the shoulder.
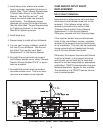
4. Install the input shaft from the long exten-
sion side of the shaft.
5. The input shaft should be a slip fit to slight
press fit into the cam. Use a rocking hand
motion and push the input shaft through
the cam.
5.1. If the shaft becomes stuck, hit the end
of the input shaft with a soft faced ham-
mer and drive the input shaft through the
cam.
5.2. In a worst case, use a hydraulic jack to
push the input shaft through the cam.
See section titled "Cam and/or Input
Shaft Replacement" in this Service
Manual for construction of a puller and
installation of wood blocks between the
cam and the housing to provide support
(hold cam in position) while pushing the
input shaft through the cam.
6. Install locknuts and lockwasher on the
opposite side of the cam. Inspect and
reuse existing locknuts and lockwashers if
they are not damaged.
6.1. Just start the locknuts onto the thread-
ed portion of the input shaft. They will
be snugged up later and tightened after
setting the cam.
7. Install a new Bearing Cone onto the short
extension of the input shaft.
7.1. Coat the shaft with anti-seize lubricant
prior to installation.