


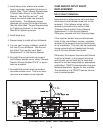
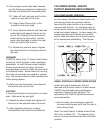

2. With a depth micrometer, measure from
the face of the dwell track on one side of
the cam to the dowel pin.
3. Repeat this measurement from the opposite
face of the dwell track to the dowel pin.
4. Use the locknuts to adjust the position of
the cam relative to the dowel pin until the
cam is centered.
4.1. Use a Spanner Wrench to tighten the
lugnut. Final tightening will occur after
the cam has been set.
5. Manually rotate the follower wheel to
engage the first cam follower into the cam.
6. With the motor and drive package rotate
the input shaft until the cam followers are
engaged in the cam. Continue rotating the
input shaft and follower wheel until the fol-
lower stud hole is positioned directly above
and centered on the follower access hole.
WARNING
CAMCO's Heavy Duty "E" Series Index Drives
cannot be "hand cranked" when completely
assembled, i.e. with follower wheel installed.
During some portions of repair, the motor
drive package is used to rotate the input shaft
and follower wheel. Some means for running
the motor at extremely low speeds is manda-
tory. Use extreme caution when operating the
motor during repairs.
7. Install a new cam follower in this position.
See section titled "Cam Follower
Installation" in this Service Manual.
8. Repeat these steps until all remaining cam
followers have been installed.
9. Apply Loctite‚ Prussian Blue #30520 or
equivalent to both sides of the entire cam
track.
10. Using the motor and drive package
slowly rotate the input shaft and cam. If
resistance is encountered, adjust the cam
axially to a more suitable position.
WARNING
CAMCO Heavy Duty "E" Series Index Drives
cannot be "hand cranked" when completely
assembled, i.e. with follower wheel installed.
During some portions of repair, the motor
drive package is used to rotate the input shaft
and follower wheel. Some means for running
the motor at extremely low speeds is manda-
tory. Use extreme caution when operating the
motor during repairs.
11. Repeat the process of applying Prussian
Blue until the unit performs smoothly and
the bluing pattern is quite uniform and there
is no looseness in any dwell position. Index
the unit through several indexes and check
the entrance tips on all tracks.
CAUTION
There should be no looseness in any dwell
position of the output.
11.1. Make sure Prussian Blue is still visible
on all tips.
11.2. If not, readjust the position of the
cam and repeat.
11.3. If after several attempts to adjust the
cam, Prussian Blue is not visible on all
tips, hand grind the tips of the entrance
track to provide relief.
CAUTION
The tips of the cam cannot be relieved prior to
installation. This procedure must be complet-
ed while installing the cam.
CAUTION
Do not grind tips excessively.
CAUTION
Tip relief must be evident. If tips are not prop-
erly relieved, the cam followers will hit the tips
when entering the cam. Eventually, this will
crack the cam follower shell. Catastrophic
damage will occur.
16