


OIL SEAL REPLACEMENT:
CAMCO recommends replacing the Input oil
seals (Item #13) anytime the input is disas-
sembled regardless of whether they are dam-
aged or not. After being in service for some
time, the sealing lip can become brittle and
easily cracked. Most damage to oil seals
occurs at assembly when recommended seal
installation procedures are not followed.
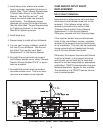
To replace the oil seal on the reducer side of
the index drive, remove the reducer and addi-
tional drive equipment as necessary to gain
access to the seal. See the reducer and other
manufacturers’ Service Manuals for instruc-
tions on removing this equipment. On the
other side of the index drive, remove visual
dwell indicator or other equipment as neces-
sary to gain access to the oil seal.
OIL SEAL REMOVAL:
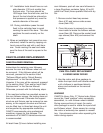
1. To remove the oil seal, use a sharp punch
and punch two (2) diametrically opposed
holes through the case of the seal. Install
sheet metal screws into the holes.
2. Use a Slide Hammer or Pliers (Vise Grips‚)
to grip the sheet metal screws to pull out
the existing seal.
CAUTION
Do not drill holes in the case of the seal.
Chips will get into the unit and they cannot be
easily removed. A punched hole provides a
better "bite" when installing sheet metal
screws into the metal case.
OIL SEAL INSTALLATION:
1. Check new seal for damage that may
have occurred prior to installation.
1.1. An oil seal with a sealing lip that is
turned back, cut or otherwise damaged
should be replaced and not used.
1.2. Likewise, if the outer face or outside
diameter is bent or otherwise dam-
aged, replace the oil seal.
2. Check the input shaft for surface nicks,
burrs or a groove from the sealing lip.
Look for spiral machine marks that can
damage the seal lip.
2.1. An input shaft with a groove from the
sealing lip can be repaired with a
Chicago Rawhide Speedi-Sleeve‚ or
similar product from another manufac-
turer. Consult the manufacturer for
installation instructions.
2.2. Alternatively, the input shaft could be
replaced instead of repaired.
3. Check the end of the input shaft and
remove any burrs or sharp edges. The
end of the shaft should be chamfered.
4. Check splines and keyways for burrs or
sharp edges.
5. Wrap the input shaft with plastic shim
stock as a temporary sleeve to guide and
protect the sealing lip.
6. Check the sealing lip direction. Make
sure the new seal faces the same direc-
tion as the original. CAMCO's standard
practice is to mount the seal so the lip
faces the lubricant or fluid to be sealed.
7. Pre-lubricate the sealing element by wip-
ing the surface with the lubricant being
retained. Apply a thin layer of "General
Electric Silicone Rubber RTV-6" or equiv-
alent to the cartridge bore as a sealant.
When the seal in pressed into place, a
bead of sealant will form at the back edge
of the steel case and prevent any leakage
around the outside edge of the seal.
8. Whenever possible use an installation tool
that has been specifically manufactured
for installing the seal.
6