


7.2. Heat a new Bearing Cone in a commer-
cial bearing oven that has been designed
for this purpose. Heat evenly to about
250˚F.
7.3. Alternatively, heat the bearing with a
heat gun.
WARNING
Use protective gloves while handling bearings
after they have been heated in an oven.
7.4. Using a twisting motion of the hand,
push the Bearing Cone against the shoul-
der on the input shaft.
CAUTION
Make sure the bearing is seated against the
shaft shoulder. Improper mounting of the
bearing can cause premature failure.
7.5. If the bearing does not immediately
seat against the shaft shoulder, use a
piece of tubing over the shaft and
against the bearing, and a soft hammer
to drive the bearing against the shoulder.
8. Use an Arbor Press to press the bearing
cups to the input cartridges.
8.1. Coat the outside of the bearing cup
with anti-seize lubricant prior to pressing
into cartridge.
9. Re-install the bearing cartridges.
9.1. Use duplicate shims to those previ-
ously removed, but adjust the shims for
the measured height of the bearings.
9.2. Apply a small bead of "General Electric
Silicone Rubber RTV-6" at the intersec-
tion of the pilot diameter and flange
before installing the bearing cartridges.
10. Install new oil seals. See section titled
"Oil Seal Replacement" in this Service
Manual for detailed instructions.
11. Check for input shaft endplay.
11.1. Endplay in the input shaft is not
permissible. There should be preload on
the input bearings. Use a dial indicator
and a pry bar to check for endplay.
11.2. Heavier preload is preferred to end-
play. Remove input shim if end play is
detected.
11.3. With just the input shaft, cam and oil
seals installed, preload can be measured
with a torque wrench. An adapter
between the input shaft and torque
wrench is required, and the torque
wrench must be capable of measured
torque values up to 6000 in-lbs. See the
table titled "Input Preload Torque" in this
Service Manual.
INPUT PRELOAD TORQUE:
Camco E-Series Index Drive
950E 1150E & 1550E 2050E
Input Preload Min.–Max.(in-lbs)
500 - 2000 1000 – 4000 2000 - 6000
CAUTION
End play in the input shaft will cause
premature failure of the Index Drive.
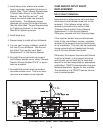
12. Re-install the reducer and any portion of
the drive package that was previously
removed.
CAUTION
Make sure the hollow shaft of the reducer and
the input shaft is properly aligned.
Misalignment of the reducer and input shaft
will cause premature failure of the Index Drive.
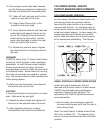
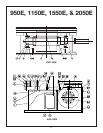
SETTING CAM:
1. Install a dowel pin in the hole provided in
the upper wall of the housing. The diame-
ter varies depending on which E-Series
Index Drive is being repaired. Polish the
dowel pin as necessary to provide a slip fit
into the hole.
15