


Page 20
Chapter 2
Parts of the System
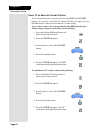
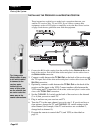
INSTALLING THE RECEIVER IN AN EXISTING SYSTEM
These instructions explain how to make basic connections between your
satellite TV receiver, dish, TV, and VCR. If you’d like to connect other
equipment, such as a DVD player or amplifier, review the Back Panel section
on page 5 and the user guide that came with the equipment.
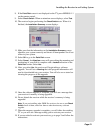
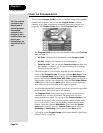
1. Connect the RG-6 cable coming from the satellite dish to S
ATELLITE IN on the
back of the receiver. Peel off the blue sticker and place it on the cable close to
the S
ATELLITE IN connection.
2. Connect a cable between the TV SET OUT on the back of the receiver and
the TV input. Peel off the white sticker and place it on the cable close to the TV
S
ET OUT connection.
3. Optionally, connect a cable between the TV SET OUT on the back of the
receiver and the input to the VCR. Connect another cable between the
VCR output and TV input.Peel off the white sticker and place it on the cable
close to the TV S
ET OUT connection.
4. Set the CHANNEL 3-4 switch on the back of the receiver to the channel
(3 or 4) that you use to watch TV.
5. Plug in and turn on your receiver and TV.
6. Tune the TV to the same channel you set in step 3. If you do not have a
clear picture, change the TV and CHANNEL 3-4 switch settings to the
other channel (for example, if the TV and receiver are on channel 3,
change both to channel 4).
7. Program the remote to control the TV (and VCR) as described on
page 11.
Tip: Using cable
labels makes it easy
to tell which cables
to connect to the
receiver ports.
Inside the front
cover of this guide
are the stickers that
are color coded the
same way as the
coaxial connections.