


Page 53
Using Troubleshooting Tools
Page 53
DIAGNOSTICS
The Customer Service Representative may ask you to open the
Diagnostics screen. Remember to have an active phone line connected to
your receiver.
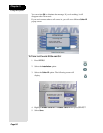
1. Press MENU, select
System Setup (6), and then select Diagnostics.
The
Diagnostics screen shows you various tests the Customer Service
Representative may ask you to perform on your receiver:
•
Connection - Tests for a valid receiver phone connection.
•
Dial Out - If “No Dial Out Pending” is displayed, the receiver does
not need to have its smart card records updated.
•
Counters - Shows you a list of diagnostic counters. Use Page Up
and Page Down to scroll through the list of counters displayed.
2. Select
Cancel.
POINT DISH AND CHECK SWITCH
The Point Dish and Check Switch screens are helpful to the Customer
Service Representatives. You may be asked to display these screens when
you call DISH Network. Even though there are items that can be changed,
only change them when specifically directed by a Customer Service
Representative.
1. Press MENU.
2. Select
System Setup (6).
3. Select
Installation (1).
4. Select
Point Dish (1). This screen shows you information to help
maximize your satellite signal. The bar at the bottom of the screen tells
you the signal strength. Green is a good signal, while red indicates the
signal is not acceptable or is from the wrong satellite.
5. Select
Check Switch to display the Installation Summary screen. The
Installation Summary screen tells you if you are receiving signals from
the satellites and which multi-dish switches you have installed, if any.
6. Select
Test only if directed by the Customer Service Representative.
7. Select
Cancel.
Tip: Before you do
the telephone test,
make sure that an
active telephone
line is connected
to the Telephone
Jack on the
receiver back
panel.
Tip: You can get a
DSL filter from
your Internet
Service Provider
or a local
electronics parts
store.