


2322
*
1
*
2
3
4
5
6
*
1
2
*
*
.
M
.
.
.
.
.
M
.
.
4
*
T
A
D
T
R
A
P
O
R
W
F
*
O
N
A
I
E
L
O
D
E
A
I
[
N
U
T
M
C
A
W
[
C
R
N
O
E
.
E
E
*
R
E
F
*
N
*
N
E
*
N
*
S
M
R
R
T
I
D
S
*
B
U
T
P
B
M
O
A
N
E
C
*
L
M
E
E
C
L
N
L
G
*
R
*
A
.
L
E
N
O
T
L
*
M
E
*
N
*
E
D
T
S
*
Y
*
E
E
*
C
*
*
*
E
S
D
*
*
N
N
*
*
*
*
*
*
*
I
*
*
U
*
*
*
*
*
*
*
C
S
*
*
*
M
*
*
*
*
*
*
N
P
*
*
*
O
*
*
M
A
*
T
T
L
*
*
*
D
*
*
.
.
*
4
I
A
*
*
*
E
*
*
*
*
*
5
N
Y
*
*
*
]
*
*
*
*
*
*
E
]
*
*
*
*
*
*
*
*
*
*
*
*
*
*
*
*
*
*
*
*
*
*
*
*
*
*
*
*
1
*
*
*
*
O
O
*
*
*
*
*
0
*
O
O
O
F
F
*
O
O
*
*
0
*
N
N
N
F
F
*
N
N
*
*
1
2
3
*
1
2
3
4
5
6
7
*
.
.
.
*
.
.
.
.
.
.
.
*
I
D
V
*
H
C
P
A
A
R
R
*
N
E
.
*
D
N
O
U
U
E
E
*
P
T
P
*
R
T
W
T
T
P
P
*
U
A
U
*
*
*
E
O
O
E
E
[
T
I
L
*
*
M
R
*
*
A
A
V
*
L
S
[
*
E
*
R
R
T
E
I
*
*
E
V
*
M
O
E
E
*
*
D
*
*
*
T
*
*
N
C
W
P
R
E
*
*
*
R
*
S
*
*
*
L
E
O
*
*
*
*
*
W
R
C
*
A
C
*
*
*
*
M
*
*
E
H
*
Y
*
M
*
*
*
O
*
*
C
E
*
*
*
O
*
*
*
D
*
*
*
C
*
*
*
D
*
*
*
E
*
*
*
K
*
*
*
E
*
*
*
]
*
*
*
*
*
*
*
]
*
*
*
*
*
*
*
*
*
*
*
*
*
*
*
*
*
*
*
*
*
*
*
*
*
*
*
*
*
*
*
*
*
*
*
*
L
*
*
*
*
*
*
*
*
*
*
*
I
O
O
*
O
O
O
O
O
O
O
*
N
F
F
*
F
F
F
F
F
F
F
*
E
F
F
*
F
F
F
F
F
F
F
*
1
2
3
*
1
2
3
4
5
6
7
*
.
.
.
*
.
.
.
.
.
.
.
*
S
E
C
[
R
R
D
T
A
R
R
*
R
X
N
A
E
E
U
A
U
E
E
*
I
T
T
L
C
C
R
P
T
P
P
[
/
*
*
A
*
*
A
E
O
E
E
S
E
R
T
R
M
S
T
*
*
A
A
R
X
E
A
M
O
P
I
E
R
T
E
I
T
C
P
/
D
E
O
N
E
*
*
/
*
*
E
S
E
E
N
D
W
P
R
E
R
E
S
E
*
D
*
*
*
L
E
X
E
N
E
N
*
*
*
M
*
A
C
T
C
D
N
S
*
*
*
O
*
Y
*
*
*
*
D
O
*
*
*
D
*
*
*
M
*
*
*
R
*
*
*
E
*
*
*
O
*
*
*
*
*
*
*
*
*
*
*
D
*
*
*
M
*
*
*
*
*
*
*
E
*
*
*
O
*
*
*
*
*
*
*
]
*
N
*
D
*
*
1
*
*
*
*
*
*
O
*
E
*
*
8
*
*
*
*
*
*
R
*
]
*
*
0
*
*
*
*
*
O
M
O
*
O
*
S
O
O
O
O
*
F
A
F
*
F
2
E
F
F
F
F
*
F
L
F
*
F
H
C
F
F
F
F
*
1
2
3
*
1
2
3
4
5
6
7
*
.
.
.
*
.
.
.
.
.
.
.
*
T
A
W
*
C
R
D
T
A
R
R
*
A
L
A
*
A
S
U
A
U
E
E
*
P
/
R
*
M
2
R
P
T
P
P
*
E
S
N
*
E
3
A
E
O
E
E
*
*
E
I
*
R
2
T
*
*
A
A
*
E
N
N
*
A
C
I
E
R
T
E
[
N
S
G
[
*
*
O
N
E
*
*
B
D
O
*
I
S
B
N
D
W
P
R
U
*
R
*
N
W
.
*
*
*
L
E
Z
*
*
*
/
*
R
*
M
*
A
C
Z
*
I
*
O
*
A
*
O
*
Y
*
E
*
N
*
U
*
T
*
D
*
*
*
R
*
*
*
T
*
E
*
E
*
*
*
]
*
*
*
]
*
*
*
*
*
*
*
*
*
*
*
*
*
*
*
*
*
*
*
*
*
*
*
*
*
*
*
*
*
*
*
*
*
*
*
*
*
*
1
*
*
*
*
*
*
*
*
*
*
*
8
*
*
*
*
*
*
*
*
*
*
9
0
*
*
*
*
*
O
O
O
*
O
6
S
O
O
O
O
*
F
F
F
*
F
0
E
F
F
F
F
*
F
F
F
*
F
0
C
F
F
F
F
*
*
*
*
*
*
*
*
*
*
*
*
*
*
*
*
*
*
*
*
*
*
*
4
*
*
*
*
*
*
*
*
*
*
*
F
*
C
O
V
S
A
B
P
H
H
O
I
*
L
N
I
R
L
U
R
O
O
T
N
*
O
S
D
I
A
Z
O
L
U
H
*
C
C
E
/
R
Z
G
I
R
E
*
K
R
O
E
M
E
R
D
R
*
*
E
/
X
/
R
A
A
M
*
*
[
S
E
V
T
S
/
M
Y
E
M
M
E
N
T
*
E
I
*
*
T
*
E
E
T
/
R
M
N
N
T
S
E
*
N
N
*
F
*
O
S
*
I
E
R
*
U
U
*
.
M
D
O
O
M
T
*
*
*
]
*
D
O
E
R
U
E
*
*
*
*
*
*
I
D
*
*
T
R
*
*
*
*
*
*
S
E
*
M
*
*
*
*
*
*
P
*
*
O
*
*
*
*
*
*
*
*
*
*
*
D
*
*
*
*
*
*
*
*
M
*
*
E
*
*
*
*
*
*
*
*
O
*
*
*
*
*
*
*
*
*
*
*
D
*
*
*
*
*
*
*
*
*
*
*
E
*
*
O
O
*
*
O
O
*
*
*
*
*
*
N
N
*
*
N
N
*
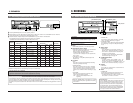
SR-9090U
REC
REC
STOP
REC
CHECK
EJECT
OPERATE
REVERSE
FIELD REV
FIELD ADV
REW PLAY
TRACKING
TIMER
SEARCH
RESET/
CANCEL
DISPLAY LOCK
HDR
CNT RESET
MENU
TIME MODE
SHIFT
ON SCREEN
OPERATE
V. LOCK
PAUSE
FF
–
+
–
+
SET
–
+
RESET/
CANCEL
MENU
TIME MODE
SHIFT
ON SCREEN
SET
–
+
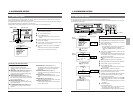
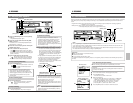
4-7 Contents of Menu Switches4-6 Menu Switch Setting
4 ON-SCREEN/MENU SWITCHES
You can customize the VCR’s functions to suit the requirements of your application using the four menu switch setting screens
accessible from the main menu screen.
• ON SCREEN/F. DISPLAY MODE
• VIDEO/VTR MODE
• SRI/EXT, ALARM/SENSOR MODE
• BUZZER/IN OUT
Each menu switch setting screen can be accessed independently from the main menu.
[MENU] button
[SHIFT 7] button
[SET +] button
[SET –] button
Main menu screen
ON SCREEN/F. DISPLAY MODE
screen
[SET +/–]
button
[MENU] button
Operation
Turn on the VCR and monitor.
Press the [MENU] button to display the main menu on the
monitor.
Press the [SHIFT 7] button to select the menu switch
setting screen you want to set or check.
• Set the cursor on the desired menu switch setting screen.
Press the [SET +/–] button.
[ The selected menu switch setting screen is shown on
the monitor.
• The menu switch setting screen consists of several menu
switch items.
To change the menu switch setting
Press the [SHIFT 7] button to set the cursor on the
menu switch item setting you want to change.
Press the [SET +/–] button to specify the set value.
Ⅲ To set more than one menu switch, repeat the above
steps and .
To check or set the other menu switch setting screens
Press the [MENU] button to restore the main menu screen and
repeat steps 3 to 5.
End menu switch setting.
To restore the normal screen from the menu switch setting
screen, press the [MENU] button twice.
• The specified setting value is stored in the VCR’s
memory and retained even if the operating power is
turned off.
• For details on menu switch items, refer to pages 23 to 26.
4 ON-SCREEN/MENU SWITCHES
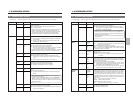
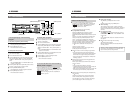
[ ]: Factory setting • The lower section in the items and set values columns shows what’s on the VCR’s display.
Screens Items Set values
Function
ON TONE 0
SCREEN 30
MODE 70
[100]
0
30
70
100
The higher the numeric value, the brighter the display.
The brightness is shown on the line under the setting value.
0 : ********** (black indication)
30 : ***
70 : *******
100 : ********** (white indication)
POWER [ON]
LOSS CNT OFF
ON
OFF
O5D 1
DATE [ON]
OFF
ON
OFF
Sets whether or not the year, month and day are shown on screen.
ON: Shown.
OFF: Not shown.
O5D 2
TIME [ON]
OFF
ON
OFF
Sets whether or not the time is shown.
ON: Shown.
OFF: Not shown.
O5D 3
Sets whether or not the recording speed mode is shown on screen.
ON: Shown.
OFF: Not shown.
REC SPEED ON
[OFF]
ON
OFF
O5D 4
ALARM CNT ON
[OFF]
ON
OFF
Sets whether or not the number of alarms is shown on screen.
ON: Shown.
OFF: Not shown.
O5D 5
O5D 6
F. DISP REC TALLY [ON]
OFF
ON
OFF
FDiP 1
Sets whether or not a warning indication (error code display) is shown
when a problem occurs.
ON: Shown.
OFF: Not shown.
Sets whether or not the [REC] indicator lights in the Record mode.
ON: Lights.
OFF: Does not light .
Sets whether or not the number of power losses is shown on screen.
ON: Shown.
OFF: Not shown.
WARNING [ON]
OFF
ON
OFF
(VCR's display)
FDiP 2
Normal screen
[MENU] button
VIDEO/VTR
MODE
screen
SRI/EXT,
ALARM/SENSOR
MODE screen
BUZZER/IN OUT
screen
Only shown when the
SA-K97U is installed.
Selects the picture quality in the Play mode.
OFF: Normal picture quality.
ON: Enhanced detail reproduction. However, the S/N ratio is degraded.
ViD 1
ViD 2
VIDEO MODE INPUT [LINE]
Y/C
LiN
Yc
DETAIL [OFF]
ON
OFF
ON
Selects input video signals.
LINE: Inputs composite video signals from the rear panel’s [VIDEO IN]
connector.
Y/C: Inputs separate Y/C video signals from the rear panel’s [Y/C IN]
connector.