


5352
*
1
2
3
*
1
2
3
4
5
6
7
*
.
.
.
*
.
.
.
.
.
.
.
*
I
D
V
*
H
C
P
A
A
R
R
*
N
E
.
*
D
N
O
U
U
E
E
*
P
T
P
*
R
T
W
T
T
P
P
*
U
A
U
*
*
*
E
O
O
E
E
[
T
I
L
*
*
M
R
*
*
A
A
V
*
L
S
[
*
E
*
R
R
T
E
I
*
*
E
V
*
M
O
E
E
*
*
D
*
*
*
T
*
*
N
C
W
P
R
E
*
*
*
R
*
S
*
*
*
L
E
O
*
*
*
*
*
W
R
C
*
A
C
*
*
*
*
M
*
*
E
H
*
Y
*
M
*
*
*
O
*
*
C
E
*
*
*
O
*
*
*
D
*
*
*
C
*
*
*
D
*
*
*
E
*
*
*
K
*
*
*
E
*
*
*
]
*
*
*
*
*
*
*
]
*
*
*
*
*
*
*
*
*
*
*
*
*
*
*
*
*
*
*
*
*
*
*
*
*
*
*
*
*
*
*
*
*
*
*
*
L
*
*
*
*
*
*
*
*
*
*
*
I
O
O
*
O
O
O
O
O
O
O
*
N
F
O
*
F
F
F
F
F
F
F
*
E
F
N
*
F
F
F
F
F
F
F
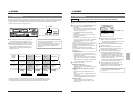
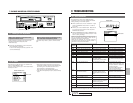
Display section
Error indication
*
1
2
3
*
1
2
3
4
5
6
7
*
.
.
.
*
.
.
.
.
.
.
.
*
T
A
W
*
C
R
D
T
A
R
R
*
A
L
A
*
A
S
U
A
U
E
E
*
P
/
R
*
M
2
R
P
T
P
P
*
E
S
N
*
E
3
A
E
O
E
E
*
*
E
I
*
R
2
T
*
*
A
A
*
E
N
N
*
A
C
I
E
R
T
E
[
N
S
G
[
*
*
O
N
E
*
*
B
D
O
*
I
S
B
N
D
W
P
R
U
*
R
*
N
W
.
*
*
*
L
E
Z
*
*
*
/
*
R
*
M
*
A
C
Z
*
I
*
O
*
A
*
O
*
Y
*
E
*
N
*
U
*
T
*
D
*
*
*
R
*
*
*
T
*
E
*
E
*
*
*
]
*
*
*
]
*
*
*
*
*
*
*
*
*
*
*
*
*
*
*
*
*
*
*
*
*
*
*
*
*
*
*
*
*
*
*
*
*
*
*
*
*
*
1
*
*
*
*
*
*
*
*
*
*
*
8
*
*
*
*
*
*
*
*
*
*
9
0
*
*
*
*
*
O
O
O
*
O
6
S
O
O
O
O
*
F
F
O
*
F
0
E
F
F
F
F
*
F
F
N
*
F
0
C
F
F
F
F
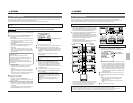
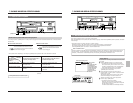
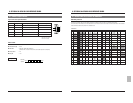
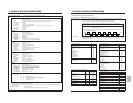
Measures
Turn the operating mode on again.
Turn the operating mode on again.
Turn the operating mode on again.
Turn the operating mode on again.
Turn the operating mode on again.
Turn the operating mode on again.
Turn the operating mode on again.
Turn the operating mode on and
wait until the error indication goes
out.
Clean the heads with a head
cleaning tape, then check the
recording picture quality again. The
tape may be defective. Replace the
tape and check again.
If the picture quality is still inferior,
contact your local JVC dealer.
Consult your local JVC dealer for
replacement of the built-in battery.
Input video signals.
Consult your local JVC dealer.
Replace the cassette.
Consult your local JVC dealer.
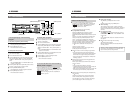
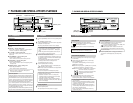
SR-9090U
REC
REC
STOP
REC
CHECK
EJECT
OPERATE
REVERSE
FIELD REV
FIELD ADV
REW PLAY
TRACKING
TIMER
SEARCH
RESET/
CANCEL
DISPLAY LOCK
HDR
CNT RESET
MENU
TIME MODE
SHIFT
ON SCREEN
OPERATE
V. LOCK
PAUSE
FF
–
+
–
+
SET
–
+
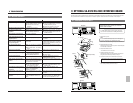
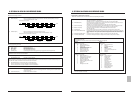
8 TROUBLESHOOTING
8-1 Error Indications
Error indications are shown on the display whenever
condensation occurs or there are problems with cassette
loading, unloading or mechanism operation.
5 When a problem occurs, the error indication “E-**” lights
(when the <WARNING> menu switch in <F. DISP> is
set to “ON”).
5 When any one of error indications (E01 - E08) is shown,
a 12-V warning signal is output from the rear panel’s
WARNING OUT connector.
5 When the <WARNING> menu switch in <BUZZER> is set to
“ON”, the buzzer sounds if a problem occurs (E-01 - E-08
and E-11 (during recording)).
When an error indication appears or the buzzer sounds,
turn the operating mode on again to clear the error
indication and buzzer sound (E-01-E07).
When the error indication “E-**” is shown, turning the
operating mode on again may not clear the problem. In
this case, consult your local JVC dealer.
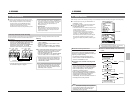
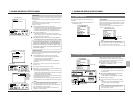
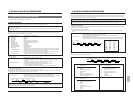
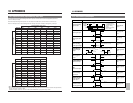
7 PLAYBACK AND SPECIAL-EFFECTS PLAYBACK
7-7 Tracking/V. Lock Adjustment
When a picture moves up and down in the
Still mode and Timelapse Play mode
Press either the [V.LOCK+/–] button to minimize vertical
jitter.
When noise appears in the picture in the
Play/Field Advance mode
Tracking adjustment is possible in the following modes.
• 2H (SP), 6H (EP) and timelapse play mode
• Field advance play
5 Press either the [TRACKING +/–] button until picture
noise is eliminated or minimized.
To return to the Tracking Preset mode, press the + and
– buttons simultaneously.
[V.LOCK +/–] buttons
[TRACKING +/–] buttons
When the picture is distorted, set the <V. PULSE> menu
switch in <VIDEO MODE> to “ON”.
This menu switch is effective only in the 2H and 6H modes.
Normally set to “OFF”.
7-8 V. PULSE
• When cameras synchronized with a power supply are
switched with a switcher, the pictures may be distorted at
the switching point. This switch locks the monitor to
prevent distortion of the displayed picture.
(Only operates in the Normal Play [2H/6H] mode)
• In the Still or Timelapse Play mode, V. pulses are always
output.
VIDEO/VTR MODE screen
BUZZER screen
Buzzer sound
Set to “ON”.
VCR operation
The operating mode is turned off.
The operating mode is turned off.
The operating mode is turned off.
The operating mode is turned off.
The operating mode is turned off.
The operating mode is turned off.
The operating mode is turned off.
The cassette is ejected and the
drum starts rotating.
Cassette loading is not possible.
The head cleaner in the VCR
cleans the heads.
If a power failure occurs, clock and
timer setting data and record/
playback speed settings may be
reset.
—
—
The cassette is ejected. The error
indication is shown only while the
cassette is being ejected.
The operating mode is turned off.
The operating mode is turned off.
Error
indication
E-01
E-02
E-03
E-04
E-05
E-06
E-07
E-08
E-09
E-10
E-11
E-12
E-13
E-98
E-99
Contents
Problem with loading operation
Problem with unloading operation
Problem with supply reel rotation
Problem with drum rotation
Problem with take-up reel rotation
Problem with capstan rotation
Problem with eject operation
Condensation
Error with recording check
(recording defect)
Insufficient battery capacity for
clock and timer backup.
No input video signal
It is not possible to write in
EEPROM.
The tape is broken.
System error
System error
This unit uses a microprocessor and may not function properly if there is external noise or interference. In this case, turn the
operating mode off and unplug the power cord from the AC outlet. Then plug the power cord in again and check operation.
See page 1-6 “1.3.4 Emergency history”.
For servicing
→