


3130
SR-9090U
REC
REC
STOP
REC
CHECK
EJECT
OPERATE
REVERSE
FIELD REV
FIELD ADV
REW PLAY
TRACKING
TIMER
SEARCH
RESET/
CANCEL
DISPLAY LOCK
HDR
CNT RESET
MENU
TIME MODE
SHIFT
ON SCREEN
OPERATE
V. LOCK
PAUSE
FF
–
+
–
+
SET
–
+
RESET/
CANCEL
MENU
TIME MODE
SHIFT
ON SCREEN
SET
–
+
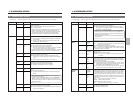
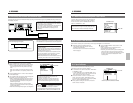
6-3 Timer Recording
This unit is provided with 2 different setting screens for timer recording program; one allows you to specify the day of week, the
other allows you to specify a date (a holiday, for example). You can select the desired setting screen from the main menu
screen.
• Program timer setting: Day-of-the-week (Sun. to Sat.) timer recording program and daily timer recording program are
available (for up to 8 programs).
• Holiday setting: Timer recording can be programmed for a specified date.
* The holiday setting has priority over the program timer setting.
6 RECORDING
6 RECORDING
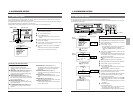
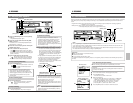
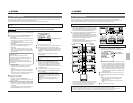
6-2 Recording Basic Operation
[TIMER] button
[SET +] button
[SET –] button
[SHIFT7] button [SHIFT4] button
[MENU] button
Note:
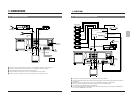
• When a tape recorded in this unit is played back on
another VCR (except another SR-9090U), noise may
appear in the picture.
If the recording speed is as shown below, the VCR
cleans the heads automatically and continues recording
whenever continuous 24-hour recording is performed.
Normal timelapse mode: 72H or more
HDR timelapse mode: 240H or more
Images recorded during the cleaning period may be
unstable due to the interference with the servo control.
This is not a malfunction.
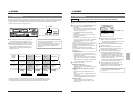
Timer Recording Program Setting
5 Timer recording programming for the specified day of the week
(Example)
HDR is performed in the 24-hour recording speed mode from 8:00 a.m.
to 5:00 p.m. on Saturday.
Turn on the VCR and monitor and engage the Stop mode.
Press the [MENU] button.
[The main menu is shown on the monitor.
Select the HDR mode.
Press the [SHIFT 7] button to move the cursor to <VIDEO/VTR
MODE> on the main menu. Then press the [SET +/–] button.
[The <VIDEO/VTR MODE> menu is shown on the monitor.
Press the [SHIFT 7] button to put the cursor on <HDR>.
Press the [SET +/–] button to set <HDR> to “ON”.
Press the [MENU] button to restore the main menu screen.
Notes:
• Timer programming is not possible if the date and time are not set.
If you select program timer or holiday setting from the main menu when the date and time have not been set, the clock
setting screen opens. Set the date and time.
• Do not try to program the regular timer or holiday timer when the Timer Record mode is engaged. To do so, you must
first release the Timer Record mode by pressing the [TIMER] button.
Preparation
5 Make sure all equipment is connected correctly.
5 Check the current time.
5 Load a cassette with safety tab in place.
If a cassette is loaded when the operating mode is off, the operating mode is switched on automatically (auto operate on
function).
[STOP] button
[REC CHECK] button
[REC] button
[OPERATE] button
[PLAY] button
[PAUSE] button
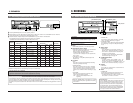
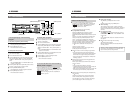
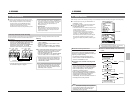
Recording
check
Recording
Normal
[REC CHECK] button
Error code “E-09” is
shown for 10 seconds.
Auto head
cleaning
Recording
Defective
During
recording
To check the recording
● To check recording in the Timelapse mode, the
recording duration must be equivalent to at least 8
seconds at 2H(SP) or 6H(EP) speed. Recording
check cannot be performed correctly if the recording
duration is too short. (Example : In the 960-hour
normal timelapse mode, the recording duration shoud
be 64 minutes or more.)
● During recording check, the audio signal is not output.
5 Press the [REC CHECK] button during recording.
→ The tape is automatically played back in reverse for
about 5 seconds, then the Play mode is engaged to
allow you to check recording. After the sequence
has played back, the recording mode is automatically
re-engaged at the point where the recording was
interrupted.
• During playback in the Recording Check mode, check
the picture to ensure that the recording is satisfactory.
If the signals are not recorded properly, the built-in
head cleaner cleans the heads and recording
continues. In this case, the error code “E-09” is shown
on the display for about 10 seconds.
SR-9090U
REC
REC
STOP
REC
CHECK
EJECT
OPERATE
REVERSE
FIELD REV
FIELD ADV
REW PLAY
TRACKING
TIMER
SEARCH
RESET/
CANCEL
DISPLAY LOCK
HDR
CNT RESET
MENU
TIME MODE
SHIFT
ON SCREEN
OPERATE
V. LOCK
PAUSE
FF
–
+
–
+
SET
–
+
*
*
*
*
*
*
*
*
*
*
*
*
*
*
*
*
*
*
*
*
*
*
*
4
*
*
*
*
*
*
*
*
*
*
*
F
*
C
O
V
S
A
B
P
H
H
O
I
*
L
N
I
R
L
U
R
O
O
T
N
*
O
S
D
I
A
Z
O
L
U
H
*
C
C
E
/
R
Z
G
I
R
E
*
K
R
O
E
M
E
R
D
R
*
*
E
/
X
/
R
A
A
M
*
*
[
S
E
V
T
S
/
M
Y
E
M
M
E
N
T
*
E
I
*
*
T
*
E
E
T
/
R
M
N
N
T
S
E
*
N
N
*
F
*
O
S
*
I
E
R
*
U
U
*
.
M
D
O
O
M
T
*
*
*
]
*
D
O
E
R
U
E
*
*
*
*
*
*
I
D
*
*
T
R
*
*
*
*
*
*
S
E
*
M
*
*
*
*
*
*
P
*
*
O
*
*
*
*
*
*
*
*
*
*
*
D
*
*
*
*
*
*
*
*
M
*
*
E
*
*
*
*
*
*
*
*
O
*
*
*
*
*
*
*
*
*
*
*
D
*
*
*
*
*
*
*
*
*
*
*
E
*
*
*
*
*
*
*
*
*
*
1
2
3
*
1
2
3
4
5
6
7
*
.
.
.
*
.
.
.
.
.
.
.
*
I
D
V
*
H
C
P
A
A
R
R
*
N
E
.
*
D
N
O
U
U
E
E
*
P
T
P
*
R
T
W
T
T
P
P
*
U
A
U
*
*
*
E
O
O
E
E
[
T
I
L
*
*
M
R
*
*
A
A
V
*
L
S
[
*
E
*
R
R
T
E
I
*
*
E
V
*
M
O
E
E
*
*
D
*
*
*
T
*
*
N
C
W
P
R
E
*
*
*
R
*
S
*
*
*
L
E
O
*
*
*
*
*
W
R
C
*
A
C
*
*
*
*
M
*
*
E
H
*
Y
*
M
*
*
*
O
*
*
C
E
*
*
*
O
*
*
*
D
*
*
*
C
*
*
*
D
*
*
*
E
*
*
*
K
*
*
*
E
*
*
*
]
*
*
*
*
*
*
*
]
*
*
*
*
*
*
*
*
*
*
*
*
*
*
*
*
*
*
*
*
*
*
*
*
*
*
*
*
*
*
*
*
*
*
*
*
L
*
*
*
*
*
*
*
*
*
*
*
I
O
O
*
O
O
O
O
O
O
O
*
N
F
F
*
O
F
F
F
F
F
F
*
E
F
F
*
N
F
F
F
F
F
F
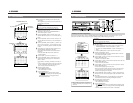
Press the [OPERATE] button to turn the operating
mode on.
[The [OPERATE] indicator lights.
Select the recording speed mode with the [TIME
MODE +/–] button.
For details, refer to “5-2 Recording/Playback Speed
Mode Selection” on page 28.
Select the on-screen display position with the [ON
SCREEN 7/f] button.
Insert a cassette with safety tab in place.
[The (
) cassette indicator lights on the display.
* If a cassette is loaded when the operating mode is off,
the operating mode is switched on automatically (auto
operate on function).
Press the [REC] button to start recording.
[ The recording indictor lights on the display,
showing that the Record mode is engaged.
* No sound is recorded during Timelapse Recording.
To stop recording temporarily
Press the [PAUSE] button.
[ The record-pause indicator is shown on
the display and the Pause mode is
engaged.
HDR
Main menu screen
VIDEO/VTR MODE screen
* If the VCR remains in the Record-Pause mode for
about 3 minutes, the head drum stops rotating to
protect the tape. Although the Record-Pause mode
remains engaged, there may be some distortion in the
picture at the recording transition when you start
recording again.
To start recording again
Press the [PLAY] button.
[ The record-pause indicator on the display
goes out and the Recording mode is
engaged.
To stop recording
Press the [STOP] button.
[The tape stops and the Stop mode is engaged.