


76
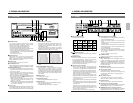
1-1 Major Features
1 INTRODUCTION
5 Extended timelapse recording for up to 960 hours
Recording times are selectable from 2 hours (SP mode),
6 hours (EP mode) and 24/48/72/120/168/240/480/960
(Timelapse mode) (when T-120 tape is used).
5 High-resolution recording
Delivers horizontal resolution of more than 400 lines
even in color mode.
*When a tape recorded on this unit is played back on
another VCR, noise may appear on playback picture.
5 High-density recording (HDR) function
Using the EP head, the tape is advanced at a fine pitch
for timelapse recording. In this way, about three times
more information is recorded in the same period than in
conventional timelapse modes. While this results in
some degradation of picture quality, the increased
coverage allows you to analyze the development of a
situation in greater detail. The actual recording duration
on the tape is the same as that of an ordinary timelapse
recording (select with menu switch <HDR>).
5 Alarm recording function
When an alarm signal is input in the Record mode, the
2/6-hour mode is automatically engaged. Alarm
recording time can be selected from 5, 10, 15, 30, 60,
120, or 180 sec., to tape end, or set manually.
An index code is automatically recorded at the start
point of the alarm recording for use as an alarm cue
signal. Alarm recording points can be accessed quickly
with the alarm search function.
5 Sensor recording
Whenever an alarm signal is input in the Stop mode
(Stop, Timer Recording Standby or Operating Off
mode), the Record mode is automatically engaged.
5 Time/date generator
Superimposes date, month, year, hour, minute and
second on the image during recording. Also allows you
to display the number of alarms, alarm time, and the
number of the power failures on a monitor.
5 Timer-recording function
Up to 8 programs can be set for daily, weekly, or
weekday timer-recording. You can also set timer
recording for up to 16 days a year by specifying the date
(holidays, for example).
5 Tape position search function
You can automatically search the start of an alarm
recording or search for a recording made at a specified
date and time.
5 Recording check function
Recording conditions (quality) can be checked at any
time during recording by pressing the recording check
button.
5 Operation lock system
The secret operation lock system prevents an accidental
or deliberate interference with VCR operation.
5 Camera switching signal output terminal
5 Warning function
Error indications are shown on the front panel display.
Error warnings include condensation and problems with
cassette loading, cassette unloading, or the rotating
system operation mode.
5 Operating mode-off video throughout function
Even when the operating mode is off, the camera’s EE
input can be output from the VCR.
5 Series recording function
Two or more SR-9090U can be connected for extended,
long-term series recording. As the tape in each VCR
reaches the end, the next unit in the series will
automatically start recording.
5 Automatic re-start of recording after a power failure
5 Time adjust function
With the IN/OUT terminal for time adjustment, the time
difference can be set to “0” with multiple SR-9090Us
connected. (adjustment time: 00:00/12:00)
5 Digital hour meter display
5 Repeat playback/recording
5 Alarm recording, tape end and warning electronic
buzzer
5 Recording control with external activation signal
5 Counter end function
5 External timer connection
5 Summer time compensation function
5 Wired remote control (optional)
Used when an optional SA-K97U RS-232C interface
board is installed.
5 RS-232C control
The SR-9090U can be controlled via a personal
computer. Operation status can be monitored on the
computer.
This VCR incorporates precision mechanical parts which will collect dirt over time and ultimately deteriorate and wear out.
Over long periods of use, dirt and dust accumulates on the heads, drums and tape transport mechanisms. Dust which
penetrates the VCR (especially during outdoor use) also promotes the wear and deterioration of mechanical parts by causing
poor contact between tape and heads. This also prevents the VCR from maintaining video and audio quality at high levels.
To prevent wear and deterioration, clean the heads regularly using a head cleaning tape. However, because a head cleaning
tape alone cannot clean the entire tape transport mechanism, this should also be inspected periodically to prevent any
problems that could result from a sudden failure.
As replacement and adjustment of parts require advanced skills and specialized equipment, please contact the person in
charge of professional video equipment at your nearest JVC-authorized service agent for servicing.
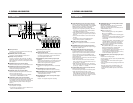
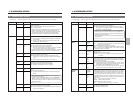
1-2 Periodical Maintenance
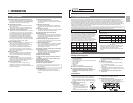
Monitoring Usage Time
The total operation time reached by an ordinary home VCR
in 5 or 6 years may be reached by a professional VCR in
as few as 5 or 6 months. Therefore, it is important that the
total hours of operation be carefully monitored. An hour
meter in the on-screen display (see page 20) shows the
accumulated time. In the chart below, the hours
accumulated in each month are shown in relation to the
number of hours used per day. Times shown in the shaded
area indicate that maintenance should be performed.
Running time 1000H 2000H 3000H 4000H
Drum ass’y (including heads) ^ ⅜⅜ⅷ
Pinch rollers ^ ⅜⅜ⅷ
Drive parts ^^ ^ ⅜
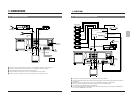
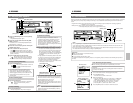
1-3 Precautions
5 Condensation
When cold beer is poured into a glass, water drops
appear on the glass’s surface. This phenomenon is
called “condensation”. When condensation occurs on
the VCR’s head drum and tape guides it may damage
the tape.
5 Condensation occurs in the
following cases:
• When the VCR is moved from a
cold place to a warm place.
• In a room that has just been heated
or in an area directly exposed to a
cooler.
• When there is excessive humidity.
Condensation
5 When condensation is expected to occur
Turn the power of the VCR on before use.
5 If condensation has occurred
The VCR automatically ejects the cassette and the error
indication “E-08” blinks on the display. Operation is
disabled until the “E-08” indication on the display goes out.
Periodic Maintenance
Check or replace the following mechanical parts according
to the running time.
Head drum
Video tape
1 INTRODUCTION
^ : Cleaning
⅜ : Check or replace as required.
ⅷ : Replace
• Maintenance requirements may vary depending on the
operating environment and usage. The information
above should be used as a reference guide.
Replace the built-in lithium battery approximately every
two years.
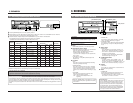
SR-9090U
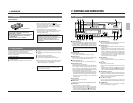
REC
REC
STOP
REC
CHECK
EJECT
OPERATE
REVERSE
FIELD REV
FIELD ADV
REW PLAY
TRACKING
TIMER
SEARCH
RESET/
CANCEL
DISPLAYLOCK
HDR
CNT RESET
MENU
TIME MODE
SHIFT
ON SCREEN
OPERATE
V. LOCK
PAUSE
FF
–
+
–
+
SET
–
+
Usage
1 month 2 months 3 months 6 months 12 months
time per
day
2 hours 60 120 180 360 720
8 hours 240 480 720 1440 2880
12 hours 360 720 1080 2160 4320
24 hours 720 1440 2160 4320 8640
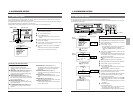
Handling and storage place
5 Avoid using the unit in places subject to the
following conditions:
• extreme heat or cold
• strong magnetic fields (do not use a transceiver within 2
meters of this unit)
• high humidity
• dust and soil
• vibrations
• variations in temperature
5 Use this unit in horizontal (flat position) only.
5 To avoid overheating the unit, do not block
ventilation slots or stack the units. If the internal
temperature rises too high, the tape may be
damaged.
5 Do not leave the unit in the Still or Record Pause mode
for a long time as this may damage the tape.
After about 3 minutes, this unit automatically enters the
Stop mode.
5 Handle the unit carefully
• Do not place anything heavy on the unit (a monitor,
etc.). A malfunction may occur.
• Do not put any foreign substance into the cassette
loading slot.
• Avoid violent shocks to the recording chassis during
transportation. Remove the cassette tape from the unit
for transportation.
5 Turn off the power to save electricity when not
using the unit.
See page 2-2 “MAINTENANCE AND CHECK”
For servicing
→