


1110
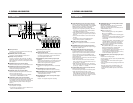
2-2 Display2-1 Front Panel
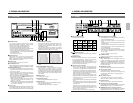
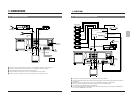
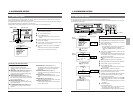
2 CONTROLS AND CONNECTORS
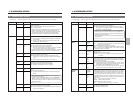
w [TIME MODE/SET +/–] buttons
• Use to select the recording and playback speed mode.
Available recording/playback speed modes vary
depending on the setting of menu switch <HDR> on the
<VTR MODE> screen.
Each time these buttons are pressed, the recording/
playback speed mode changes as follows. The recording/
playback speed mode is shown on the display.
HDR recording: OFF HDR recording: ON
2H: Standard 2H: Standard
6H: 3x 6H: 3x
24H: 24-hour SP timelapse 24H: 24-hour EP timelapse
48H: 48-hour SP timelapse 48H: 48-hour EP timelapse
72H: 72-hour SP timelapse 72H: 72-hour EP timelapse
120H: 120-hour SP timelapse 120H: 120-hour EP timelapse
168H: 168-hour SP timelapse 168H: 168-hour EP timelapse
240H: 240-hour SP timelapse 240H: 240-hour EP timelapse
480H: 480-hour SP timelapse 480H: 480-hour EP timelapse
960H: 960-hour SP timelapse 960H: 960-hour EP timelapse
• Also use these buttons during date/time setting, timer
program setting and menu switch setting to specify setting
values.
e [ON SCREEN/SHIFT 7/t] buttons
• Use these buttons on the normal screen to move the
display position or recording position of on-screen
information. The position can be moved down by pressing
the 7 button and to the right by pressing the t button.
• Use these buttons on the menu screen to select the desired
item in date/time setting, timer program setting and menu
switch setting.
r Display section
For details, refer to page 11.
t [OPERATE] indicator
Lights when the [OPERATE] button is turned on.
y [HDR] indicator
Lights in the HDR recording and HDR playback modes.
* HDR: High Density Recording
• For details on HDR recording, refer to page 28.
^ [SEARCH] button
Use to search the alarm recorded section or a section
recorded at a specified date and time. In the Stop mode,
select the search mode by pressing this button.
• Press once to engage the Alarm Search mode.
• Press twice to engage the Alarm Scan mode.
• Press three times to engage the Date/Time Search mode.
• Press four times to release the search mode.
After the search mode is selected with this button, press
the [FF] or [REW] button to execute the search operation
in the selected mode.
For details, refer to page 49.
& [DISPLAY] button
Selects which data — current time, control tape counter
(00
H 00M 00S — 23H 59M 59S) or reel tape counter (0 —
9999) — is displayed. Each time this button is pressed, the
display switches to the next item.
* [LOCK] button
Press to activate the operation lock function.
( [CNT RESET] button
When the display shows the control tape counter or reel tape
counter, press this button to reset to “00
H00M00S” or “0000”.
) [RESET/CANCEL] button
• In the Timer Program Setting mode, press this button to
cancel the program settings. For details, refer to “Timer
Recording” on page 36.
• Also press this button to interrupt alarm recording or to
reset the alarm input data or power loss (power failure)
data. For details, refer to pages 21 and 39.
• Resets the seconds in the currently displayed time to 00
when pressed together with the
( [CNT RESET] button
(except in menu setting mode).
- When the seconds value is 29 or less, the minutes value
is the same but the seconds value is reset to 0. (eg.
12:34:29 [ 12:34:00)
- When the seconds value is 30 or more, the seconds value
is reset to “00” and the minutes value is increased by one.
(e.g. 12:34:30 [12:35:00)
q [MENU] button
Press to display the date/time, timer program, and various other
menu setting screens, as well as the hour meter, on the
monitor. Press again to cancel the menu or hour meter display.
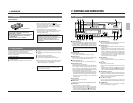
2 CONTROLS AND CONNECTORS
2 3
4
5
1 6
7
8
9
13
11
10
12
13
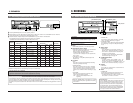
1 Operation mode display
Shows the operation modes.
Playback Recording
Rewind
Fast-
forward
Timelapse
playback
Still
Record-
pause
Rewind
search
Fast-forward
search
Reverse
playback
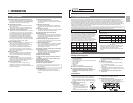
5 Recording/playback speed display
• Normally shows the recording/playback speed mode set
with the [TIME MODE] button.
• Shows the following indications in the Alarm Search
mode.
During alarm search: Shows the specified alarm number
(example: AL12)
During alarm scan: Shows the alarm scan mode (ALSC).
During date/time search: Shows the specified date and
time (example 2310).
• Shows setting details in menu switch setting.
• When an error occurs, the error indication “E-**” blinks (if
the menu switch <WARNING> on the <F. DISP> screen
is set to “ON”).
For error indications, refer to page 53.
6 [TIMER] indication
Lights during timer recording programming/operation.
7 [REPEAT] indication
When <REPEAT REC> in the <VTR MODE> menu is set
to “ON”, this indication is shown. When <TAPE END
MODE> in the <ALARM/SENSOR MODE> menu is set to
“STOP” and the Repeat Record mode is engaged, the
[REPEAT] indication goes out if alarm recording or sensor
recording takes place.
8 [OVERLAP] indication
Blinks when programs scheduled for timer recording overlap.
9 Timer program number
All programmed timer recording numbers light.
During timer recording, the number of the program being
recorded blinks. When the timer recording ends, this
number goes out.
0 [AL] (alarm) indication
Shown during alarm recording or sensor recording.
Blinks when alarm recording or sensor recording ends.
! [LOCK] indication
Lights when the operation lock function is activated.
@ [AL REC] (alarm recording) indication
Lights when the menu switch <REC MODE> on the <ALARM/
SENSOR MODE> screen is set to “ALARM” or “ALL”.
# [SENSOR REC] (sensor recording) indication
Lights when the menu switch <REC MODE> on the <ALARM/
SENSOR MODE> screen is set to “SENSOR” or “ALL”.
24 25 26
22
23
20
19181716
SR-9090U
REC
REC
STOP
REC
CHECK
EJECT
OPERATE
REVERSE
FIELD REV
FIELD ADV
REW PLAY
TRACKING
TIMER
SEARCH
RESET/
CANCEL
DISPLAY LOCK
HDR
CNT RESET
MENU
TIME MODE
SHIFT
ON SCREEN
OPERATE
V. LOCK
PAUSE
FF
–
+
–
+
SET
–
+
21
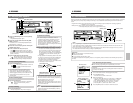
* ( ) mark in the Rec/Pause mode is shown in red.
2 Cassette indication
Lights when a cassette is loaded. Blinks when a cassette
is being ejected.
3 [SP/EP] indication
Shows the standard (SP) mode or extended (EP) mode
during recording/playback. During ordinary timelapse
recording/playback, the [SP] indication is shown.
The [EP] indication is shown during recording in the HDR
(High-Density Record) mode or during playback of a tape
section recorded in the HDR mode.
4 Tape counter/clock indication
• Shows the current time (hour: minute: second), tape
control counter (00H 00M 00S — 23H 59M 59S) or tape
reel counter (0 — 9999) when the operating mode is on.
The display can be selected with the [DISPLAY] button.
Shows the current time when the operating mode is off.
When a cassette is ejected, the tape control counter and
tape reel counter are reset automatically.
• When the cassette is rewound to the beginning in the
Repeat Recording or Auto Rewind mode using the counter
end output function, the tape control counter and tape
reel counter are reset.
• The control and reel counter counts slowly in the Timelapse
mode.
• In the timelapse mode, the control counter shows the time
equivalent to that shown when a tape is played back in the
2H or 6H mode.
(Example: The control counter advances 1 second for
about 8 minutes in the 960H ordinary timelapse mode.)
• During date/time search setting and operation, “td” is
shown in place of the seconds.
• Shows the setting item during menu switch setting.