


4544
*
1
2
3
*
1
2
3
4
5
6
7
*
.
.
.
*
.
.
.
.
.
.
.
*
S
E
C
[
R
R
D
T
A
R
R
*
R
X
N
A
E
E
U
A
U
E
E
*
I
T
T
L
C
C
R
P
T
P
P
[
/
*
*
A
*
*
A
E
O
E
E
S
E
R
T
R
M
S
T
*
*
A
A
R
X
E
A
M
O
P
I
E
R
T
E
I
T
C
P
/
D
E
O
N
E
*
*
/
*
*
E
S
E
E
N
D
W
P
R
E
R
E
S
E
*
D
*
*
*
L
E
X
E
N
E
N
*
*
*
M
*
A
C
T
C
D
N
S
*
*
*
O
*
Y
*
*
*
*
D
O
*
*
*
D
*
*
*
M
*
*
*
R
*
*
*
E
*
*
*
O
*
*
*
*
*
*
*
*
*
*
*
D
*
*
*
M
*
*
*
*
*
*
*
E
*
*
*
O
*
*
*
*
*
*
*
]
*
N
*
D
*
*
1
*
*
*
*
*
*
O
*
E
*
*
1
*
*
*
*
*
*
R
7
]
*
*
5
*
*
*
*
*
E
E
0
*
O
*
S
O
O
O
O
*
X
X
0
*
F
2
E
F
F
F
F
*
T
T
0
*
F
H
C
F
F
F
F
*
1
2
3
*
1
2
3
4
5
6
7
*
.
.
.
*
.
.
.
.
.
.
.
*
T
A
W
*
C
R
D
T
A
R
R
*
A
L
A
*
A
S
U
A
U
E
E
*
P
/
R
*
M
2
R
P
T
P
P
*
E
S
N
*
E
3
A
E
O
E
E
*
*
E
I
*
R
2
T
*
*
A
A
*
E
N
N
*
A
C
I
E
R
T
E
[
N
S
G
[
*
*
O
N
E
*
*
B
D
O
*
I
S
B
N
D
W
P
R
U
*
R
*
N
W
.
*
*
*
L
E
Z
*
*
*
/
*
R
*
M
*
A
C
Z
*
I
*
O
*
A
*
O
*
Y
*
E
*
N
*
U
*
T
*
D
*
*
*
R
*
*
*
T
*
E
*
E
*
*
*
]
*
*
*
]
*
*
*
*
*
*
*
*
*
*
*
*
*
*
*
*
*
*
*
*
*
*
*
*
*
*
*
*
*
*
*
*
*
*
*
*
*
*
1
*
*
*
*
*
*
*
*
*
*
*
8
*
*
*
*
*
*
*
*
*
*
9
0
*
*
*
*
*
O
O
O
*
O
6
S
O
O
O
O
*
O
F
F
*
F
0
E
F
F
F
F
*
N
F
F
*
F
0
C
F
F
F
F
*
1
2
3
*
1
2
3
4
5
6
7
*
.
.
.
*
.
.
.
.
.
.
.
*
I
D
V
*
H
C
P
A
A
R
R
*
N
E
.
*
D
N
O
U
U
E
E
*
P
T
P
*
R
T
W
T
T
P
P
*
U
A
U
*
*
*
E
O
O
E
E
[
T
I
L
*
*
M
R
*
*
A
A
V
*
L
S
[
*
E
*
R
R
T
E
I
*
*
E
V
*
M
O
E
E
*
*
D
*
*
*
T
*
*
N
C
W
P
R
E
*
*
*
R
*
S
*
*
*
L
E
O
*
*
*
*
*
W
R
C
*
A
C
*
*
*
*
M
*
*
E
H
*
Y
*
M
*
*
*
O
*
*
C
E
*
*
*
O
*
*
*
D
*
*
*
C
*
*
*
D
*
*
*
E
*
*
*
K
*
*
*
E
*
*
*
]
*
*
*
*
*
*
*
]
*
*
*
*
*
*
*
*
*
*
*
*
*
*
*
*
*
*
*
*
*
*
*
*
*
*
*
*
*
*
*
*
*
*
*
*
L
*
*
*
*
*
*
*
*
*
*
*
I
O
O
*
O
O
O
O
O
O
O
*
N
F
F
*
F
F
O
F
F
F
F
*
E
F
F
*
F
F
N
F
F
F
F
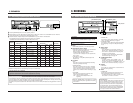
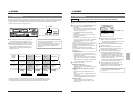
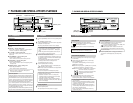
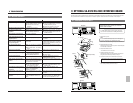
To [SERIES REC IN] terminal
To [COM] terminal
External control
equipment
AC~IN
AC120V~50/60Hz
RS-232C
CAM SW
OUT
ALARM
IN
COM
COM
ALARM
REC OUT
ALARM
RESET
TAPE
END OUT
WARNING
OUT
CLOCK
RESET IN
SERIES
RESET IN
SERIES
RESET OUT
CLOCK
RESET OUT
REMOTE
MIC
IN
OUT
AUDIO
VIDEO
Y/C
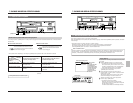
6-8 Recording with External VCR Activation Signal
Recording start/stop can be controlled externally by inputting a VCR activation signal to the [SERIES REC IN] terminal on the
SR-9090U’s rear panel.
6 RECORDING
6 RECORDING
6-9 How to Restore Recording After Power Failure
If a power failure occurs during recording, recording will
restart in the same mode as soon as power is restored.
To use this function, set the <POWER ON REC> menu
switch in <VTR MODE> to “ON”.
If this menu switch is set to “ON” and operating mode
is turned off and on again in the Stop mode, the VCR
enters the Record mode automatically. Be careful.
6-10 External Timer Recording
External timer recording can be performed by connecting the SR-9090U to an external timer.
Set the <POWER ON REC> menu switch in <VTR
MODE> to “ON”.
Power is supplied from the external timer at the
specified time and recording starts.
• Recording is performed at the preset recording speed.
If alarm recording or sensor recording is executed
before the power is supplied, the Alarm Record mode
or Sensor Record mode is released and normal
recording starts.
Check that a cassette is loaded in the VCR.
* If the cassette’s safety tab has been removed,
recording will not take place.
* This function does not work when the Timer Record
mode is engaged.
6-11 Tape End Buzzer
You can switch the buzzer sound which lets you know
when the tape ends during recording ON/OFF.
5 To sound the buzzer, set the menu switch <TAPE END>
in <BUZZER> to “ON”.
• If <CNT TAPE END> in the <SRI/EXT MODE> menu
is set to any position except “OFF”, the buzzer sounds
when the reel counter value is reached.
5 The buzzer continues to sound. To stop the buzzer
sound, set the menu switch <TAPE END> to “OFF”,
perform another operation (such as pressing the [REW]
button) or press the [OPERATE] button.
5 During repeat recording and auto rewind, the buzzer
sounds for about 2 seconds.
Connection
VCR control signal (ground signal)
Connect the [SERIES REC IN] terminal and [COM] terminal
on the SR-9090U’s rear panel to the external control equipment.
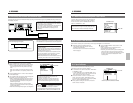
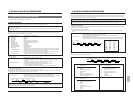
Start of recording
Stop or operating mode off
LV: 0 V
Alarm search/date and time search
• Alarm recording or sensor recording should continue for
at least 5 seconds.
• When recording is performed in the long-time timelapse
mode, date/time search will not function correctly if the
recording duration is too short.
To ensure that the date/time search operates correctly,
the recording duration must be equivalent to at least
5 seconds at Standard (2H) or EP (6H) speed.
(Example) With a 960-hour normal timelapse recording,
a recording time of 40 minutes or more is necessary.
Operation
Set the <SRI/EXT REC> menu switch in <SRI/EXT
MODE> to “EXT” to use the external recording function.
• Use the <EXT REC END> menu switch to select the
mode engaged when externally activated recording
ends.
When set to “STOP”, the VCR enters the Stop mode.
When set to “OPE OFF”, the operating mode is turned
off.
Press the [MENU] button to set the on-screen display to
the time/date display.
Load a cassette with a safety tab in place and engage the
Stop mode or turn the operating mode off.
• When a VCR activation signal (ground input) is input to
the rear panel’s [SERIES REC IN] terminal, recording
starts automatically and continues for as long as the
activation signal is input.
When the activation signal stops, the Stop mode is
engaged or the operating mode is turned off (according
to menu switch setting).
• When the activation signal is input again, recording starts.
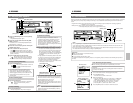
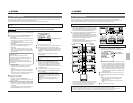
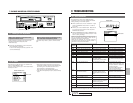
SRI/EXT MODE screen
Note:
When the TIMER indication lights or the menu switch
<REPEAT REC> in the <VTR MODE> menu is set to
“ON”, externally activated recording is not executed.
To execute repeat recording via the external recording function,
set <REPEAT REC> to “OFF” and <AUTO REW> to “ON”.
• In addition to the Stop mode and the operating mode
off status, the external recording function also
operates in the Pause mode.
• If recording is already in progress when the VCR
activation signal is input, recording continues and
stops when the activation signal is no longer input.
Set to “EXT”
VTR MODE screen
Shown only when the SA-K97U is installed
BUZZER screen
* If the external recording function is activated a hundred
times a day or more, a malfunction may occur because
the guaranteed range is exceeded.
If you want to use this unit more than a hundred times a
day, set the recording speed mode to 2H/6H and
perform regular maintenance, replacing parts as
necessary.
Set to “ON”
Set to “ON”