- 16
Notes:
If the audio format of the digital output does not
correspond to the capabilities of your receiver,
the receiver will emit a strong distorted sound or
no sound at all.
5.1 digital surround sound via the digital con-
nection can only be obtained if your receiver is
equipped with a digital multi-channel decoder.
You can obtain information about the audio
format of the current DVD via the “Disc Info“
menu (see page 28 and 33).
This recorder does not perform internal (2-chan-
nel) decoding (downmix) of a DTS sound track.
To enjoy DTS multi-channel surround sound, you
must connect this recorder to a DTS compatible
receiver via one of the recorder‘s digital audio
outputs.
Connecting to Audio/Video
(A/V) Accessories
Connect the DVD recorder‘s input sockets (AV2,
AV3 = AUDIO IN 3 / VIDEO IN 3 on the back of the
unit or AV4 = input 4 on the front of the unit (see
page 4)) to the audio/video out sockets on the ac-
cessory component using audio/video cables.
Note: If you use the S-VIDEO IN socket on the
front panel, the VIDEO IN socket on the front panel
cannot be used.
Video
S-Video
DV
L-Audio-R
L
R
VIDEO
OUTPUT
AUDIO
OUTPUT
S-VIDEO
OUTPUT
Back of the
Connector block for an accessory component
(VCR, Camcorder, etc.)
Front of the
•
•
•
•
Connecting to a Digital
Camcorder
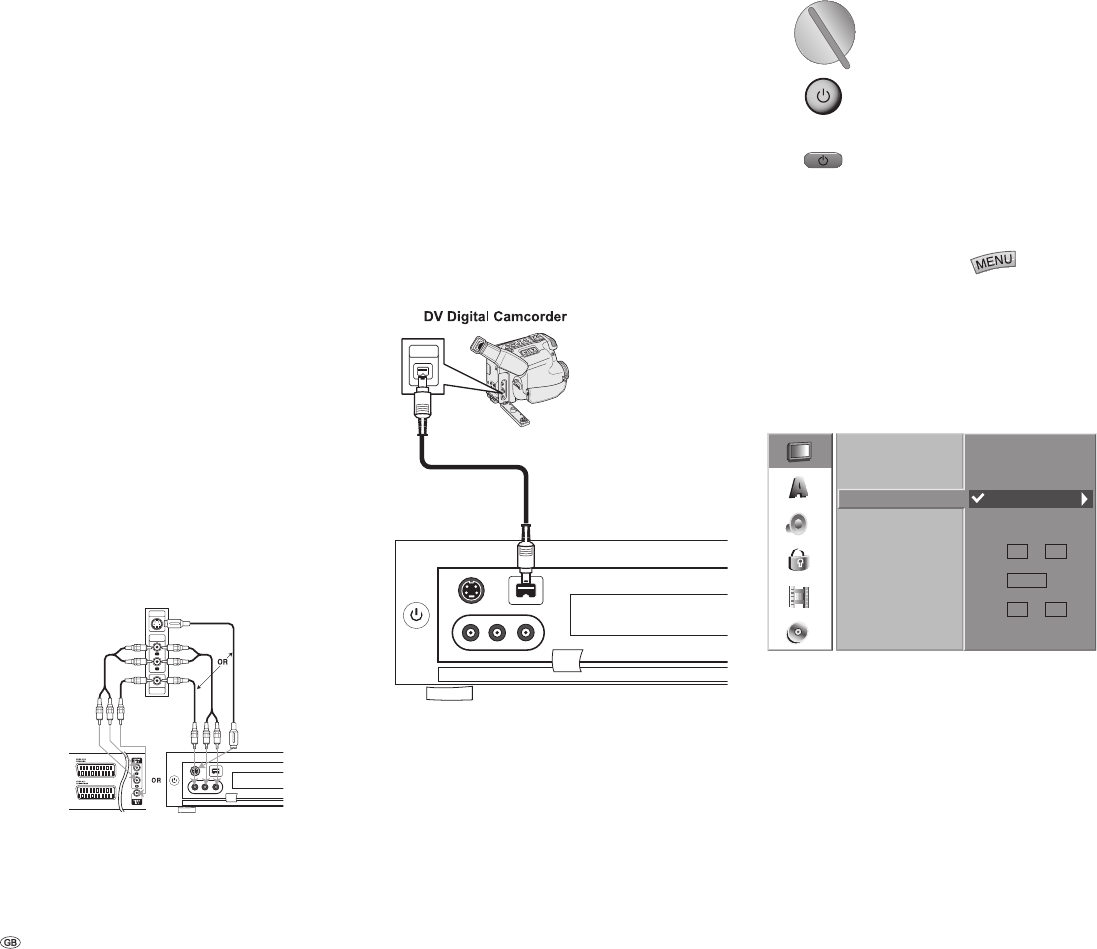
You can connect a digital camcorder (DV) or a
digital DVD-R/RW recorder to the DV IN socket on
the front panel and digitally transfer the content of
DV tapes or DVD-/RW discs onto DVD-R/RW discs.
Use a DV cable (not supplied) to connect the DV
IN/OUT socket on your camcorder/video deck to the
DV IN socket on the front panel of this recorder.
Note: Only DV units can be connected to this
socket (The source signal must be in the DV-25
format; see page 47 and 48). It is not compatible
with digital satellite tuners or S-VHS video decks.
DV
IN/OUT
Video
S-Video
DV
L-Audio-R
Basic Settings
Set the rotating switch on the
remote contol to DVD mode.
TV
DVD STB
VCR
Push the On/Off button on the
DVD recorder or ...
... the On/Off switch on the
remote control.
The menu system offers several ways of changing
settings. Most menus consist of three levels for
setting up options. If you press
, only the
fi rst and second levels of the menu system are
displayed on the screen. You can display the third
level by pressing “”. When navigating in the
menus, “” on the right side of the menu tab
shows you that the next level can be called up.
Main Menu:
- - - -Year
Time
- - - -Date /
- - - -:
Manual
Automatic
Auto Programming
TV Aspect
Program Edit
Clock Set
Display Mode
Decoder at AV1
PBC
Factory Set
Power Save Mode
1st Level 2nd Level 3rd Level
Initial Installation
