


Initial Setup (cont’d) 19
Continued from previous page
4
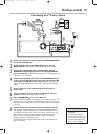
The Subtitle Language menu appears next. Press
KK
or
LL
to
choose the language you prefer for subtitles, then press OK.
The Recorder will show subtitles in this language if they are
available. If the language is not available, either there will be no
subtitles or subtitles will be in the default language of the Disc.
Some DVDs require you to choose a subtitle language from the Disc
menu. Disc preferences or defaults may override your selection in
the Recorder’s Subtitle Language menu.
To change the Subtitle Language later, see pages 37 and 66.
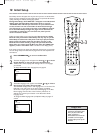
5
The TV Shape menu appears next. Press
KK
or
LL
to choose the
preferred TV Shape, then press OK.
To change the TV Shape later or for details on TV Shapes, see page 63.
6
“If you have connected the antenna - press OK” appears next. If
you have connected an Antenna or Cable TV signal to the
Recorder’s ANTENNA IN jack, press OK.
If you have not connected the Antenna or Cable TV signal, take a
moment now to do so.After the Antenna/Cable TV signal is
connected, press OK. See pages 10-16.
To reset TV channels later, or to add/delete new channel choices later, see
page 28.
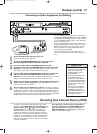
7
“Searching for TV channels” will appear, along with a scale
showing channels are being memorized.The number of channels
found will show on the screen as the searching progresses.This will
take a few minutes, depending on the number of channels available in
your area.
When the channel search finishes,“Auto ch. search complete” will
appear, along with the total number of channels found.
8
Press SYSTEM MENU.The Recorder automatically turns off,
then turns on again.You will see a DVD background screen and
some Information Boxes. See page 35.
The Recorder is ready for use!
~
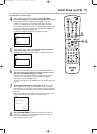
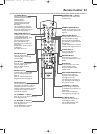
Initial Setup
Subtitle Language
English
K
L
Español
Français
Português
Italiano
Press OK to continue
Installation
Auto Ch. Programming
Auto ch. search complete
024 Channels found
To exit press
SYSTEM MENU
~
Initial Setup
TV Shape
4:3 letterbox
K
L
4:3 panscan
16:9
Press OK to continue
8
4-6
E9490UD_EN.qx3 04.9.21 10:54 AM Page 19