


EN-18
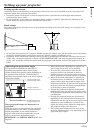
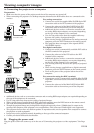
AUTO
D
V
I-D
C
O
M
P
B
N
C
Z
O
O
M
M
E
M
3
S
-V
id
e
o
OFF
ON
Video
DVI -A
16:9
MEM2
ZOOM IN/UP
LIGHT
S
ta
n
d
a
rd
M
E
M
1
STANDBY
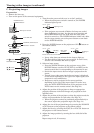
INSTALLATION
TEST PATTERN
SIGNAL SETTING
COMPONENT
FLOOR FRONT
STANDARD
0
ENGLISH
AUTO
ASPECT
MIRROR
KEYSTONE
LANGUAGE
EXPAND
opt.
Viewing video images (continued)
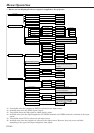
Setting the aspect ratio
You can change the aspect ratio of the input video signal (or the ratio of width to height of the image). Change the
setting according to the type of the input video signal.
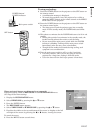
How to change the settings:
With the remote control:
1. Press any of the aspect buttons (Standard, 16:9, or ZOOM).
•Every time the ZOOM button is pressed, the zoom mode changes from
Zoom 1 to Zoom 2, to Zoom 3, and back to Zoom 1.
With the operation panel of the projector:
(See Page 23 for menu setting.)
1. Display the INSTALLATION menu.
2. Select ASPECT by pressing the { or } button.
3. Select your desired aspect ratio by pressing the $ or % button.
To cancel the menu:
4. Press the MENU button.
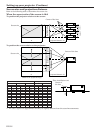
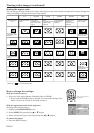
Original image
size
4:3 image (480i,
576i, 480p, 576p,
and PC)
4:3 CinemaScope
and Vista image
Squeezed 4:3
(480i, 576i, 480p,
576p)
16:9 image(1080i)
16:9 image (720p)
16 : 9
Projects images
on the full screen
(16:9)
Standard
Changes the
aspect ratio
according to the
type of the input
signal.
ZOOM1
Projects images
in the
CinemaScope size
together with
subtitles.
ZOOM2
Projects images
in the Vista size
together with
subtitles.
ZOOM3
Projects images in
the European
Vista size
together with
subtitles.
REAL
Projects images
in their original
size as input.
PC inputs not less than
1280x720 are projected on
the full screen (16:9).
Images are
projected with half
vertical pixels.
Images are
projected on the
full screen.
Bold frames are recommended modes.
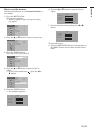
Aspect buttons (Standard,
16:9, ZOOM)