


EN-9
ENGLISH
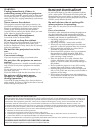
Using the remote control
2
3
4
5
6
7
1
12
8
11
10
9
13
AUTO
MENU
D
V
I-D
C
O
M
P
B
N
C
Z
O
O
M
M
E
M
3
S
-V
id
e
o
OFF
ON
Video
DVI-A
16:9
MEM2
ENTER
FOCUS–/LEFT FOCUS+/RIGHT
ZOOM IN/UP
ZOOM OUT/DOWN
LIGHT
S
ta
n
d
a
rd
M
E
M
1
C
O
N
T
B
R
IG
H
T
C
.T
E
M
P
T
IN
T
C
O
L
O
R
S
H
A
R
P
STANDBY
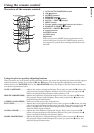
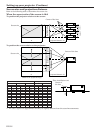
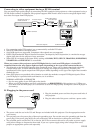
Overview of the remote control
1 AUTO (AUTO POSITION) button
2 ON ( ) button
3 SOURCE buttons
4 MEMORY buttons
5 ZOOM IN / UP (
{{
{{
{) button
6 FOCUS - / LEFT (
$$
$$
$) button
7 MENU button
8 Picture quality adjusting buttons (see below)
9 ZOOM OUT / DOWN (
}}
}}
}) button
10 FOCUS + / RIGHT (
%%
%%
%) button
11 Aspect buttons
12 LIGHT button
13 OFF button
Important:
When you press the LIGHT button, the buttons on the
remote control are lit. Press the LIGHT button again or
wait approx 15 seconds after releasing the button to turn
them off.
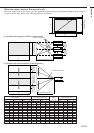
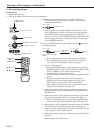
Using the picture quality adjusting buttons
When you press any of the picture quality adjusting buttons, the screen for adjusting the picture quality appears.
Adjust the picture quality by pressing the % and $ buttons. The picture quality adjustment can be made
alternatively in the PICTURE menu or the PRO PICTURE menu. (See Pages 27 and 28.) Items in the menus
are shown in parentheses below.
CONT (CONTRAST) ............ Adjusts the contrast of projected images. Every time you press the % button, the
projected image becomes brighter and more vivid. Every time you press the $
button, the projected image becomes darker and less vivid.
BRIGHT (BRIGHTNESS)... Adjusts the brightness of projected images. Every time you press the % button,
the projected image becomes brighter. Every time you press the $ button, the
projected image becomes darker.
C.TEMP (COLOR TEMP) ... Selects one of the preset color temperatures.
TINT (TINT) .......................... Adjusts the tint of projected images. Every time you press the % button, the skin
color of the projected image becomes more greenish. Every time you press the $
button, the skin color of the projected image becomes reddish. (Available only
when the NTSC signal isi input.)
COLOR (COLOR)................. Adjusts the color thickness of projected images. Every time you press the %
button, the projected image color becomes thicker. Every time you press the $
button, the projected image color becomes lighter.
SHARP (SHARPNESS) ....... Adjusts the sharpness of projected images. Every time you press the % button,
the projected image becomes sharper. Every time you press the $ button, the
projected image becomes softer.