


Chapter 2. Connecting 35
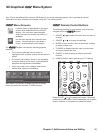
Helpful Hints for NetCommand Connections
Q. My VCR (or other device) does not have two sets of stereo audio outputs. How can I connect this device’s
audio to both the TV and the A/V Receiver?
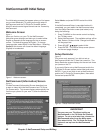
A. Connect the single set of stereo audio outputs to the TV only. Use Edit NetCommand® to change the setup of this
device. In the Connection screen of “Change” make sure both audio and video for the TV input are check marked
and the audio for the AVR input is not check marked. This will allow the NetCommand system to use the TV
outputs to transfer the device’s audio to the A/V Receiver. See Edit NetCommand in the next chapter for details.
Q. I have both the TV stereo audio output and TV digital audio output connected to the same input
designations on my A/V Receiver. How do I switch between analog audio and digital audio?
A. In most setups, analog audio is also output as digital audio, so no switching is required, and there is no need to
connect the analog output. In some circumstances, however, you may also need analog audio from the TV. For
example, MP3 audio is only output in analog format, so you must connect the TV’s analog AUDIO OUTPUT to the
A/V Receiver if you want to hear MP3 audio through the A/V receiver. Refer to your A/V Receiver user’s guide to
find out how analog/digital audio switching works.
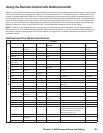
• If your A/V Receiver’s remote control has an Analog/Digital Audio key, you can use the GUIDE key with the
following models to control switching:
Mitsubishi M-VR900 Integra DTR-9.1
Denon AVR-2700 Kenwood VR-2080
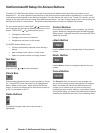
To make the switch, press the Device key on the TV’s remote control, and from the Device Selection menu,
press the Audio key. Then, with the A/V Receiver highlighted, press the GUIDE key to make the switch.
• If you have some other A/V Receiver model, use the TV’s learn function to learn the analog/digital audio
code for the GUIDE key. Follow the instructions above for using the GUIDE key.
• If your A/V Receiver has an Analog/Digital selection key on the front panel only, and not on the remote,
then your only option is to use that key to perform switching.
Q. The front panel of my A/V Receiver is too tall or too convex for the IR emitter signal to reach the remote
control sensor of the A/V Receiver. What can I do?
A. There are several possible solutions.
1. Mount the IR Emitter on the top, front edge of the A/V Receiver over the remote control sensor. Use tape to
secure it in place.
2. Mount the IR Emitter on the underside of the shelf above the A/V Receiver (if the A/V Receiver is in a cabinet).
Use double sided tape to secure it in place.
3. Some small stick-on emitters from other manufacturers may be compatible with this TV’s IR Emitter jacks.
These may be used instead of the supplied IR Emitters.
Q. I occasionally need to see the menu from my A/V Receiver. How can I connect it to the TV for this purpose?
A. You can connect the video output of the A/V Receiver to an unused input on the TV. Then use Edit NetCommand
to “Add” this as an “Other” device, not an A/V Receiver. On the “Connection” screen, indicate which TV input was
used and check mark the video box. Make sure the TV input audio box and both the audio and video boxes for
the AVR input are not check marked. You should also name this device so you can easily identify it on the Device
Selection Menu. You can also use Input 3 on the front panel.
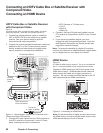
Q. I have a high definition receiver I would like to connect and it also has an S-video output I would like to be
able use as well. Is there any way to connect this receiver both ways?
A. Yes, this item will appear twice in the Device Selection Menu. Just add this unit once using the Component-1 and
once using one of the S-video inputs. Make sure you indicate that this is the same manufacturer for both. We
suggest that you connect stereo audio outputs with the S-video to the TV so that you do not need to use two inputs
on the A/V Receiver. If this is a NetCommand compatible HDTV receiver and HD or SD outputs can be switched by
remote control, see Edit NetCommand in the next chapter for NetCommand control of this feature.