


2. TV Setup 13
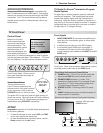
Change the Menu Language
Choosetodisplayon-screenmenusineitherEnglishor
Spanish(Español).
Select a menu language in the Setup menu.
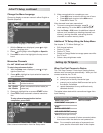
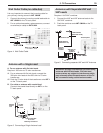
1. WiththeSetupmenudisplayed,press tohigh-
lighttheLanguageicon.
2. Press tohighlighteitherEnglishorSpanish.
3. Press
MENU
toreturnthehighlighttothetoprowof
icons.
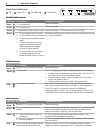
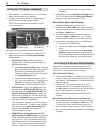
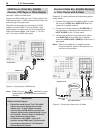
Memorize Channels
For ANT 1/MAIN and ANT 2/AUX
To start channel memorization
1. WiththeSetupmenudisplayed,press tohigh-
lighttheScanicon.
2. Press tohighlightaninputselectionbasedon
yourconnections:
Input Condition
Ant 1 Air
Ant 2 Air
Whenconnectedtoanindooror
outdoorantenna
Ant 1 Cable
Ant 2 Cable
Whenconnectedtodirectcable(no
cablebox)
3. Press
tohighlighttheon-screenSTARTbutton.
4. Press
ENTER
tostartautomaticchannelmemoriza-
tion.
To stop channel memorization before
completion, press
CANCEL
.
Start channel memorization from the Setup menu.
Additional TV Setup Using the Setup Menu
Seechapter5,“TVMenuSettings,”to:
• Editchanneloptions
• SettheTVclock
• SettheTVTimer
• SelectanEnergyModetomanagepowerusewhile
theTVisoff.
• Selectalampbrightnessmode
Initial TV Setup, continued
5. Whenmemorizationiscompleteyoucan:
• Press
MENU
oncetoreturntothetoprowoficons.
• Press
MENU
againtoreturntotheMainmenu.
• Press
EXIT
towatchTV.
Afterchannelshavebeenmemorized:
• Totunetomemorizedchannels,press
CH
/
whilewatchingTVonthe
ANT 1
or
ANT 2
inputs.
• UsetheSetup > Editmenuforadditionalchannel
options,suchasaddingordeletingchannelsfrom
memory,namingchannels,andsavingfavorite
channelsincustommemorybanks.
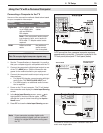
Setting Up TV Inputs
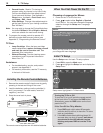
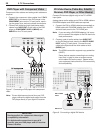
When You First Connect a Device
ThisTV’sEasyConnect™AutoInputSensingfeature
detectsmostconnectionsautomatically.Whenyoufirst
connectadevice,theTVwill:
a. detecttheconnecteddevice
b. promptyoutoidentifythedevicetype
c. promptyoutoperformNetCommandset-upfor
thedevice,ifavailable
d. repeatthesestepsforanyadditionalnewly
detecteddevices
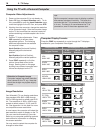
ThetablesbelowstatewhichconnectionstriggerAuto
InputSensing.
Auto Detection Active No Auto Detection
INPUT
videojacks
ANT 1
and
ANT 2
COMPONENT
videojacks
HDMI
*
DIGITAL AUDIO OUT
AVR AUDIO OUTPUT
(analog)
USB
(USBphotoportonfront)
*
Ifthedeviceispoweredoffwhenconnected,detec-
tionoccurswhenthedeviceisnextpoweredon.
Note: Forconnectionandsetupofapersonalcom-
puter,seetheinformationlaterinthischapter.