22
Adjusting the color to the desired quality
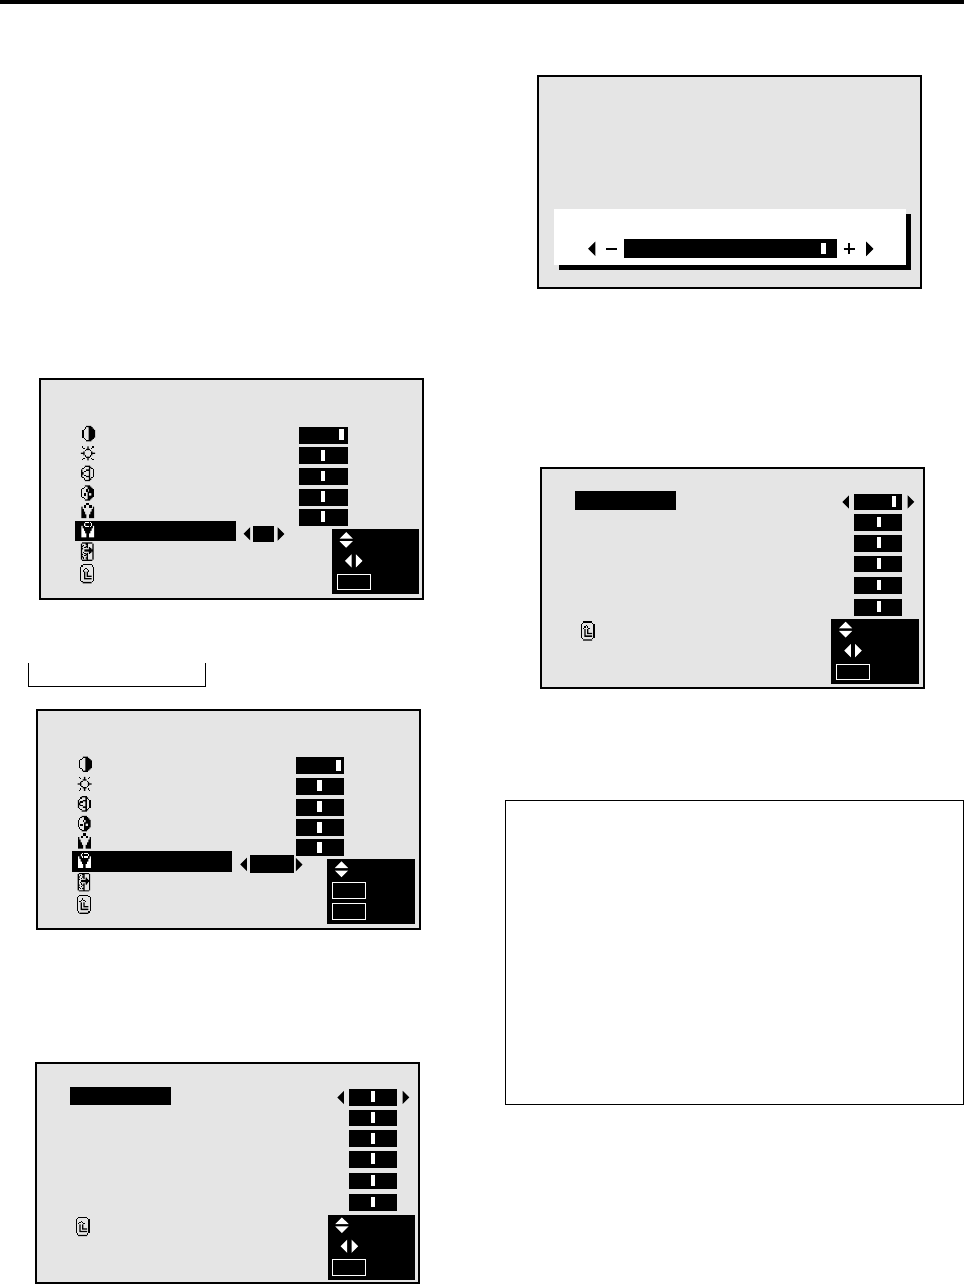
Use this procedure to adjust the white balance for bright pic-
tures and dark pictures to achieve the desired color quality.
Example: Adjusting the "WHITE BALANCE"
Press the MENU button on the remote controller to dis-
play the MAIN MENU on the screen, then...
1. Use the ▲ and ▼ buttons to select “PICTURE”, then
press the “OK” button.
The “PICTURE” screen appears.
2. Use the ▲ and ▼ buttons to select “COLOR TEMP”.
PICTURE
MEMORYPICTURE MODE :
CONTRAST :
BRIGHTNESS :
SHARPNESS :
COLOR :
TINT :
COLOR TEMP : 2
N R : NR–2
RETURN
SEL.
ADJ.
EXIT
MENU
3. Use the ᮤ and ᮣ buttons to select "PRO".
→ 1 ↔ 2 ↔ 3 ↔ PRO ←
4. Press the “OK” button.
The "WHITE BALANCE" screen appears.
5. Use the ᮤ and ᮣ buttons to select "R-GAIN".
PICTURE
SEL.
OK
EXIT
OK
MENU
MEMORYPICTURE MODE :
CONTRAST :
BRIGHTNESS :
SHARPNESS :
COLOR :
TINT :
COLOR TEMP : PRO
N R : NR–2
RETURN
6. Adjusts the white balance using the ᮤ and ᮣ buttons.
WHITE BALANCE
R-GAIN
G-GAIN
B-GAIN
R-BIAS
G-BIAS
B-BIAS
RETURN
:
:
:
:
:
:
SEL.
ADJ.
EXIT
MENU
R-GAIN
* If neither the ᮤ or ᮣ button is pressed within 5 sec-
onds, the current setting is set and the previous screen
reappears.
7. Press the “OK” button.
The white balance has now been adjusted.
WHITE BALANCE
R-GAIN
G-GAIN
B-GAIN
R-BIAS
G-BIAS
B-BIAS
RETURN
:
:
:
:
:
:
SEL.
ADJ.
EXIT
MENU
8. Once the adjustment is completed...
Press the “MENU” button.
All menus disappear.
Information
Ⅵ Adjusting the white balance
RGB-GAIN ....White balance adjustment for signal
level
RGB-BIAS .....White balance adjustment for black
level
Ⅵ Restoring the factory default settings
Restoring the factory default settings
Select “RESET” under the function menu. Note that this
also restores other settings to the factory defaults.
