


14
Operations
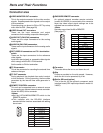
<Notes>
O
It is not possible to select ANALOG for the video
input signals and SDI for the audio input signals or
vice versa— the same setting must be used for
both sets of signals.
O
The input signals cannot be recorded properly if a
recording inhibit signal is recorded with them.
O
Check that the SERVO lamp remains lighted during
recording. The pictures played back will be
disturbed if the lamp is flashing or off.
O
When PB has been selected as the setup menu
item No.105 setting, it will take two to three
seconds for recording to commence after the REC
and PLAY buttons have been pressed. (See page
30)
Set this menu item to REC to start the recording
faster. However, with REC set for this item, it takes
longer for the image to appear during playback after
the PLAY button is pressed.
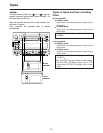
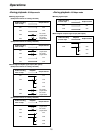
Recording
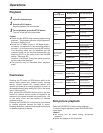
Use the setup menu item No.007 to select
recording in either the 50 Mbps mode or 25
Mbps mode.
(See page 29)
1
Press the PAUSE/STILL button while the
cassette tape is being played.
1
Press the REC button to set the unit to the
REC PAUSE mode.
The monitor screen display now switches to the
E-E picture.
If the setup menu item No. 110 “AUTO BACK” is
set to “REC-P” or “ALL,” the tape is rewound two
to three seconds from the position at which the
PAUSE/STILL button was pressed.
(See page 31.)
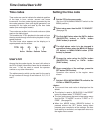
2
3
Set the accidental erasure prevention tab on
the cassette to the “recording enable”
position, and insert the tape.
2
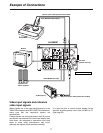
1. Selecting the input video and audio signals
1) Connect the signals that are to be
recorded.
2) Select the video and audio input signals
using the INPUT SELECT button on the
front panel.
2. Adjusting the audio levels
O
Adjust the audio input signal levels.
The audio signals are recorded at the
appropriate level when the audio recording
level controls are in the pushed-in position.
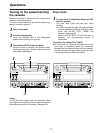
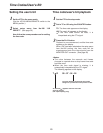
4
Press the PLAY button while holding down
the REC button.
The REC and PLAY lamps light, and recording
commences.
If the setup menu item No. 110 “AUTO BACK”
is set to “ALL,” the tape is first rewound two to
three seconds from the position at which the
REC and PLAY buttons were pressed,
advanced, and then recording starts from the
point at which the REC and PLAY buttons
were pressed. This ensures that there are no
gaps between recorded sections.
(See page 31.)
5
To stop recording, press the STOP button.
Recording now stops and the unit is set to the
stop mode.
6
Press the STOP button to set the unit to the
stop mode.
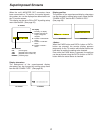
3
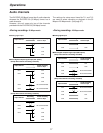
Pause/recording
(with back-space assemble recording)
Press the PAUSE/STILL button to start
recording.
The tape travels to the position where the
PAUSE/STILL button was pressed in step
1
, and
recording commences.
<Notes>
O
The E-E picture now appears on the screen.
O
Recording with back-space assemble
recording from the 50 Mbps mode to the 25
Mbps mode and vice versa is not possible.
Press the PAUSE/STILL button to pause
recording.
If the setup menu item No. 110 “AUTO BACK” is
set to “REC-P” or “ALL,” the tape is rewound two
to three seconds from the position at which the
PAUSE/STILL button was pressed and then
pauses.
4
Repeat steps
3
and
4
above to add recorded
sections with no gaps in between.
5