


19
Time Codes/User’s Bit
Time codes
Time codes are used to indicate the absolute position
of the tape in hour, minute, second and frame
increments: the time code signals generated by the
time code generator (time code signal generator) are
recorded on the tape and read by the time code
reader (time code signal reader).
Time codes are written into the sub-code area (data
area) on the helical track.
This enables the VTR’s playback to be read out from
the stop mode through slow-motion playback to high-
speed playback.
The time code value appears on the display or is
superimposed onto the screen.
TCR 00 : 07 : 04 : 24
Hours Minutes Seconds Frames
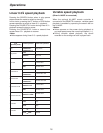
User’s bit
Among the time code signals, the user’s bit refers to
the 32-bit (8-digit) information frame that is released to
the user. It can be used to record the operator
number or any other information.
The alphanumerics which can be used for the user’s
bit are numbers 0 through 9 and letters A, B, C, D, E
and F.
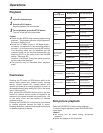
Setting the time code
<Notes>
O
The current time code value is displayed as the
default.
O
The display is reset to 00:00:00:00 if the RESET
button is pressed when TC PRESET is set.
O
The time code cannot be used unless setup menu
item No.504 “TC MODE” is set to “P-REC” or “P-
FREE.” (See page 33)
O
When the MODE button (SEARCH button) is
pressed without the SET button having been
pressed upon completion of the settings, the time
code setting is canceled, and operation returns to
the regular menu screen.
Set the VTR to the menu mode.
(Set the LOCAL/MENU/REMOTE switch to the
MENU position.)
1
Select setup menu item No.505 “TC PRESET.”
(See page 33)
2
The first digit flashes when the DATA+ button
(PAUSE/STILL button) or DATA– button
(PLAY button) is pressed.
3
The digit whose value is to be changed is
moved and flashes when the MENU-UP button
(FF button) or MENU-DOWN button (STOP
button) is pressed.
4
Change the value using the DATA+ button
(PAUSE/STILL button) or DATA– button
(PLAY button).
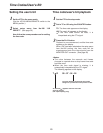
5
Upon completion of the settings, press the
SET button (REC button).
Operation now returns to the regular menu
screen.
6
Set the LOCAL/MENU/REMOTE switch to the
LOCAL or REMOTE position.
7