


8
Parts and Their Functions
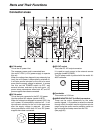
H
FF button
This button is pressed to fast forward the tape. The
playback pictures can be monitored when the
TAPE/EE switch
M
is set to TAPE.
Pressing the FF button while in the search mode
(search still, reverse search, reverse search still,
forward search still) causes operation to switch to
forward search, and fast forward playback occurs at
the speed selected using setting No. 100 on the
setup menu. (See pages 15 and 30.)
Pressing the FF button while in the slow mode
(slow still, reverse slow, reverse slow still) causes
operation to switch to forward linear 0.3
a
playback.
(See page 16.)
Noise will appear during linear 0.3
a
playback: this
is normal and not indicative of malfunctioning.
I
SEARCH button
This button is pressed to switch to the search mode
or the slow mode. (See pages 15 and 16.)
J
PLAY button
This button is pressed to commence playback.
Recording is commenced when it is pressed
together with the REC button.
K
PAUSE/STILL button
When this button is pressed during recording, the
tape is temporarily stopped.
Recording is resumed when it is pressed again.
When this button is pressed during playback, the
still picture mode is established. Playback is
resumed when it is pressed again.
Pressing the PAUSE/STILL button during forward
or reverse search operation causes the tape to
pause (forward or reverse search still). Pressing the
button a second time causes forward or reverse
search operation to resume.
Pressing the PAUSE/STILL button during forward
or reverse slow operation causes the tape to pause
(forward or reverse slow still). Pressing the button a
second time causes forward or reverse slow
operation to resume.
Linear 0.3
a
playback takes place during forward or
reverse slow operation. Noise will appear during
still and linear 0.3
a
playback: this is normal and not
indicative of malfunctioning. (See page 16.)
L
REC button
Recording is commenced when this button is
pressed together with the PLAY button. When it is
pressed in the stop or eject mode, the input video
signals and audio signals can be monitored even
when the TAPE/EE switch is set to TAPE.
It is also possible to use the button to check the
time code generator’s value. (REC CHECK mode)
When the STOP button or any other function button
is pressed, the REC CHECK mode will be released.
M
TAPE/EE switch
This switch is used to select the signals to be
output in the stop, fast forward or rewind mode.
TAPE:
The signals which are played back from the
tape are output.
EE:
The input signals which were selected by the
INPUT SELECT button are output.
<Notes>
O
When REC has been set for setup menu item
No.105, the E-E mode will be established in the
stop mode regardless of the position of the
TAPE/EE switch. (See page 30)
O
The picture and sound may break up when the
position of the switch is changed.
N
COUNTER button
This button is used to switch the counter display
area. Each time it is pressed, the setting is
changed in the following sequence: CTL
TC
UB r CTL, etc.
CTL:
The tape timer (control signal) appears on the
display.
TC:
The time code appears on the display.
UB:
The user bit appears on the display.
r: The amount of tape remaining is displayed in
1-minute increments.
(Example)
“r102” = 102 minutes of tape are remaining.
O
RESET button
When this button is pressed in the CTL mode, the
counter display is reset to 00:00:00:00.
P
REC INHIBIT button
This button is used to allow or inhibit recording onto
the cassette tape.
ON:
Recording on the cassette tape is inhibited.
The REC INHIBIT lamp on the display lights.
OFF:
Provided that the accidental erasure
prevention mechanism on the cassette tape is
set to the recording enable position, a
recording can be made on the cassette tape.