


9
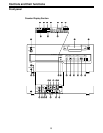
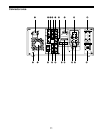
@3 Volume control
This is used to adjust the headphones volume.
@4 Audio recording level controls*
These are used to adjust the recording levels of the audio signal CH1/CH2.
@5 SUPER ON/OFF switch
ON: The time code or other display is superimposed onto the signals supplied to the
VIDEO OUT 3 connector.
OFF: No display is superimposed.
<Notes>
• When the AJ-YA455P is used, the superimposed display appears at the VIDEO OUT 3
connector.
• When the SUPER ON/OFF switch is set to ON, the EDH of the SDI OUT 3 connector is
not superimposed.
@6 MONITOR SELECT switch
This is used to select the audio signals output to the monitor channel.
@7 INT/EXT switch
INT: For using the built-in time code generator.
EXT: For using the time external code which is input from the time code input connector or
the video signal VITC. The selection is set at the setup menu.
@8 MENU button
When this is pressed, the setup menu appears on the TV monitor using VIDEO OUT 3
connector, and the setup menu No. appears on the display.
When it is pressed again, the setup mode is exited and the original operating mode is
restored.
@9 TC PRESET (FILE) button
The time code setting mode is established by pressing this button. (For details, refer to the
time code section on page 39.)
User file can be selected when the cursor buttons ( , ) are used during the setup
menu mode. (For details, see setup menu items on page 16.)
#0 Cursor buttons ( , , , )
These are used when setting time codes and settings at menu setup.
, : These change the flashing digit in the time code indicators.
Each time they are pressed, the flashing indicator moves incremently to the left or
right.
increments to the left; increments to the right.
, : These change the flashing digit in the time code indicators.
Each time they are pressed, the indicated value increments and decrements.
decrements the value; increments the value.
The flashing digit changes continuously when the button is continuously pressed.
For details about operation during setup menu mode, see setup menu items (page 15).
#1 SET button
The time code is set or the data selected for the setup menu settings are entered by
pressing this button.
After the data has been entered, the setup mode is exited, and operation returns to the
original mode.
* The recording level of the audio signals cannot be adjusted when DVCPRO/DV has been
selected by the VIDEO INPUT switch #3.