


17
RQTV0141
HDMI is the next-generation interface for digital devices. When connected to an HDMI compatible unit, an uncompressed digital audio and video
signal is transmitted. You can enjoy high quality, digital video and audio with just one cord. When connecting to an HDMI-compatible HDTV (High
Definition Television), the output can be switched to 1080i or 720p HD video.
Set the following:
From the Setup menu (l 65), Set “HDMI Video Output” and “HDMI Audio Output” to “On”.
≥Please use HDMI cables that have the HDMI logo (as shown on the cover).
≥If the speaker setup cannot be completed on the amplifier, then
use the “HDMI Connection Speakers Setting” setting (l 65).
≥
If connecting to equipment incompatible with CPPM (Content
Protection for Prerecorded Media,
l
76), copy-protected DVD-Audio
cannot be output through the HDMI terminal. Connect to the amplifier
with an optical digital cable or audio cables (red and white).
If connecting with a Panasonic television equipped with the HDAVI Control function, you can use this convenient function to control both the
recorder and the television.
After connecting the unit to a television using an HDMI cable, set “Ctrl with HDMI” to “On”. (l 65)
≥It is recommended that you use Panasonic’s HDMI cable.
Recommended part number: RP-CDHG15 (1.5 m/4.9 ft.), RP-CDHG30 (3.0 m/9.8 ft.), RP-CDHG50 (5.0 m/16.4 ft.), etc.
≥Depending on the cable used, this function may not be possible.
For the connection to be completed and activate correctly, turn on all HDAVI Control compatible equipment and select this unit’s input
channel on the connected television. Also when the connection or settings are changed, repeat this procedure.
When the following operations are performed the television will
automatically switch the input channel and displays the
corresponding action.
- When play starts on the unit
- When an action that uses the display screen is performed (e.g.,
Direct Navigator screen, schedule recording screen)
Note
≥When the unit is recording on the DVD drive, the output does not
automatically switch even if when you operate the VHS.
The television automatically turns on and the corresponding display
appears when the following operations are performed with the
television in standby mode.
- When play starts on the unit
- When an action that uses the display screen is performed (e.g.,
Direct Navigator screen, schedule recording screen)
Note
≥When the unit is recording on the DVD drive, the television does
not automatically turn on even if when you operate the VHS.
When the television is turned off, this unit is also automatically turned off.
The unit automatically turns off even if the FUNCTIONS screen, the
status message or the on-screen menu is displayed, during
playback or when the unit is only scheduled recording.
Note
≥Even if the television is turned off, the unit will not turn off at the
same time in the following conditions:
- When you pressed [¥, REC] and the unit is recording
- When copying
- When finalizing
For your reference
≥When [1, PLAY] is pressed on this unit for “automatic input
switching” or “power on link”, the playback is not immediately
displayed on the screen and it may not be possible to watch the
contents from where playback starts.
In this case, press [:, SKIP] or [6, SLOW/SEARCH] to go
back to where playback started.
≥
When the DIGITAL AUDIO OUT (Optical) terminal is used for audio
output and the unit is connected to the television with a HDMI cable,
set “HDMI Audio Output” to “Off” in the setup menu.
(l 65)
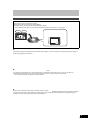
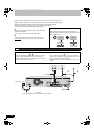
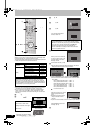
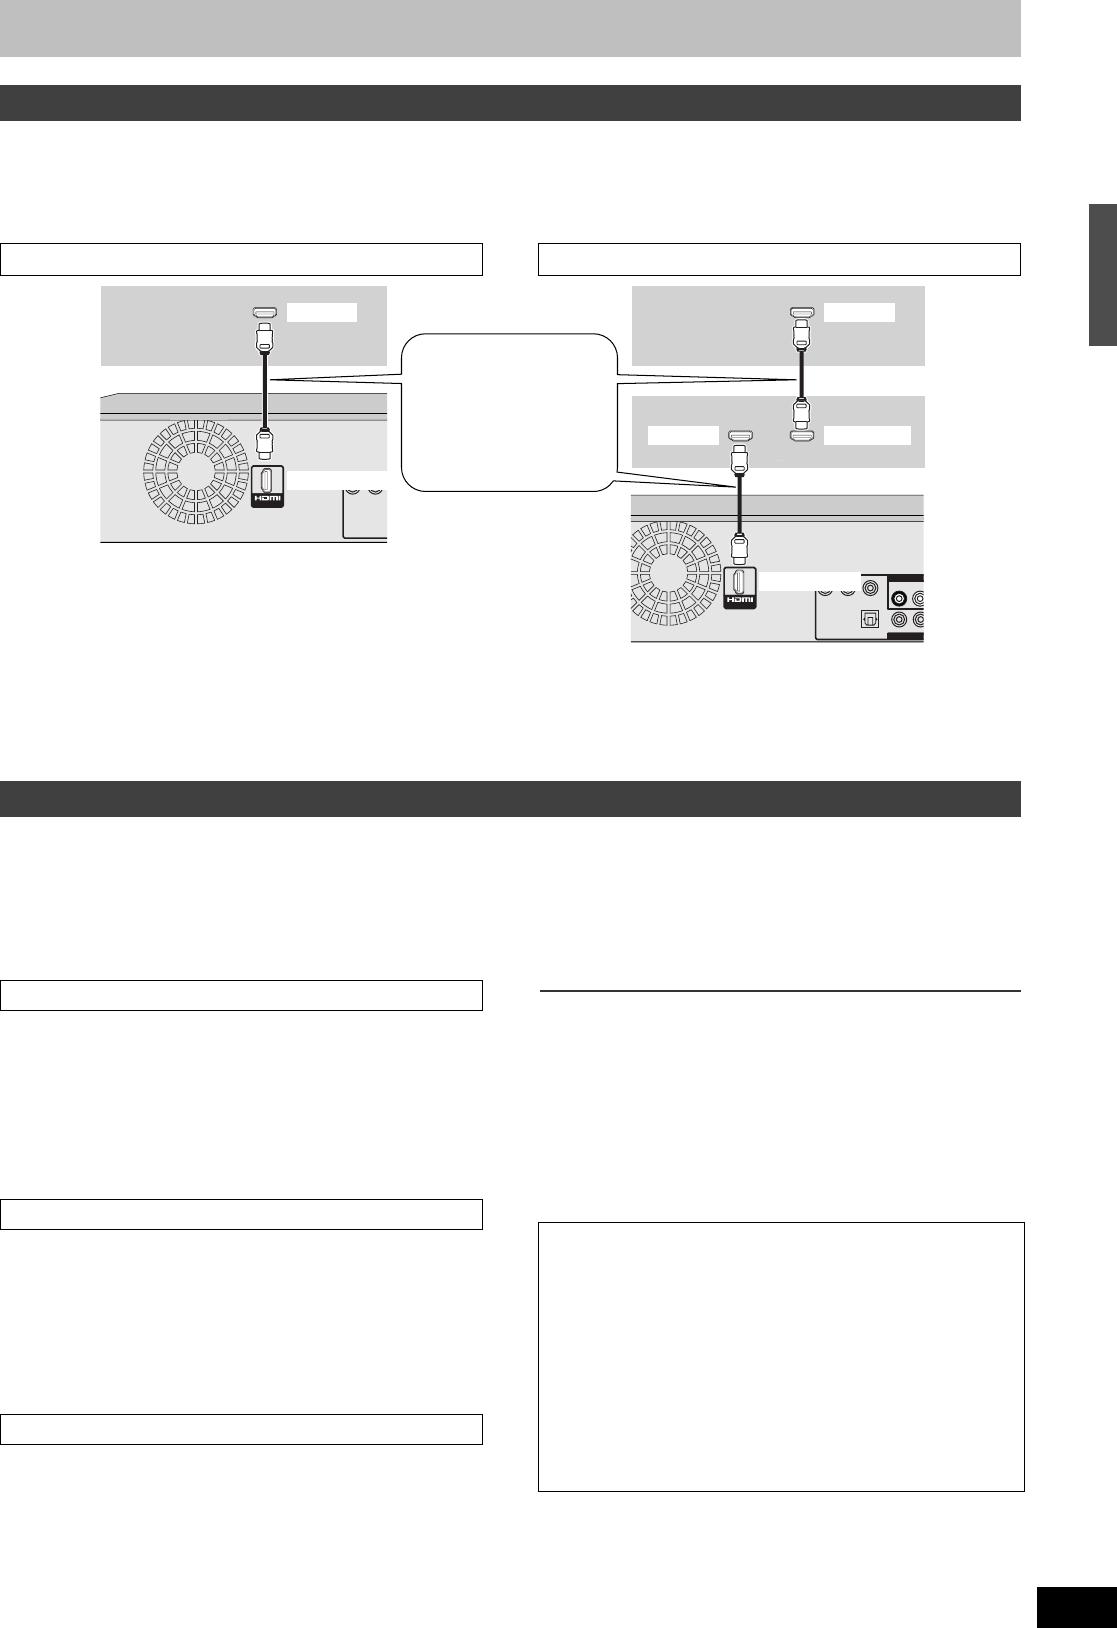
Connecting with an HDMI (High Definition Multimedia Interface) terminal
∫ Connecting to a TV ∫ Connecting to an amplifier
Y
P
B
COMPON
E
DIGITAL
A
(PCM/BI
T
AV OUT
R-AUDIO-L
R-AUDIO-
L
Y
P
B
PR
OPTICAL
COMPONENT VIDEO OUT
DIGITAL AUDIO OUT
(PCM/BITSTREAM)
DVD
/
D
AV OUT
HDMI IN
HDMI OUT
HDMI cable
(Only included in DMR-ES46V)
Please use a cable
5.0 m or less in length for
stability and prevention of
deterioration in video quality.
HDMI IN
Television Television
HDMI AV OUT
HDMI AV OUT
HDMI IN
Amplifier
This Unit
This Unit
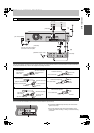
Control with HDMI (HDAVI Control)
Automatic input switching
Power on link
Power off link
Equipment compatible with and equipment scheduled to be
compatible with HDAVI Control (as of January 2006).
Plasma TVs: TH-42/50/58PX600, TH-37/42/50PX60,
TH-58PX60,TH-42PD60, TH-42/50PX6
LCD TVs: TC-26/32LX600, TC-23/26/32LX60, TC-26/32LE60
LCD projection TVs:
PT-52/56/61LCX66
Receiver: SA-XR57P
¢ The HDAVI Control function will only work if you can connect this
unit with Panasonic equipment equipped with the HDAVI control
function.
Before purchasing equipment, confirm that it has the HDAVI
Control function.
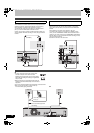
STEP 1 Connection
≥
If connecting to equipment incompatible with CPPM (Content
Protection for Prerecorded Media,
l
76), copy-protected DVD-Audio
cannot be output through the HDMI terminal. Connect the audio cables
(red, white) to the corresponding audio input terminals.
≥
If you are connecting to equipment that is only compatible with
2 channel output, audio with 3 channels or more will be down mixed
(
l
76) and output as 2 channels. (Some discs cannot be down mixed.)
≥For units compatible with HDCP (High-Bandwidth Digital Content
Protection) copyright protection that are equipped with a digital DVI
input terminal (PC monitors, etc.):
Depending on the unit, images may not display property or at all when
connecting with a DVI/HDMI switching cable. (Audio cannot be output.)
M6VP&PC.book 17 ページ 2006年2月6日 月曜日 午後3時29分