


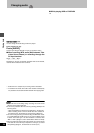
Playing back
25
RQT6570
Playing still pictures (JPEG)
[CARD] [HDD] [RAM]
Carry out insertion/removal of the PC card after turning the
unit off.
When the card indicator in the unit display is flashing, the card is being
read from or written to. Do not turn off the power or remove the card.
Such action may result in malfunction or loss of the card’s contents.
1 While stopped
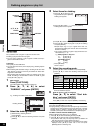
Press [FUNCTIONS].
The FUNCTIONS window appears (➜page 53).
2
Press [
3
,
4
,
2
,
1
] to select
“JPEG” and press [ENTER].
3
Select the still picture folder for display.
1 Press [3, 4] to select “INPUT” and press [ENTER].
(A list of the folders in the drive appears.)
2 Press [2] and [3, 4] to select the drive and press [1].
3 Press [3, 4] to select the folder and press [ENTER].
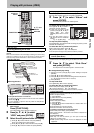
You can display a list of still pictures or display pictures one by one
from any folder existing on the PC card, HDD or DVD-RAM.
4 Press [3, 4] to select “Album” and
press [ENTER].
A list of the still pictures in the folder appears.
To display still pictures one by one
Press [3, 4, 2, 1] to select a
still picture and then [ENTER].
≥If there are more than 10 still
pictures, press [3, 4, 2, 1] to
select “Next” and press
[ENTER]. Select “Prev.” to move
back.
≥You can also select a page of
still pictures with the numbered
buttons.
e.g., “5”: [0] ➜[0] ➜ [5] “15”: [0] ➜[1] ➜ [5]
To stop still picture display
Press [RETURN]. (The still picture list containing the picture you first
selected will be displayed.)
To select the next or previous still picture
While in still picture display, press [2, 1].
[2] : previous still picture [1] : next still picture
≥The still picture changes every time the button is pressed.
The still pictures in the folder will be displayed one by one with a
constant interval. The display timing can be altered in units of 1 sec-
ond.
4 Press [3, 4] to select “Slide Show”
and press [ENTER].
The still pictures in the folder appear in numerical order.
To change the display timing
1 After step 3 at left, press [3, 4] to select “Settings” and press
[ENTER].
2 Press [3, 4] to select “Slide Show”.
3 Press [2, 1] to select the desired timing between still pictures
(0 – 30 seconds) (in base units of 1 second).
4 Press [ENTER].
To stop slide show
Press [RETURN]. (Menu screen appears.)
To select the next or previous still picture
While in still picture display, press [2, 1].
[2] : previous still picture [1] : next still picture
≥The still picture changes every time the button is pressed.
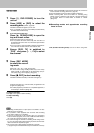
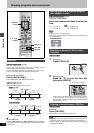
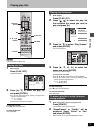
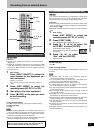
Inserting/Removing the PC card
Inserting the card
Removing the card
≥If using the adaptor, remove the adaptor and card together.
≥If the eject button does not come out
To remove the PC card, press the card in once more and then
repeat steps 1–3.
≥It is not possible to open the disc tray while the still pictures
screen is displayed.
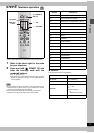
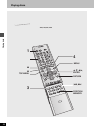
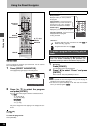
CH
VOLUME
123
789
0
100
4
5
6
SLOW/SEARCH
DIRECT NAVIGATOR
TOP
MENU
MENU
RETURN
FUNCTIONS
PROG/CHECK
DISPLAY
TIME SLIP
ADD/DLT
ENTER
PLAY LIST
CANCEL
OPEN/CLOSE
SET UP
ERASE
DUBBING
POSITION MEMORY
MARKER
AUDIO
INPUT SELECT
CM SKIP
STATUS
SKIP
HDD
DVD
3, 4, 2, 1
ENTER
RETURN
FUNCTIONS
ERASE
Numbered
buttons
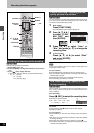
2
Align to
match the mark
Terminal connections
facing into the unit
The labeled side
facing upwards
Hold the edge of the card
and insert until firmly home
Do not press directly
on the memory card
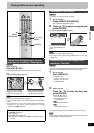
1
2
3
Push
Comes out
Push again
JPEG
Displaying still pictures (Album Display)
To display still pictures one by one with constant
interval (Slide Show)
To erase still pictures
(Still pictures are erased irretrievably by this procedure.)
While in still picture display
1 Press [ERASE].
2 Select “Erase” and press [ENTER].
To rotate the picture
While in still picture display
1 Press [ENTER].
2 Press [3, 4] to select “Rotate RIGHT” or “Rotate LEFT” and
press [ENTER].
≥The still picture as a whole is rotated.
≥Rotation information will not be stored.
To display information about the still pictures
While in still picture display, press [ENTER].
(Date, “folder number” - “file number” and number of still pictures
are displayed.)
To give a folder a title
After step 3 on the left column, you can input a folder title
(➜page 45, “Entering text” ):
≥Titles inputted using this unit will not be displayed on other
equipment.
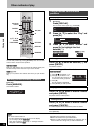
ENTER
RETURN
SELECT
INPUT
JPEG
ALBUM
1 / 1
--- ---
--- ---
---
0001
0002
0003