VHS
Operations
17
RQTV0057
Timer Recording
Up to 16 timer programmes, including weekly and daily programmes,
can be recorded for up to one month in advance by setting the timer.
≥Select the unit viewing channel (or the AV input) on the TV.
≥
Insert a video cassette tape with an intact erasure prevention tab (
l
4).
≥Check that the clock is set to the correct time. If it has not been set,
refer to page 12.
≥Press [VHS].
In case of “JET NAVIGATOR” is set to “ON” (l 19);
........................................................................................................................................................................................................................
[1] Press
[PROG/CHECK].
...........................................................................................
[2] Press [21] to set
the date on which
the TV programme
will be broadcast,
and press [4].
A. Current date (e.g.17th)
l;:
l The date before one month later (e.g.16th)
l;:
l Daily: SU–SA ,-. MO–SA ,-. MO–FR
l;:
a.Weekly: SU ,-. ... ,-. SA
(SU
u
Sunday, MO
u
Monday, TU
u
Tuesday, WE
u
Wednesday,
TH
u
Thursday, FR
u
Friday, SA
u
Saturday)
........................................................................................................................................................................................................................
[3] Press [21] to select the programme position
of the desired TV station, and press [4].
≥Select “A1” or “A2” when recording from an external source
(l 16).
≥You may also use [INPUT SELECT] and numeric buttons to
select the channel position.
........................................................................................................................................................................................................................
[4] Press [21] to set the starting time, and press
[4].
≥When [21] is kept pressed, the indication changes in 30-
minute steps.
........................................................................................................................................................................................................................
[5] Press [21] to set the ending time, and press
[4].
≥When [21] is kept pressed, the indication changes in 30-
minute steps.
........................................................................................................................................................................................................................
[6] Press [21] to set the desired Rec Mode, and
press [4].
SP,-.LP,-.EP,-.A
¢
,-.SP
¢Recording Mode Auto Change function (l right)
≥You may also use [REC MODE] to set the recording mode.
........................................................................................................................................................................................................................
[7] Press [21] to
select the
category. Then,
select the desired
category by
pressing
[3421].
.............................................................................................
[8] Press [ENTER] to
revert to the
previous display.
.............................................................................................
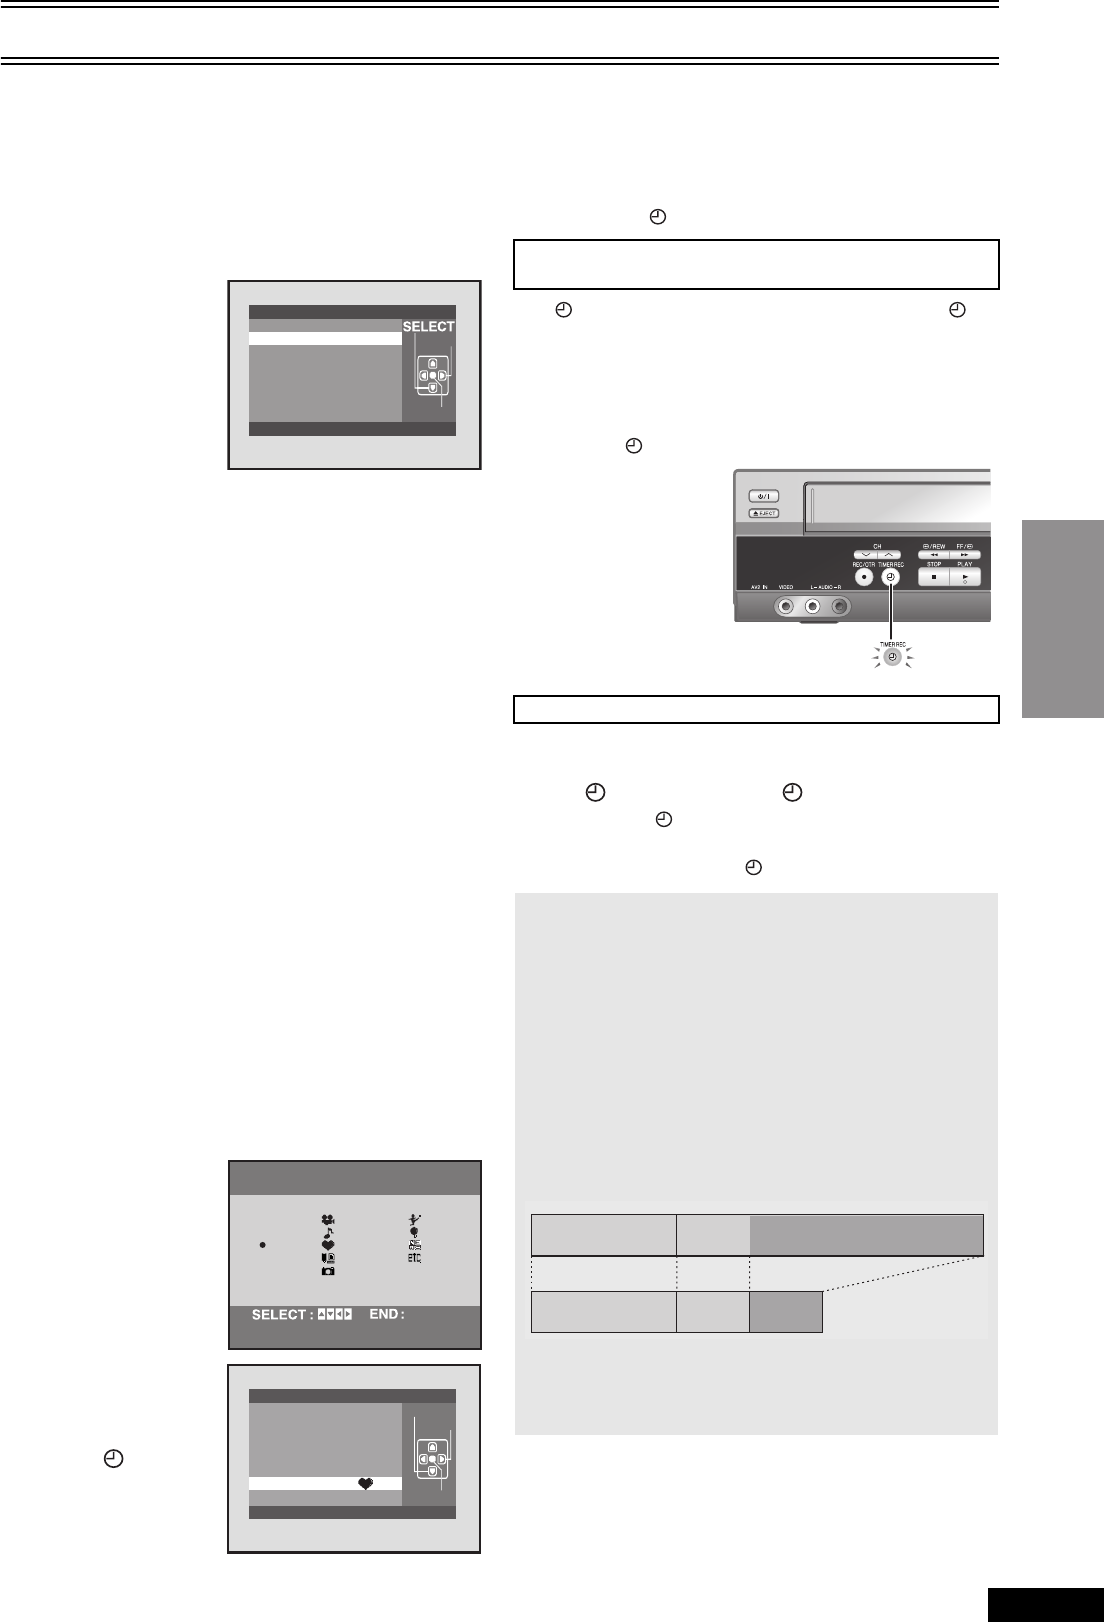
[9] Press [ TIMER]
to switch this unit
to the timer
recording standby
mode.
≥When “JET NAVIGATOR” is set to “ON”, for example, the
“PROGRAMME IS COMPLETE. REMAINING PROGRAMME
49.” message appears. (l 19)
≥When “JET NAVIGATOR” is set to “OFF”, the “PROGRAMME
IS COMPLETE.” message appears. (l 19)
These messages will not appear if timer recording is started
immediately after [TIMER] is pressed.
The [ TIMER REC] indicator on the unit turns on and the “ ”
indicator lights up on the unit's display while the unit is waiting for the
timer recording or the timer recording is being activated.
When you want to play back or to activate other functions, you should
cancel the timer recording. (l below)
If you attempt to operate the unit without canceling the timer
recording, the “ ” indicator blinks. (l below)
For example, if you want to record something else before the
programme start time:
Press [ TIMER] to make “ ” stop.
≥Be sure to press [TIMER] before the programme start time to
put the unit on recording standby.
The programme only works if “ ” is on.
.
1. DATE
2. CH
3. ON TI
M
E
4. OFF
T
I
M
E
5. RE
C
MO
DE
6. CATE
G
ORY
7. PU
SH
ENTER
SP
EASY PROGRAMMING
CHECK:PROG/CHECK
SET
ENTER
– – – –
– – : – –
– – : – –
– –
CATEGORY SE
TTING
ENTER
MOVIE
MUSIC
DRAMA
EDUCA
DOCUM
SPORT
CHI LD
NE
W
S
OTHER
– – – – –
1. DATE
2. CH
3. ON TI
M
E
4. OFF T I
M
E
5. REC
MO
DE
6. CATEGORY
7. PUSH ENTER
SP
EASY PROGRAMMING
CHECK:PROG/CHECK
SELECT
SET
ENTER
29 WE
2
20 : 02
21 : 30
To check the timer recording or the timer recording
standby on the unit
To release the unit from timer recording standby
Recording Mode Auto Change Function
If a timer recording is performed in SP mode, this function
automatically changes the recording mode if the unit determines
that the remaining tape time is insufficient to record the entire
programme.
If the remaining tape time is still not sufficient even in LP/EP mode,
the programme cannot be recorded to the end.
The recording mode will change as follows:
PAL system: SP # LP
NTSC system: SP # EP
≥This function cannot change the recording speed to the EP mode
for PAL system.
e.g. NTSC system (when using a 60-min. tape)
≥The tape length must be set correctly (l 22).
≥Some tapes may not work correctly.
≥If the recording speed changes during a timer recording, some
picture distortion will occur at that point.
1st programme
(30 min.)
2nd programme (60 min.)
Timer programming
30 min. at SP
15 min.
at SP
45 min.
at EP
Video tape
VP33GL.book 17 ページ 2005年4月28日 木曜日 午後5時34分
