


11
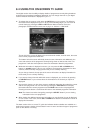
GENERAL OPERATION OF YOUR
DIGITAL TERRESTRIAL RECEIVER
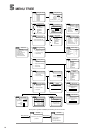
Throughout this instruction book you will notice that the everyday operation of your digital
receiver is based on a series of user friendly on-screen displays and menus. These displays will
help you get the most from your digital receiver, guiding you through initial installation, channel
selection, timer settings and many other functions.
All functions can be carried out using either the buttons on the front of your digital receiver or the
remote, however we suggest that you will find it easier to use your remote in most instances. If
at any time when using the menus you want to return to the normal TV picture, press either the
EXIT or MENU button.
Should you experience any difficulties with the operation of your receiver, please consult the
relevant section of the instruction book, including the trouble shooting guide, or alternatively call
ONdigital customer services on 0870 600 9696.
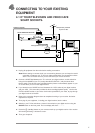
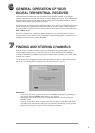
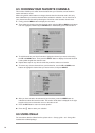
FINDING AND STORING CHANNELS
Now you have connected your digital receiver as described on the previous pages, you are
ready to begin searching for your new channels. This is also covered within the ONdigital
envelope included with your digital receiver. We recommend that if possible, you use this guide
to install your receiver.
The procedure in the ONdigital envelope or that described in chapter 4 of this instruction book
will result in you seeing either the welcome or main menu screen on your TV.
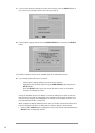
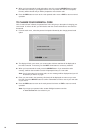
IMPORTANT:
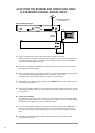
- If you do not see either screen and you have used SCART leads when connecting you
may need to press the TV/DTV button twice on your remote.
Alternatively use the button on your TV remote that selects the TV’s AV or External
(SCART) socket.
- If you do not see either screen and you have not been able to use SCART leads when
connecting check the channel number you have selected, alternatively you may need to
adjust the tuning of your TV again. Please refer back to chapter 4.
6
6
7
7