


Page 19
Chapter4 Basic Operation Guide
4.1 Power on
Note:Please make sure the power supply matches DVR and AC cable connected
correctly. Before switch DVR on, please connect one monitor with VOUT or VGA
interface. Otherwise, you can not see graphic user interface and can not operate.
If【POWER】lamp is off, please do as following:
Step1:Connect AC cable correctly;
Step2:Switch on the power button on the real panel.
If【POWER】lamp is in red, just press【POWER】button to start DVR.
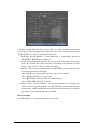
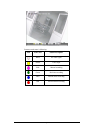
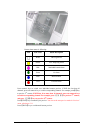
When DVR is started,【POWER】lamp is in green. On the monitor or VGA display, DSP and
HDD initialization process will be shown.
The first line represents DSP initialization. If the DSP icon is “×”, it means that the DSP is
initialized error, please contact administrator at once.
The second line represents HDD initialization. Icons of IDE1 master and slaver HDDs, IDE2
master and slaver HDDs, etc are displayed. If the HDD icon is “×”, it means the
corresponding HDD is not installed or not detected. If HDD is not detected, please contact
administrator.
Note:If HDD is not installed or not detected, DVR will beep for alarm. You can disable
the alarm option in “Exceptions” menu.
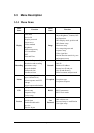
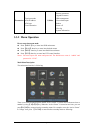
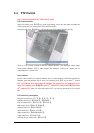
4.2 Preview
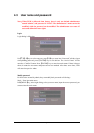
DVR will enter into preview mode after it is started.
On preview screen, you can see date, time, camera name and camera status icon.
Set system date and time in “Display” menu, referring to 5.2.9; Change camera name in
“Image” menu, referring to 5.3.2.
In the screen, it will display record and alarm status of each camera. These two kinds of
status will switch over automatically.
Press【A】key to display or hide the camera status bar.