Chapter 4: Basic operation
truVision DVR 31 User Manual 39
The DVR identifies a video clip when the clip reaches 20 MB in size. If you
select the original file format and specify a time range with both the start and
end times falling in the middle of two video files, both video files are archived.
9. Select Yes for the Begin Export option to start archiving.
Note: The Watermark box is always set to On.
Archiving a video segment in playback mode
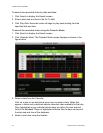
While playing back recorded video, you can mark a video segment to archive.
To mark and archive a video segment:
1. Play back recorded video.
See “Playing back video” on page 30 for more information.
2. Press Archive to mark the start time of the video segment you want to
archive.
3. Press Archive again to mark the end time of the video segment you want to
archive.
This segment is then archived to the media.
Using the DVR player
Use the DVR player to view video clips archived from the DVR 31 on any PC.
The DVR player is automatically included when archiving data from the device.
When you insert the backup media into the PC, the DVR player automatically
runs.
Note: If your PC is running on Windows Vista or Windows 7, the DVR player may
not automatically launch. If so, open the backup media by double-clicking the
device drive letter, and then launching the DVR Player file located in the Player
folder.


