English
How to set 34
Basic settings
b Displaying the basic settings screen
Menu configuration
<WARNING>
CAMERA DETECT
CONTINUE?
NO
<TITLE SET>
CAMERA NO.01
---------
01
<HOLIDAY SET>
1. ----- 11. -----
2. ----- 12. -----
3. ----- 13. -----
4. ----- 14. -----
5. ----- 15. -----
6. ----- 16. -----
7. ----- 17. -----
8. ----- 18. -----
9. ----- 19. -----
10. ----- 20. -----
<INITIAL SET>
1.LANGUAGE/CLOCK SET ->
2.CAMERA DETECT ->
3.TITLE SET ->
4.HOLIDAY SET ->
5.TIME PERIOD SET ->
MOVE:JOG SELECT:SHUTTLE
<LANGUAGE/LANGUE/SPRACHE/IDIOMA>
ENGLISH
<CLOCK SET>
01-01-2006 SUN 00:00:00
<SUMMER TIME SET>
MODE : USE
WEEK MONTH TIME
ON LST-SUN 03 02:00
OFF LST-SUN 10 02:00
<EXT.CLOCK SET>
ADJUST. TIME 01:00
<TIME PERIOD SET>
TIME PERIOD T-1 T-2 T-3 T-4
TIME PERIOD A 00:00 00:00 00:00 00:00
TIME PERIOD B 00:00 00:00 00:00 00:00
SELECT TIME PERIOD
SEQUENCE TIME PERIOD A
MASK TIME PERIOD A
MOTION SENSOR TIME PERIOD A
A Language setting
☞ Language, Clock setting (P13)
Sets the date and time for displaying on the
normal screen. Refer to the "Preparing for
use" section.
☞ Summer time setting (P35)
☞ External clock setting (P35)
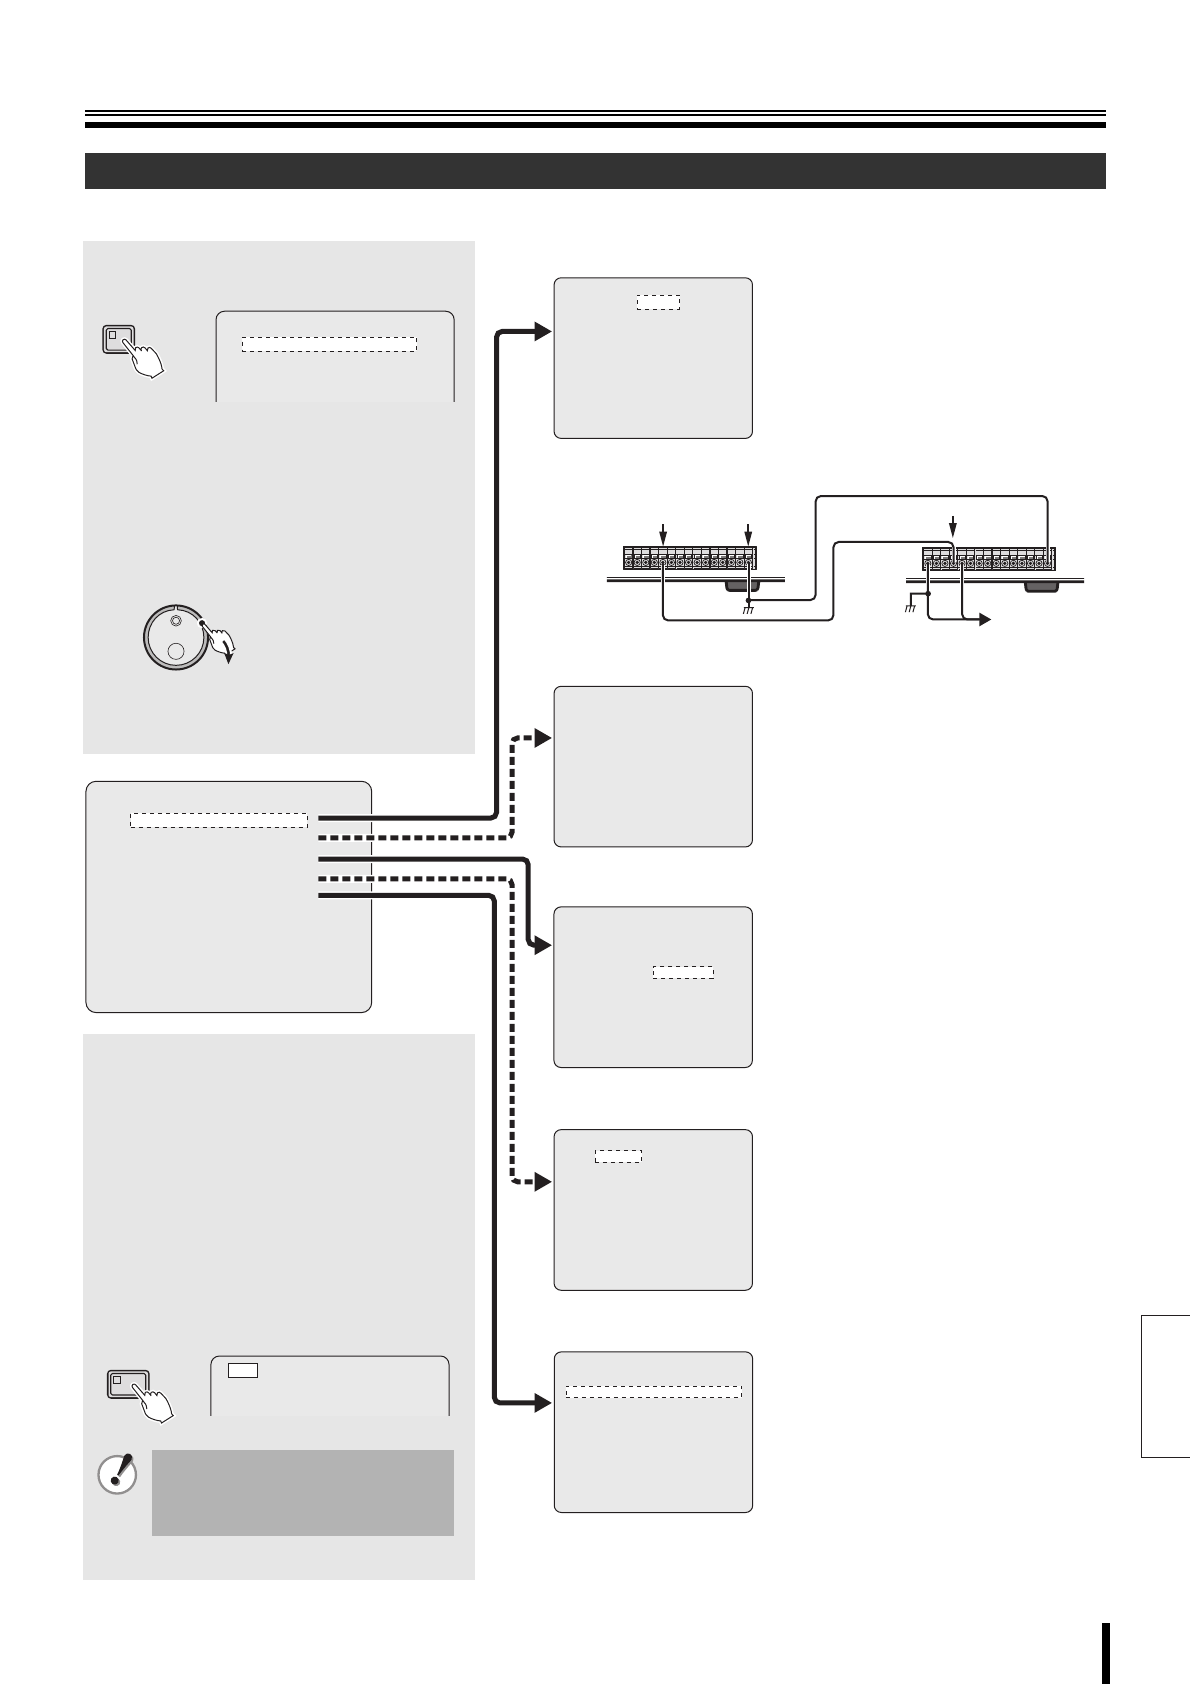
If multiple devices are connected, they can
be synchronized to the same clock. Refer to
Figure 1 for the proper connections.
(Figure 1)
(Clock setting
output terminal)
(C terminal)
First
DVR unit
Second
DVR unit
(Clock setting input terminal)
To connect a
third DVR unit
B Camera detection (P35)
Automatically detects the cameras connected
to the DVR.
C Title setting (P36)
Sets a unique title for each camera, for example
the name of the location it is placed. The titles
are displayed on the monitor.
D Holiday setting (P36)
Sets the specified days as holidays. Public
holidays, company holidays can also be set for
timer-controlled operation identical to that of
Sundays.
E Time period setting (P37)
For example, TIME PERIOD A can be set for
automatic scrolling display, and TIME PERIOD
B can be set for gray pattern masking of
camera images.
b Menu changes disabled display during
recording
If <a> is displayed on the far left of the screen
when the main menu is displayed while the DVR is
recording, the main menu can not be modified.
b Menu changes allowed display
Interrupt the recording, the main menu can be
modified.
Pressing the SHUTTLE HOLD button for approx. 3
seconds will display <- -> on the far left of the
screen, the menu can be modified.
Once the menu is complete the DVR automatically
returns to recording.
If a recording is being cancelled, a
new recording cannot be received.
Similarly, in the event of power failure
recording cannot be restored.
<MAIN MENU>
1.INITIAL SET ->
2.RECORD SET ->
SHUTTLE HOLD
1
Press the MENU button.
The <MAIN MENU> screen is displayed.
2
Turn the S-dial clockwise, turn the
J-dial to select the menu and then
turn the S-dial clockwise
The <INITIAL SET> screen is displayed.
The selected screen (A~E) is
displayed. Refer to the appropriate
pages for the settings.
<MAIN MENU>
1.INITIAL SET ->
2.RECORD SET ->
3.GENERAL SET ->
4.SCREEN SET ->
MENU
(S)