


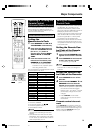

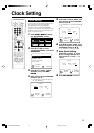


25
VIDEO Plus
+
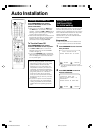
Auto Installation
5
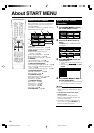
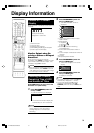
Once Automatic Tuning is com-
plete, the MOVE menu screen will
appear showing all the channels
the Recorder was able to tune in.
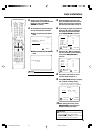
6
If you want to move any channels,
press ' / " / \ / | to highlight
the channel to be moved. Then
press SET/ENTER to confirm.
MOVE
1CH50 7
2BBC1 8
3BBC2 9
4ITV 10
5CH4 11
6CH5 12
SELECTED :CH50
:SELECT
1/5
13
14
15
16
17
18
:RETURN:ENTER
7
Press ' / " / \ / | to highlight
the new position for the channel.
Then press SET/ENTER to
confirm.
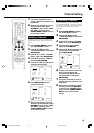
AUTOMAT IC TUNING
PLEASE WAIT.
------
1CH02
.
--------
:NEXT
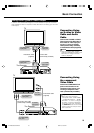
■ When connecting with SCART
cable
PLEASE WAIT.
PR 25
NOTE
• A maximum of 84 channels can be set.
3
Ensure your Aerial cable or
SCART cable is connected to the
Recorder, then press SET/
ENTER to confirm.
4
All available terrestrial channels
will be automatically installed.
■ When connecting with Aerial
cable
8
If any more channels are to be
moved, repeat step
6
to
7
.
9
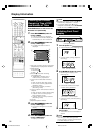
Press RETURN (NEXT) to display
the “CLOCK” setting screen.
• The “CLOCK” screen will appear.
Refer to “Clock Setting” on page 27.
CLOCK
TIME DATE
0:00 1/01
:SELECT
YEAR
04
:RETURN
:CHANGE
:ENTER
Important!
•
You can perform the AUTO INSTALLATION
function afterward by holding down
CHANNEL
''
''
' and DVD on the front of the
Recorder for more than 2 seconds.
MOVE
1BBC1 7
2BBC2 8
3ITV 9
4CH4 10
5CH50 11
6CH5 12
:SELECT
1/5
13
14
15
16
17
18
:NEXT:ENTER
10
After setting the clock, press
SET/ENTER to end the AUTO
INSTALLATION procedure.
DV-HR350H/300H-022-025 2004.4.8, 10:36 AM25